Tag Archives: exceltemplate

Sparklines in OfficeWriter

[In OfficeWriter 8.6 we introduced support for sparklines in your Excel reports. Sparklines are mini graphs that live within a cell of your Excel spreadsheet to quickly visualize and identify trends in your data. Below is an example of how to use sparklines within OfficeWriter reports.]

Hi! My name is Kyle and I worked on developing support for sparklines in ExcelTemplate. For those unfamiliar, a sparkline is basically a small chart that lives in a single cell. Sparklines are a great way to quickly visualize trends in data, especially if they are located in cells near their data source.

sparklines_image1

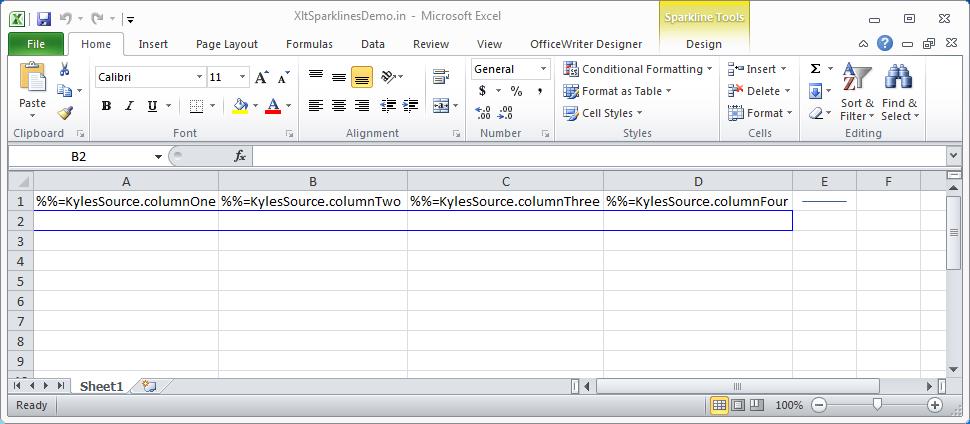
Below we’ve put together a demo of using sparklines within OfficeWriter’s ExcelTemplate. The first step is to insert data markers and sparklines into the file. Here I’ve inserted a sparkline next to the row of data markers and created a group of sparklines immediately below the data markers. The data source for the sparkline in cell E1 is A1:D1. The data source for the sparkline in cell A2 is A1 and so on for the rest of the group. Continue reading Sparklines in OfficeWriter

ExcelTemplate: How to format alternating row colors

Problem

A common way to display data in Excel is to alternate the background color of every other row when displaying a large table of data. With ExcelWriter there are multiple ways to accomplish this. This post covers some possible ways to apply alternating row colors with ExcelTemplate.

There is another post that discusses how to do this with ExcelApplication.

Solution

Option 1: Format as Table in Excel 2007/2010

Starting in Excel 2007, Excel provides pre-formatted table styles which already contain alternating row or column colors. This is the easiest way to format your data with alternating row colors. Note: these table styles may not render properly in Excel 2003 or in the XLS file format.

To format an area of cells as a table:

1. Highlight the area of cells.

2. Go to Format as Table in the ribbon.

3. Select a table style from the available styles.

4. If you chose to include your table header row, make sure to check off “My table has headers” in the confirmation dialog.

There are basic options for modifying the banding patterns:

You can also create new table styles:

You can do this for ExcelTemplate templates:

When the rows of data are inserted, the color banding will be applied:

Option 2: Use Conditional Formatting

The other approach is to use conditional formatting in the template to achieve alternating row colors. This may be more appropriate if you are not certain if your end-users will have Excel 2007/2010.

1. Create an ExcelWriter template with data markers in Excel.

2. Highlight the cells with data markers that correspond to the data you wish to display with alternating background colors.

3. From the menu, choose Format>Conditional Formatting. The formatting you define for this row will be applied to every new row that will be inserted by ExcelTemplate at runtime.

4. First define the formatting for even rows. In the “Condition1” field, choose “Formula Is” and in the formula field, type the following formula:

 =MOD(ROW(),2) = 0 

This formula uses the MOD( ) function to determine if the number of the current row (returned by the ROW( ) function) can be evenly divided by 2.

5. Click on the “format” button.

6. Click on the “patterns” tab and select a background color.

7. Now set a condition for odd rows, by clicking “ADD” and following the same steps as above but with a different formula:

 =MOD(ROW(),2) = 1 

8. Save the template and use it in your ExcelWriter application.

When ExcelTemplate imports new rows of data, the conditional formatting will also be applied to all the new rows:

What’s new in OfficeWriter 8.5

Spring has sprung, bringing with it our newest release of OfficeWriter: OfficeWriter 8.5!  What’s in store for this maintenance release? Scroll down to see the latest additions our development team has been working on.

WordTemplate – Embed DOCX files into templates

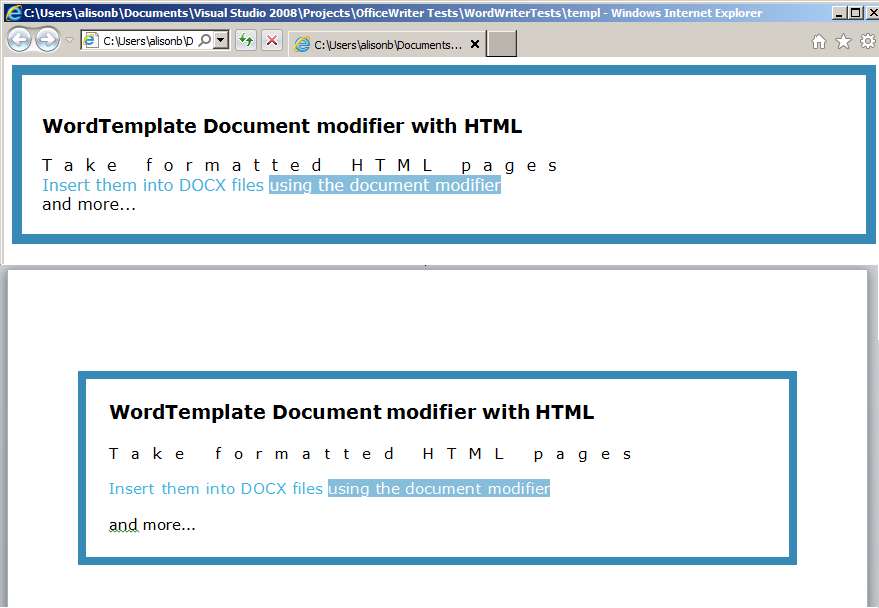
In OfficeWriter 8.0, we added the ability to embed RTF or HTML documents in Word files with WordTemplate.  The feature uses the document modifier to signify that a RTF or HTML document will be inserted. To learn more about using the document modifier, see our guide on inserting an embedded document under our WordTemplate Tutorials.

HTMLtoWord

We have also extended the feature to include DOCX files. Now you can embed other Word documents into your WordWriter templates. Continue reading What’s new in OfficeWriter 8.5

OfficeWriter for the IT Pro: Automated Dell Warranty Lookup using Powershell and ExcelTemplate

OfficeWriter for the IT Pro posts are aimed at exploring ways to extend the use of OfficeWriter to the IT work space.

This script will dynamically query Dell’s Warranty web-service via PowerShell and export the results to an Excel (xlsx) file using OfficeWriter’s ExcelTemplate object. I’ve added colored conditional formatting depending on how many days are left before the warranty expires.

In the script, we leverage two external community provided PowerShell functions, Out-DataTable and Get-DellWarranty. Get-DellWarranty accepts a computer name then returns the results as a PowerShell object. The ExcelTemplate object will not bind a PowerShell object so we use Out-DataTable to convert the object into a .NET DataTable.

You will need proper permissions and PowerShell access to run the script against remote servers. You will need to modify the $myComputerList variable to include the computers that you want to query. You will need to download the resources.zip file attached to this post. It contains the required PowerShell modules, DellWarrantyExporttoExcel script, DellWarrantyLook.xlsx excel template, and a sample excel output file (output.xlsx). The final requirement to run the script is a copy of OfficeWriter Standard. You can download a free evaluation here . Continue reading OfficeWriter for the IT Pro: Automated Dell Warranty Lookup using Powershell and ExcelTemplate

How to keep cell references absolute when using ExcelTemplate

Problem

When using ExcelTemplate to import data, a new row is inserted into the worksheet for each row of data in the data source. Any cell references to the cells where the new rows are being inserted will be updated to reflect that new rows have been inserted. This includes relative cell references (e.g. A5) and formulas (e.g. SUM(A5:A7)).

This is native Excel behavior: whenever a row (or column) is inserted or deleted, all cell references to that row/column will be updated.

In some cases, having the formulas or references updated may not be the desired behavior.

Solution

There are two ways to keep cell references absolute:

Use ‘$’ to denote absolute references

In Excel, absolute references are denoted with ‘$’. If a reference is absolute, then ExcelTemplate will not update the reference when rows are inserted. Here are some examples of absolute references:

  • $B5 – The column A is absolute and will not change, even if a new column is inserted between columns A and B. Rows will still update if new rows are inserted.
  • B$5 – The row 5 is absolute and won’t change if rows are inserted or deleted. If a column were to be inserted, then the column reference would update.
  • $B$5 – The cell reference is absolute and will refer to B5 even if rows/columns are inserted/deleted.

Use INDIRECT to preserve formula references

If a cell reference is pre-pended with INDIRECT, Excel treats the reference as a string and does not change it. For example, the formula =AVERAGE(INDIRECT(“Sheet1!E1:E10”)) will always refer to that particular range of cells.

Additional Reading

How to autofit all cells in a workbook when using the ExcelTemplate object

Problem

When using the ExcelTemplate object to populate a spreadsheet with data, you may want to AutoFit the row heights or column widths to better display the data in the cells. The AutoFit needs to be done after all the data has been populated.

ExcelTemplate is a small, light-weight object model that is designed to populate data very quickly. ExcelTemplate does not provide AutoFit functionality, because that would require parsing the entire spreadsheet and creating objects for every single cell, the way the ExcelApplication object does with its much larger object model.

Solution

One solution is to pass the workbook to the ExcelApplication object after it has been populated with data, and then perform the AutoFit (using ColumnProperties.AutoFitWidth or RowProperties.AutoFitHeight). However, this can have an impact on performance, particularly if the workbook contains a lot of data.

If you want to avoid reopening the workbook on the server with the ExcelApplication object, another solution is to use a macro that will run when the user opens the file on the client machine. The following VBA code can be placed in your template spreadsheet to AutoFit all of the cells in a workbook. The code should be placed in the ThisWorkbook object in the VBA Project for the spreadsheet.


Private Sub Workbook_Open()
Dim ws As Worksheet
For Each ws In Me.Worksheets ws.Cells.Columns.AutoFit ws.Cells.Rows.AutoFit Next End Sub

Exception: ‘[character]’, hexidecimal value 0x[value], is an invalid character

Problem

When running an Excel report rendered by ExcelWriter’s ExcelTemplate object, the report will throw the following eception if the data set contains certain special characters:

Unhandled Exception: SoftArtisans.OfficeWriter.ExcelWriter.SAException: ‘[character], hexadecimal value 0x[value], is an invalid character. at SoftArtisans.OfficeWriter.ExcelWriter.ExcelTemplate.Process()

This exception occurs if:

  • Data is imported into an Excel file using ExcelWriter
  • Files are .XLSX (Office 2007) or .XLSM (Office 2007 with macros enabled)
  • Data set contains a character that is not valid in XML

Note: Support for OOXML files was introduced in OfficeWriter 4.0, so this issue only occurs in OfficeWriter 4.0-4.6.0 (ExcleWriter 7.0 – 7.6.0).

Solution

Option 1: Upgrade to OfficeWriter 4.6.1 or later (recommended)

This issue was addressed in OfficeWriter 4.6.1 (ExcelWriter 7.6.1). As of version 7.6.1, ExelWriter correctly preserves characters that are not valid in XML, so they will appear in output.

Product updates for OfficeWriter can be downloaded at www.officewriter.com/product-updates.

Note: Make sure to uninstall the old version of OfficeWriter before installing a new version.

If you are experiencing this issue with OfficeWriter for SQL Server Reporting Services and need to upgrade the server-side installation of OfficeWriter, we generally recommend upgrading the client-side installation of the OfficeWriter Designer as well.

Option 2: Scrub data of invalid XML characters

There are certain ranges of characters that are not valid XML. The XML specification has defined which ranges of characters are supported in XML files. These files cannot be written into XML files, which includes the OOXML file formats. Excel handles the special characters by encoding them before they are written to file.

Since ExcelWriter 7.0-7.6.0 does not handle these characters properly, the other solution is to remove any characters that are not valid XML, if the characters don’t need to be preserved.

Data not imported when using a recordset for a data source

Problem

When using a recordset as a datasource with the ExcelWriter template object, the cells are not populated with data. This typically happens when the recordset is at EOF due to manipulation in the script. When the template object’s .Process() method is called, the data binding occurs.

Solution

Before calling .Process(), you should move to the first record in the recordset with this command:

 oRS.MoveFirst() 

That way, the recordset will be passed properly to the object.

Side-by-Side Data Markers (3 of 3)

BACKGOUND:

The ExcelTemplate method of creating Excel files is to design a template in Excel that contains data markers. Data markers are cell values that begin with %%= or %%=$ that specifies a database column, variable, or array to insert into the spreadsheet column. ExcelWriter does this by inserting a new row into the worksheet for each row of data being imported. This means that anything below the data marker in the template will be pushed down as the new rows of data are imported.

Data markers from the same data set can be placed next to each other, but placing data markers from different data sets side-by-side in an ExcelTemplate can cause extra rows to be inserted into the smaller data sets.

This series of posts explains how to get rid of the extra rows in output files that result from placing data markers side by side. If you’re not a current ExcelWriter user, you can download a free evaluation and follow along!

PART 1: Updating displayed ranges from hidden ranges
PART 2: Clearing out bad content

Part 3: Putting it together

For each named range in the workbook, UpdateRange() will need to be called. For each group of side-by-side data markers, ClearBadDisplay() will need to be called. I put UpdateRange() and ClearBadDisplay() in a module and called the following code in the WorkbookOpen() event: Continue reading Side-by-Side Data Markers (3 of 3)

Side-by-Side Data Markers (2 of 3)

BACKGOUND:

The ExcelTemplate method of creating Excel files is to design a template in Excel that contains data markers. Data markers are cell values that begin with %%= or %%=$ that specifies a database column, variable, or array to insert into the spreadsheet column. ExcelWriter does this by inserting a new row into the worksheet for each row of data being imported. This means that anything below the data marker in the template will be pushed down as the new rows of data are imported.

Data markers from the same data set can be placed next to each other, but placing data markers from different data sets side-by-side in an ExcelTemplate can cause extra rows to be inserted into the smaller data sets.

This series of posts explains how to get rid of the extra rows in output files that result from placing data markers side by side. If you’re not a current ExcelWriter user, you can download a free evaluation and follow along!

Part 1: Updating displayed ranges from hidden ranges

Part 3: Putting it together

Part 2: Clearing out bad content

THE PROBLEM:

ExcelWriter will try to populate any data markers that it finds in the template. This means that if the macro updates the ranges on the destination worksheet before the data markers are populated, the data markers will be displayed on the destination sheet and ExcelWriter will try to populate those data markers as well. The macro will still update the ranges, but it will just write over the bad formatting, so the end result still has extra rows: Continue reading Side-by-Side Data Markers (2 of 3)