Category Archives: WordWriter

How to Avoid Extra Page at Document End When Using WordTemplate

When you want part of your WordTemplate document to repeat on every page, you must set a PageBreak on that page. However, if you set a default PageBreak, Word will automatically insert what is called a Page Break After. The Page Break After  will result in an extra page at the end of your document. In order to fix this, you will need to set a Page Break Before  at the beginning of the page you want to repeat.

Instructions on Setting a Page Break Before

  1. Click on the top left corner of the page where you want your page break to occur.
  2. In the “Home” tab, there should be a “Paragraph” section. Click the arrow on the bottom-right of the Paragraph Section.
    Screenshot 2014-06-20 11.30.19
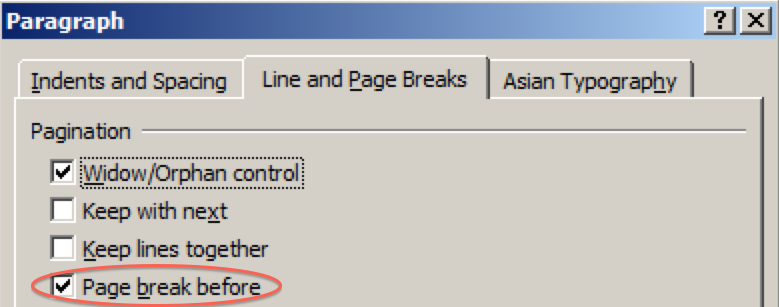
  3. Go to the “Line and Page Breaks” tab and check the “Page Break Before” option.
    Screenshot 2014-06-20 11.35.51
  4. Click “Ok”.

Word will have now inserted a PageBreak before at the spot where you cursor lay in the document. Your document should now generate the correct number of pages.

How to Send OfficeWriter Output in an E-mail

Sending OfficeWriter output in an e-mail is possible while either using OfficeWriter in .NET or with SSRS integration. When using the OfficeWriter .NET API, you can use the .NET MailMessage class to send your OfficeWriter output as an attachment in an e-mail. In SSRS, you can send the output as a subscription-based e-mail.

Sending OfficeWriter Output Using the .NET MailMessage Class

In order to send OfficeWriter in an e-mail output using .NET, you need to use the MailMessage object. If you save the workbook,  document, or presentation to a stream, you can create an attachment out of the file in the stream. This attachment can be added to the MailMessage object and sent to the workbook’s or document’s end users.

//Open Word Template
WordTemplate wt= new WordTemplate();

//Do some databinding and processing here
//YOUR CODE HERE

//Create a file stream that will save the output file on the server
FileStream myStream = new FileStream(@"C:\temp\outfile.xlsx", FileMode.Create);

//Save the output to the stream
wt.Save(myStream);

//Create an Attachment of the file in the stream
Attachment myAttachment= new Attachment(myStream, "output.xlsx");

//Create a mailmessage obj
MailMessage mailObj = new MailMessage("From Address", "To Address", "Subject", "Body");

//Add the attachment
mailObj.Attachments.Add(myAttachment);

//Connect to the server that will send the email
SmtpClient SMTPServer = new SmtpClient("thenameofyourhost");

//Set credentials
SMTPServer.UseDefaultCredentials = true;

//Try sending
try
{
    SMTPServer.Send(mailObj);
}
//Basic error handling
catch (Exception ex)
{
    Response.Write(ex.ToString());
}

Sending OfficeWriter Output Using a SSRS Subscription

If you are integrating OfficeWriter with SSRS, it also possible to send OfficeWriter output by using subscriptions. Be aware that the credentials to run the report must be stored inside of the report.

  1. After uploading your report to the SSRS server, open Report Manager
  2. Find your report and from the Drop Down, select “Manage”
  3. In the left-hand menu, select “Subscriptions” and then “New Subscription”
  4. Fill out the form, including:
    1. Who you want to send the report to
    2. When you want to send it
    3. What parameters the report should run with
    4. Be sure to select either “Excel designed by OfficeWriter” or “Word designed by OfficeWriter” as the rendering format.
      RenderFormat
  5. Click “Ok”
  6. Your new subscription should now appear in the Subscriptions list for your report and will run at the time you specified.

Using OfficeWriter .NET on a 64-bit machine

What version of OfficeWriter do I need for 64-bit support?

  • Full 64-bit support for OfficeWriter’s pure .NET classes was introduced in OfficeWriter 3.9.1 (ExcelWriter 6.9.1). The OfficeWriter .NET dlls are compiled with the /anycpu flag so they will work fine on either 32-bit or 64-bit systems.
  • OfficeWriter’s COM dlls are still 32-bit. If you have old ASP.NET applications that are still using the .NET wrapper classes for ExcelWriter COM, you will need to run those applications in a 32-bit application pool or change your code to use the pure .NET objects. See Using OfficeWriter COM.

What is the difference between the 32-bit and 64-bit installers?

  • There are no significant differences between OfficeWriter’s 32-bit and 64-bit installers. Both contain the same .NET dlls which are compatible with both 32-bit and 64-bit systems.
  • The 64-bit installer will create the OfficeWriter program folder in Progam Files rather than Program Files (x86)
  • You can run the 32-bit installer on a 64-bit OS. However if you are installing OfficeWriter in SSRS integration mode, the 32-bit installer may have trouble finding a 64-bit instance of SSRS.
  • There is no problem manually deploying files from a 32-bit installation to a 64-bit machine

Options for Importing HTML snippets into a Word document

If you are generating a Word document with OfficeWriter and you wish to import some HTML-formatted text, there are various  options, depending on the version of OfficeWriter you are using and the file format of your document (.doc or .docx/.docm)

The Template-based Approach
The Programmatic Approach

Template-based approach

With WordWriter’s template-based approach, using the WordTemplate API or  OfficeWriter’s SSRS integration, HTML-formatted text can be imported by using special merge field modifiers.  This functionality was introduced in version 8.0 with some limitations   (i.e. no SSRS support).     Further enhancements were added in version 9.0 and 9.1.    Using version 9.1 is highly recommended, as it provides the most comprehensive support for this functionality in both custom .NET applications and SSRS integration mode.

Advantages of template-based approach

  1. No complex coding required, everything is controlled through your template and data
  2. Allows HTML-formatted text to be used with WordWriter’s mail merge and grouping functionality

Limitations of template-based approach

  1. Only supports the OOXML file format.  The template must be a .docx or .docm file
  2. The feature relies on Word’s “altChunk” functionality.  Each HTML snippet is embedded as a separate little file, and Word renders the contents when the file is opened on the client machine.   Therefore, if you are viewing the output file in something other than Word (i.e. a mobile device), the HTML may not be rendered correctly. Note: If you resave the output in MS Word, the HTML will be merged into the main document and can be viewed in any Word-compatible application.

How to Use It

Version 8.0 through 9.0 – use the document(html) modifier

  • Your merge field should look something like this:
    <<DataSourceName.ColumnName(document(html)>>
  • Your HTML-formatted text must be passed in as a byte array, since the “document(format)” modifier expects a file rather than a string.
  • Starting in Version 9.1, it is possible for your data to include a filepath or URL rather than a byte array, by using  the new AllowURIs property. However, in 9.1 the “document(format)” modifier is no longer the best way to import HTML snippets.  In 9.1 and above, the “document(format)” modifier should be reserved for cases where you wish to embed an entire document (HTML, DOCX or RTF)
  • Prior to version 9.0, the data must contain an opening and closing <html> tag.  Beginning in version 9.0, WordWriter will add the opening and closing tags for you.
  • For more information about using the document modifier, see Inserting an Embedded Document

Version 9.1 and above – use the new HTMLSnippet modifier

  •  Instructions for using the new HTMLSnippet modifier are in the WordWriter documentation.
  •  Your merge field for the field containing the HTML-formatted text should look like this: <<DataSourceName.ColumnName(HTMLSnippet)>>
  • The data being bound to a merge field with an HTMLSnippet modifier must be a string.  The string does not need to include opening and closing <html> tags.


Programmatic approach

If you have OfficeWriter Enterprise Edition, you can import HTML snippets using the WordApplication API together with our open source project HTMLToWord.

Advantages of the Programmatic Approach

  1. The HTML snippets are converted into true Word formatting, unlike the altChunk approach used by the WordTemplate object.     Therefore the output file will be viewable in any Word-compatible application.
  2. HTMLToWord provides very fine-grained control of the HTML import. For example:
    • Using the HTMLInsertProperties settings, you can specify a default font to override fonts in the HTML, and you can specify whether to ignore unknown tags or insert their contents as text.
    • Using the delegate methods (like InsertDelegate) you can override the default behavior when processing certain tags, or write your own code to handle custom tags in your XHTML.
  3. HTMLToWord is open source project so you can modify the source code as desired.

Limitations of the programmatic approach

  1. WordApplication only supports the .doc file format.  HTMLToWord cannot be used with .docx or .docm files.
  2. This approach is code-intensive
  3. The string must be valid XHTML
  4. HTMLToWord is an open source project, separate from the OfficeWriter product itself.  OfficeWriter support contracts do not cover support for HTMLToWord.

How to Use it

  1. Make sure you have WordWriter Enterprise Edition version 4.0 or above
  2. Download the HTMLToWord project from sourceforge
  3. Follow instructions in Using HTMLToWord for compiling the dll and referencing it in your application
  4. For detailed information about how to use the API, see the section of the documentation under Inserting HTML with WordApplication

Can OfficeWriter 3 or ExcelWriter 6 run on a 64-bit OS?

OfficeWriter version 3.x includes ExcelWriter version 6.x and WordWriter version 3.x.

OfficeWriter v3.x is no longer supported, and upgrading to the current version is highly recommended.   However, if for some reason you need to use version 3.x on a 64-bit system, this article provides all the information you need.

OfficeWriter 3.9.1 and 3.9.2

The first version of OfficeWriter to include 64-bit support was version 3.9.1.  The 3.9.1 installer will run on a 64-bit machine.   The .NET assemblies in 3.9.1 and above are compiled with the /anycpu flag, which means they will work with both 32-bit and 64-bit processes.  The COM dlls, however, are 32-bit.  Here are all the considerations when using 3.9.1 or 3.9.2 on a 64-bit system:

  1. If you are using OfficeWriter in a classic ASP application or an ASP.NET application that is using our legacy .NET wrapper classes for ExcelWriter COM, you will need to set your application pool to 32-bit mode   (For more information about OfficeWriter COM, see Using OfficeWriter COM)
    1. Open the IIS management console
    2. Create a new app pool or select an existing one
    3. Click on “Advanced Settings”?
    4. Set “Enable 32-Bit Applications” to True
    5. Click OK
  2. If your application is ASP.NET, whether it is using the pure .NET objects or the wrapper classes, you will need to install the 64-bit version of the J# runtime before running the OfficeWriter installer.  OfficeWriter 3.x had a dependency on J#.   This was removed in version 4.  You can get the 64-bit J# redistributable here.   Note that the version of J# must match the version of the .NET framework you are using for your application.   Microsoft has deprecated J# and there is no version of J# later than 2.0.

OfficeWriter 3.0 to 3.8.1

Versions of OfficeWriter 3 prior to version 3.9.1 do not officially have 64-bit support, however the dlls may be used on a 64-bit system with certain limitations. The automatic installer is not 64-bit compatible and the .NET assembles are not compiled with the /anycpu flag.  Therefore, both the .NET and COM dlls are 32-bit.  OfficeWriter 3.0 – 3.8.1 can be used on a 64-bit system only in the following manner:

  1. You must do a manual installation:
    1. If your application is ASP.NET, make sure the 64-bit J# runtime is installed.  See step 2 above.
    2. Copy the OfficeWriter dlls and LicenseManager.exe from an OfficeWriter program folder on a 32-bit machine
    3. Enter the OfficeWriter v3 (or ExcelWriter v6) license key with LicenseManager.exe
    4. If you are using OfficeWriter in classic ASP or if you are using the .NET wrapper classes for the COM objects, register the COM dlls (see Using OfficeWriter COM)
    5. Copy the .NET dlls to the bin directory of your application(s)
  2. You must be using OfficeWriter in a custom application rather than in SQL Server Reporting Services.   A 32-bit dll cannot run in a 64-bit process.  64-bit SSRS does not have an option to set it to run in 32-bit mode.  Therefore in order to use OfficeWriter in 64-bit SSRS, you must use version 3.9.1 or above.
  3. You must assign your application to a 32-bit application pool:
    1. Open the IIS management console
    2. Create a new app pool or select an existing one
    3. Click on “Advanced Settings”?
    4. Set “Enable 32-Bit Applications” to True
    5. Click OK

Upgrading from v3.x

If you have an ASP.NET application and you wish to upgrade from version 3.x in order to eliminate the dependency on J# and take advantage of  fixes and enhancements in later versions, you will need to make some changes to your code.  See these pages in the documentation:

Enabling ExcelTemplate and WordTemplate Properties for SSRS

OfficeWriter SSRS Integration allows users to generate OfficeWriter output from RDLs in Report Manager. To enhance the level of customization that SSRS integration provides, users are able to set ExcelTemplate and WordTemplate properties by adding keys to specific configuration files. This article will describe how to enable supported ExcelTemplate and WordTemplate properties in SSRS. Please note that these properties are global: they will apply to OfficeWriter output generated by every report in Report Manager. To see what ExcelTemplate properties are supported in SSRS, visit this link.

Generating Reports On-Demand

One possibility for generating reports from RDLs is to click on the RDL in report manager and export the RDL to ExcelWriter or WordWriter formats.

If you would like to use this functionality, you will need to add your property keys to:  C:\Program Files\Microsoft SQL Server\[SQL INSTANCE]\Reporting Services\ReportServer\web.config

SSRS Subscriptions

SSRS subscriptions allow reports to be generated from RDLs to a fileshare or delivered to users via e-mail on a schedule. However, it is important to note that SSRS subscriptions run in a different context and process from the rest of SSRS. The result is that you will need to add your property keys to a different configuration file for subscriptions than you will for generating reports on the fly.

If you would like to use this functionality, you will need to add your property keys to:  C:\Program Files\Microsoft SQL Server\[SQL INSTANCE]\Reporting Services\ReportServer\bin\ReportingServicesService.exe.config

Instructions for Adding Keys to A Configuration File

Here are the steps to enabling supported ExcelTemplate and WordTemplate properties to the above configuration files:

  1. Open the configuration file you would like to modify. See above for which configuration file will enable the functionality you desire. You can add properties for reports generated on-demand, by subscription, or both.
  2. Check to see if an appSettings section exists in the file: ie <appSettings></appSettings>
    1. If yes
      1. Add your keys to the existing appSettings section. The format is <add key=”[KEY NAME]” value=”[VALUE]” />
    2. If not
      1.  add an appSettings section before the closing </configuration> tag at the bottom of your file. It should look like: <appSettings></appSettings>
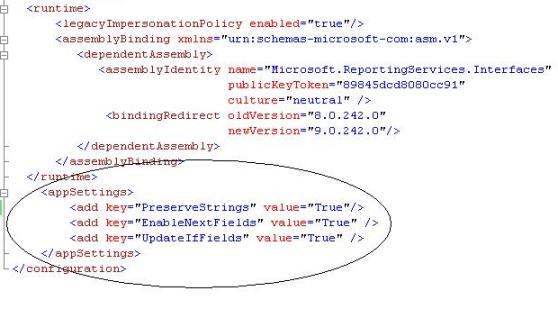
      2. Inside of the appSettings tags, add your keys in the <add key=”[KEY NAME]” value=”[VALUE]” /> format.

webconfig

This is an example appSettings section in a configuration file

Using OfficeWriter COM

The COM version of OfficeWriter has been deprecated.   However, some customers have existing applications that use the ExcelWriter and WordWriter COM dlls. The officially supported versions of OfficeWriter (v8.x and v9.x) no longer include the COM dlls.   The latest versions of the COM dlls are ExcelWriter 7.6.1 and WordWriter 4.6.1.   The last automated installer which contained the COM dlls was OfficeWriter version 4.5.1.

One of the most important things to know is that OfficeWriter’s COM dlls are 32-bit. If you are migrating an existing application to a 64-bit server, any application using OfficeWriter COM will need to be assigned to a 32-bit application pool.

This article provides more information about the points mentioned above, as well as anything else you may need to know about using OfficeWriter COM.

How do I know if my application is using OfficeWriter COM?
What functionality is included in the COM version of OfficeWriter?
Getting the Documentation
Getting the COM dlls
Installing ExcelWriter COM
Installing WordWriter COM

How do I know if my application is using OfficeWriter COM?

If your application is classic ASP, it is obviously using the COM dlls.

But there is another possible scenario. If you have an ASP.NET application using a very old version of ExcelWriter, your application may have a dependency on the ExcelWriter COM dll.  This is because before the pure .NET version of ExcelWriter was released, we provided a .NET wrapper for the COM version.  Note: If you are using OfficeWriter in .NET, we highly recommend migrating your code to use the pure .NET objects which are fully supported, more up-to-date, and fully 64-bit compatible.

Note: ASP.NET applications using only WordWriter will never have a dependency on COM. This is because WordWriter, a newer product than ExcelWriter, has always been a pure .NET product. (A COM-callable wrapper was provided for use with classic ASP)

To determine whether your .NET application has ExcelWriter COM dependencies:

  1. First check if your code is using the SoftArtisans.ExcelWriter namespace.  This namespace contains all the interop classes provided by our .NET wrapper (The pure .NET objects, on the other hand, are all in the namespace SoftArtisans.OfficeWriter.ExcelWriter)
  2. If your application uses both the ExcelTemplate and ExcelApplication object and it was written using certain versions of ExcelWriter, you may find that your code references both namespaces mentioned above.  This is because the pure .NET ExcelTemplate object was released before the pure.NET ExcelApplication object.  ExcelTemplate .NET was released in ExcelWriter v5 (OfficeWriter v2) and ExcelApplication .NET was released in ExcelWriter v6 (OfficeWriter v3)
  3. If you see a reference to “SAEXCELLib” rather than SoftArtisans.ExcelWriter,  your developers probably imported the ExcelWriter COM dll into a .NET project rather than using our custom .NET wrapper.   The .NET framework will create a default wrapper if a COM dll is imported into a .NET project in Visual Studio.

What functionality is included in the COM version of OfficeWriter?

ExcelWriter COM Functionality and Limitations
ExcelWriter was already a mature COM product before the .NET version was introduced.   The ExcelWriter COM dll has no dependency on the .NET dll, and it includes full ExcelTemplate and ExcelApplication functionality.  However, in recent years, as most customers migrated to the .NET, many new features were added only to the .NET version.   Therefore the COM version of ExcelWriter has some significant limitations, including:

  1. No support for OOXML file formats (.xlsx, .xlsm)
  2. No automatic grouping and nesting functionality (released in ExcelWriter .NET v7.1.0)
  3. Does not support all new Excel formulas introduced in Excel 2007 and above
  4. No server-side calculation engine (released in v9)

Wordwriter COM Functionality and Limitations
WordWriter is a pure .NET product with a COM-callable wrapper (CCW) provided for use with classic ASP.  The CCW includes only the WordTemplate object. If you are using WordWriter in classic ASP, all the template-based functionality is available.  However, since 4.6.1 was the last release, the COM version does not include any fixes or enhancements added to later versions.  See the OfficeWriter change log to determine which new features and fixes were introduced after 4.6.1 and therefore are not included in WordWriter COM.

Getting the COM dlls

OfficeWriter version 4.5.1 was the last public release that included COM dlls in the installation package.   It includes ExcelWriter 7.5.1 COM and WordWriter 4.5.1 COM.  The latest versions of the COM dlls, ExcelWriter 7.6.1 and WordWriter 4.6.1, are available by request for customers with an active support contract.  This request may be made using regular support channels.

Note:  If you are planning to do a manual installation, you will also need a copy of LicenseManager.exe v4 or above in order to enter your OfficeWriter v4 (or ExcelWriter v7) license key.  LicenseManager.exe is included in the automated installer package, or you can request a copy from Support together with your request for the COM dlls.

Getting the Documentation

The latest documentation for using ExcelWriter and WordWriter in classic ASP is included in the OfficeWriter v4 documentation, which can be downloaded here: http://support.softartisans.com/download/OfficeWriter4Documentation.zip

  • ExcelWriter ASP documentation is in the file “EW-COM-7.pdf”
  • Instructions for using WordWriter in classic ASP are included in the main WordWriter v4 documentation – “WW-4.pdf”

If you are using ExcelWriter COM through the interop in an ASP.NET application, there is no up-to-date documentation available for this configuration.   However, there are some resources in older versions of the documentation that may be helpful.

Installing ExcelWriter COM

Installation instructions can also be found in the ExcelWriter v4 documentation.

  1. Install an ExcelWriter v7 (or OfficeWriter v4) license key
    The License Key can be entered using the full OfficeWriter installer or the LicenseManager.exe utility (version 4 or above)
    • LicenseManager.exe can be found in the program folder of an OfficeWriter installation on a different box
    • or you can request a copy of LicenseManager from SoftArtisans support.
  2. Register the COM dll – “SAXW7COM.dll”
    In versions 4.5.1 and below, the OfficeWriter installer will register the COM dll automatically, but it won’t be the newest version of the dll.  If you have an installer for  v4.5.1 or below, one option is to run the installer and then copy over the newer dll and register it.  That way you will have the full program folder in addition to the dlls.

    If you are doing a manual installation, or if you are updating a previous installation with the newer version of the dll:

    1. navigate to the directory containing the dll and enter:
      regsvr32 SAXW7COM.dll

      Note: On a 64-bit OS, make sure to use the 32-bit version of regsvr32, usually located in C:\Windows\SysWOW64. So you would enter:

      C:\Windows\SysWOW64\regsvr32 SAXW7COM.dll
    2.  Reset IIS by entering:
      iisreset
  3. Make sure your application is running in a 32-bit process
  4. Since ExcelWriter COM is 32-bit dll, if your server is 64-bit you must assign your virtual application to an application pool running in 32-bit mode:

    1. Open the IIS management console
    2. Create a new app pool or select an existing one
    3. Click on “Advanced Settings”
    4. Set “Enable 32-Bit Applications” to True
    5. Click “OK”

    Installing WordWriter COM

    Instructions for installing WordWriter for ASP can also be found in the WordWriter v4 documentation.

    These are the main steps for installing WordWriter COM:

    1. Check the system requirements
      • The COM-callable wrapper (CCW), WordTemplateCCW.dll, is a COM object that makes internal calls to the WordWriter .NET assembly.  Therefore, to use WordWriter in ASP, all of the system requirements for running WordWriter in ASP.NET must also be satisfied.
      • Version 4.x of the CCW also has a requirement for the Microsoft Visual C++ 2005 SP1 Redistributable. If this is a 64-bit OS, make sure to get the 32-bit version of the C++ 2005 SP1 Redistributable. Download Visual C++ 2005 SP1 Redistributable for x86 systems
    2. Install a v4 license key
      The license key can be installed using the automatic installer or (if you are doing a manual installation) the LicenseManager.exe utility (version 4 or above)
      1. LicenseManager.exe can be found in the program folder of an OfficeWriter installation on a different box
      2. or you can request a copy of LicenseManager from SoftArtisans support.
    3. Put the WordWriter .NET assembly “SoftArtisans.OfficeWriter.WordWriter.dll “ in the GAC.
      SoftArtisans.OfficeWriter.WordWriter.dll is a .NET assembly.  The CCW allows you to use the .NET WordTemplate object from ASP. The assembly must be installed in the Global Assembly Cache (GAC) to allow the CCW to work.

      In versions 4.5.1 or below, the OfficeWriter installer will automatically put the WordWriter.NET assembly in the GAC, however it won’t be the latest version of the dll. Here is how to manually add the .NET assembly to the GAC:

      1. On versions of Windows prior to Windows 2008 or Windows 7, copy the file “SoftArtisans.OfficeWriter.WordWriter.dll” to C:\WINDOWS\Assembly.
      2. On Windows 7 or Windows 2008 and above, use gacutil.exe. Unless you have Visual Studio installed on the machine (which most servers do not), you may need to download the Windows SDK to get a copy of gacutil.exe.
        Open a command prompt and navigate to the directory with the .NET dll and enter:
        gacutil /i SoftArtisans.OfficeWriter.WordWriter.dll
      3. Register the COM dll “WordTemplateCCW.dll” with regsvr32
        In versions 4.5.1 and below, the OfficeWriter installer will register the COM dll automatically, but it won’t be the newest version of the dll. If you have an installer for v4.5.1 or below, one option is to run the installer and then copy over the newer dll and register it. That way you will have the full program folder in addition to the dlls.

        If you are doing a manual installation, or if you are updating a previous installation with the newer version of the dll:

        1. navigate to the directory containing the dll and enter:
          regsvr32 SAXW7COM.dll

          Note: On a 64-bit OS, make sure to use the 32-bit version of regsvr32, usually located in C:\Windows\SysWOW64. So you would enter:

          C:\Windows\SysWOW64\regsvr32 WordTemplateCCW.dll
        2. Reset IIS by entering:
          iisreset
      4. Make sure your application is running in a 32-bit process
        The WordWriter .NET assembly is compiled with /anycpu and can run natively on 64-bit operating systems. However the CCW dll is 32-bit and must run in a 32-bit process.If your server is 64-bit, assign your virtual application to an application pool that is set to run in 32-bit compatability mode.
        • Open the IIS management console
        • Create a new app pool or select an existing one
        • Click on “Advanced Settings”
        • Set “Enable 32-Bit Applications” to True
        • Click “OK”

Upgrading from OfficeWriter 8.x to 9.0

If you are upgrading from OfficeWriter 8.x to OfficeWriter 9, there are a couple important things to note before you install OfficeWriter 9. Running the OfficeWriter 9.0 automatic installer, remove any previous versions of OfficeWriter on your server. If you intend on having OfficeWriter 8 and OfficeWriter 9 run on the same server, special installation steps will need to be followed. Another issue to consider when upgrading is that several deprecated objects have now been removed from the API.

Running OfficeWriter 8.X to 9.0 on the Same Server

Running the OfficeWriter 9.0 automatic installer will remove any previous OfficeWriter 8 installations on the server.

  1. Any version 8 license keys will be removed from the registry
  2. The Program Files folder will be overwritten by the new version
  3. OfficeWriter integration with SSRS installation will also be overwritten.

You will need to preserve the OfficeWriter 8 license key if you have applications on the server that use OfficeWriter 8.

If you want to run OfficeWriter 8.X and 9. 0 on the same server, please choose one of the two following installation paths before beginning to install OfficeWriter 9.

Option 1 Add v8 License Key after Running v9 Installer

Your first option is to record or backup your OfficeWriter 8 license key before running the OfficeWriter 9 installer. During the installation process, your OfficeWriter 8 license key will be removed from the registry and any applications using this license key will not work. However, once the installation is complete, you can run the License Manager program found in the SoftArtisans program files folder and re-add your OfficeWriter 8 license key there.

  1.  Record your license key
    1. Write down your OfficeWriter 8 license key
      1. Open C:\Program Files\SoftArtisans\OfficeWriter\LicenseManager.exe
      2. Click the dropdown to see the installed keys
      3. Copy your installed OfficeWriter 8 license key
    2. OR Export the OfficeWriter 8 license key in the registry.
      1. Enter regedit.exe to get to the registry
      2. Navigate to HKEY_CLASSES_ROOT\Licenses\SoftArtisans
      3. Go to File->Export and enter a file name. Make sure Export Range is set to HKEY_CLASSES_ROOT\Licenses\SoftArtisans
      4. Save the file to your desktop.
  2. OPTIONAL: Back up the C:\\Program Files\SoftArtisans folder.
  3. Run the OfficeWriter 9 installer
  4. Add your OfficeWriter 8 License Key
    1. If you wrote down the license key:
      1. Run License Manager by going to C:\Program Files\SoftArtisans\OfficeWriter\LicenseManager.exe
      2. Enter your version 8 key in the “New Key” field
      3. Click “Add/Upgrade”
      4. Hit “OK”.
    2. If you exported the version 8 license keys
      1. Go to the registry
      2. Import the keys by clicking File->Import and selecting the registry keys file on the Desktop.

Option 2 Manual v9 Installation

You can also do a manual installation of OfficeWriter 9 to prevent your version 8 license key from being removed.

  1.  Download the OfficeWriter 9 Installer to your desktop
  2. Unpack the V9 Installation Files without Installing OfficeWriter 9
    1. Open Command Prompt and navigate to the desktop by entering: cd desktop
    2. Enter the command msiexec /a C:\Users\YOURUSERNAME\Desktop\OfficeWriterInstaller-9.0.0-x64.msi /qb TARGETDIR=C:\Users\YOURUSERNAME\Desktop\OW9UNPACKED
    3. This will unpack the installer files into a folder on your desktop called “OW9UNPACKED”
  3. Copy the SoftArtisans folder inside of OW9UNPACKED
  4. Paste the SoftArtisans folder into C:\\Program Files.
  5. Run the License Manager inside of the OW9UNPACKED folder
    1. Enter your version 9 key in the “New Key” field
    2. Click “Add/Upgrade”
    3. Hit “OK”.
  6. If you are integrating with SSRs, follow these manual SSRS integration instructions.

API Methods and Properties Removed in Version 9

Some API methods and properties that were deprecated in OfficeWriter 8 have now been completely removed from the OfficeWriter 9 API. For more information, please visit this link.

How to Use the LineBreakstoParagraphs Property

The LineBreakstoParagraphs Property

A new feature in the WordWriter 8.6.1 WordTemplate Object is the ability to output new paragraphs where there are line breaks in your data using the LineBreakstoParagraphs property. This allows the user to have their text separate into new paragraphs every time there is a line break. The biggest benefit of this feature is that each new paragraph that is inserted will inherit the paragraph styles of its MergeField, including hanging paragraph settings, indentations after paragraphs, alignment, spacing, and orientation, to name a few. This means a single merge field can now output many identically formatted paragraphs rather than a single, large paragraph.

How to Use

By default, LineBreakstoParagraphs is set to False, and line breaks are inserted as soft breaks. A soft break is when text goes to the next line, but is still a part of the previous paragraph. Therefore the new line lacks any typical spacing and indentation that would occur between paragraphs. A soft return can be done in Word by pressing Shift + Enter. To use LineBreakstoParagraphs, you must set the property to true before calling Open(). Also be aware that this property only works on OOXML Word documents (.docx, .dotx, etc).

Comparison

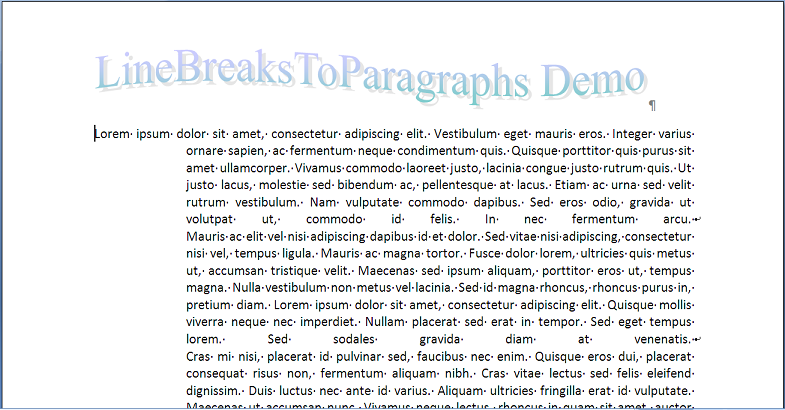
LineBreakstoParagraphs Set to FALSE (DEFAULT)
 KB_LB1
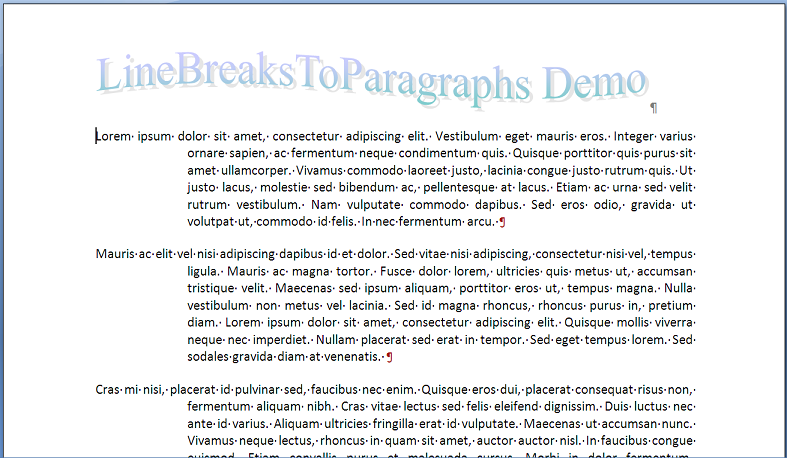
LineBreakstoParagraphs Set to TRUE
KB_LB2

Sample Code

// Names of your mergefields
string[] NamesArr = { @"MultiLineString" };

//Your long multi-line string of text with linebreaks.
object[] ValuesArr = {  
@"Lorem ipsum .... 
Mauris ac elit ... 
Cras mi nisi....};

WordTemplate WordTempl = new WordTemplate();

//Set LineBreakstoParagraphs to true
WordTempl.LineBreaksToParagraphs = true;

WordTempl.Open(Page.MapPath("/LineBreakstoParaDemo.docx"));

//Set the datasource to the arrays.
WordTempl.SetDataSource(ValuesArr, NamesArr);
WordTempl.Process(); 
WordTempl.Save(Page.Response, "Demo.docx", false);

Creating Dynamic Links With MergeFields in Microsoft Word

Introduction

MergeFields allow users to import dynamic content in Microsoft Word. While this feature is very useful in many situations, it can be unclear how you must handle MergeFields nested inside of fields like hyperlinks. A user might want to have both dynamic link test and destinations for their hyperlinks. Unfortunately, how to achieve this is unclear because Hyperlink field codes only take a destination parameter. There is no place to put a merge field for your dynamic display text. In this article, I will show how to create fully dynamic links for Microsoft Word 2007 and up!

Step 1: Adding a Hyperlink Field

  • Put your cursor where you want to place the hyperlink
  • Go to Insert->Hyperlink
  • In the dialog box:
    • Next to Text to Display, enter something like “Temp Display Text”
    • Next to Address, enter something like “Temp Link”

You Should Now Have Something Like This:

KB_Step1

Step 2: Adding a Dynamic Destination Location

  • Press ALT+F9 to see the field code.
  • Delete the “Temp Link” text inside of the quotes.
  • If you have a base url location, enter it in between the quotes. Then proceed to the next step.
  • Now we must add a MergeField to get dynamic urls.
    • Put your cursor before the closing quote of your destination location.
      • Go to Insert-> Quick Parts-> Field.
      • Select MergeField from the Field Names menu.
      • Add the Field Name to identify the MergeField.
      • Click “OK” to exit the dialog.

You Should Now Have Something Like This:

KB_Step2 Continue reading Creating Dynamic Links With MergeFields in Microsoft Word