Category Archives: ASP.NET

Save PDF file to HttpResponse

In a previous blog post we discussed how OfficeWriter 10.0 introduced the ability to save an Excel workbook to a PDF document. When working in a web environment it is common to want to send the generated file to the browser for your end user to download and view on their own machine.

Step 1:
Generate your workbook. A very simple example might be:

var xla = new ExcelApplication();
var wb = xla.Create(ExcelApplication.FileFormat.Xlsx);
var ws = wb[0];
ws.Cells[0, 0].Value = "Hello";
ws.Cells[0, 1].Value = "World!";

Step 2:
Define a helper method to write the file byte to the current response stream:

public static void WriteFileToResponse
(HttpContext context, byte[] bytes, string fileName)
{

var bytesLength = bytes.Length.ToString(CultureInfo.InvariantCulture);
var response = context.Response;
response.Clear();
response.Buffer = true;
response.AddHeader("Content-Length", bytesLength);
response.AddHeader("Content-Disposition", "attachment; filename=" + fileName);
response.ContentType = MimeMapping.GetMimeMapping(fileName);
response.BinaryWrite(bytes);
response.Flush();
response.End();
}

Step 3:
Save the PDF to a memory stream and call our helper method we just defined. This has the benefit of avoiding disk IO. This may vary if your application actually needs to persist the generated PDF.

using (var memoryStream = new MemoryStream())
{
var fileName = "generatedfile.pdf";
wb.SavePdf(false, memoryStream);
memoryStream.Seek(0, SeekOrigin.Begin);
WriteFileToResponse(HttpContext.Current, memoryStream.ToArray(), fileName);
}

And that’s it!

How to Use Process Monitor (ProcMon) to Troubleshoot Web Applications

Process Monitor is a great tool that can help you troubleshoot applications when error messages alone just aren’t enough information to solve a problem. Process Monitor works by logging in-depth about the actions of particular processes. It will give you in-depth information about file access, registry access, threading, and permissions. In this how-to tutorial, we will show you how to collect information on the process that ASP and ASP.NET web applications run on – wpw3.exe.

Step 1:  Download Process Monitor

You can download Process Monitor here. http://technet.microsoft.com/en-us/sysinternals/bb896645.aspx

Step 2:  Open Your Web Application

Go to the page in your web application before your error occurs. You need to be easily able to trigger the event that causes the error while ProcMon is running to avoid collecting too much information.

Step 3:  Monitor the w3wp.exe Process

  1. Reset the filter by clicking Filter -> Reset Filter
  2. Add the w3wp.exe process to the filter by going to Filter -> Filter…
  3. A dialog box will appear.
  4. Create a rule that says “Process Name is w3wp.exe”
    Process is w3wp.exe Rule
  5. Click “Add”
  6. Click “Apply” and then “OK” to exit the Dialog

Step 4:  Collect Information from ProcMon

  1. Please make sure that the Capture icon (shaped like a magnifying class) is enabled. There should NOT be a red “X” through it.
    Capture Events
  2. Go to your web application and trigger the error.
  3. Once the error occurs, go back to ProcMon and click the Capture Icon to stop capturing events.

Step 5:  Examine the ProcMon Logs

  1. The first thing you should do when examining the logs is to see if anything in the “Result” column is not “SUCCESS”. Please take notes of any warnings or errors.
  2. Once you find the errors, determine if they are relevant to your issue.
  3. If you would like to save the logs, you can by going to File -> Save.

Introduction to VSTO Document-Level Customizations

For many years, the only way to add interactivity to an Office workbook or document was to use VBA Macros. However, in more recent years, Microsoft has offered a newer .NET developer tool called Visual Studio Tools for Office (VSTO). To customize a particular document or workbook using VSTO, you can use a project type called “document-level customization.” While the end-user functionality of these solutions overlap, they have very different development processes and practical implementations. In this article, we will discuss how to use VSTO document-level customizations and how they differ from their predecessor.

VSTO in a Nutshell

VSTO offers a developer two different project types: document-level customizations and application-level add-ins. Document-level customizations are projects based around a single workbook or document. Application-level add-ins, on the other hand, are add-ins affecting the UIs of Microsoft Word, Microsoft Excel, Microsoft PowerPoint, Microsoft Outlook, or Microsoft InfoPath applications themselves. In this article, we will talk about document-level customizations.

By leveraging the .NET framework, VSTO can turn a document into a full-fledged application that must be installed onto an end user’s computer. While using .NET offers a programmer nearly limitless possibilities and integration with many other services and libraries, it also means that it requires Visual Studio and strong coding skills to develop the customizations. Updates to a customization will be issued from a  server or disk where the customization is deployed. However, the updates are not without limitations. VSTO updates the code attached to a document, but it does not update the visual formatting done to workbook via Visual Studio’s Designer or Excel. All visual formatting must be done in code to be included in automatic updates. A second limitation is that a user will not be able to have more than one version of the customization on their machine at one time.

VSTO Advantages VSTO Disadvantages
  • Offers full .NET framework integration
  •  A lot of developer and client requirements
  • More robust projects
  •  Because it requires VS Premium or Ultimate, it may be more expensive to develop
  • Offers new project type: Task Pane
  •  Cannot have multiple versions of a project installed on a client machine
  •  All distributed applications will be updated to be the most recent version of the application
  • Must have strong coding skills to use
  •  Uses Visual Studio to develop code
  •  VSTO will update the code attached  to a document, but it will not update designer or template formatting
  •  Can use VBA macros inside of documents containing VSTO document-level customizations
  •  VSTO code is not located within the document, but is installed separately

Compared with VBA

VBA has been around since 1993 and is the simplest way to add interactivity to an Office document. The basic advantages and disadvantages of using VBA are outlined below: Continue reading Introduction to VSTO Document-Level Customizations

Released in OfficeWriter 8.6.1 – IEnumerable Feature

In OfficeWriter 8.6.1, we added a new feature that may have been flying under your radar, and I wanted to let you in on the story of how it came about.

When I first arrived at SoftArtisans I went through training of our entire product line.  As I was reviewing the training material, I came across the ExcelWriter Template section. I saw how to add data markers to my spreadsheet, and it seemed intuitive, so I went ahead and tried it:

ienumerable

At that moment, I was thinking “This is pretty slick. Now, I can just pass things into the spreadsheet!”  I’m not the greatest at reading documentation; I just like to learn by doing, so I opened Visual Studio and started writing code:


class Expense

{

double Amount { get; set; }

string Description = "";

bool Approved { get { return (Amount > 1000); } }

}


for (int i=0; i<1000; i++)

expenses.Add(new Expense(i));


Looking good so far.  What I did next, however, was my downfall:


ExcelTemplate xlt = new ExcelTemplate();

xlt.BindData(expenses);

Creating Holiday Cards and Other Unexpected OfficeWriter Projects

Last week, our VP of Development Sam and Senior Sales Engineer Chad were challenged to look at different ways to use OfficeWriter. The result? They put together a project designed to keep you in touch with your friends and family this holiday season. They looked at using OfficeWriter’s mail merge feature in a new way. Plus, they took that one step further, looking at how the technologies from this project can be applied to business applications within your company. Before heading home for the holidays, take a little inspiration from this behind-the-scenes video of unexpected ways to use OfficeWriter in building your reports and company documents.

Read the original post, get the code, and take a behind-the-scenes tour of the technologies it runs on.

Embedly Powered

via Vimeo

Want to get straight to the point? Skip to the end of the video to discover how this project could be applied to your business.

Thinking Outside the Spreadsheet Box: Unexpected Uses of OfficeWriter

If you leave me alone for too long, I do foolish things like make a mini-paint app that writes the image to 1×1 cells in Excel. And so can you! But before I show you how to make a mini-paint app (the easiest thing you will ever do in your life), let me explain to you what part of me said, “Yeah, Champ, this is a great idea! Who wouldn’t want to make a weird spreadsheet that contains an image made with the background color on cells?” It all began when I was thinking about this awesome idea by my art crush, Evan Roth (*swoon*). He said, “Hey world! I want work to be art,” and decided to make a double-mouse that outputs to an art program on one screen and his regular work on the other. So I figured, why not put some art in Excel too?

Then I got more and more excited as I realized there are actually a ton of cool things you can do…

  • Use the formulas in Excel as transformations on your picture.
  • Randomize cell size to introduce weirdness.
  • Flip the project to input an Excel template and output an image, using Excel calculations and System.Draw to make a simple ray tracer.
  • Do some stuff with conditional formats, or all those light transform equations you learned in high school for no reason…until now!
  • Make a mock tool that lets users draw a spreadsheet design and output it to a real spreadsheet! (I thought a lot about this, and it’s not necessarily simple, but it is a really cool idea. If anyone puts that together, please let me know. I mean you, Evan Roth….Call me?)

The Mini-Paint

For the sake of simplicity, I’m showing you the randomized cell idea. I’ve made it an optional setting in this example, but, you know, make it your own and all. Oh, also, get at me with your art! For this app you’ll need WinForms and OfficeWriter.

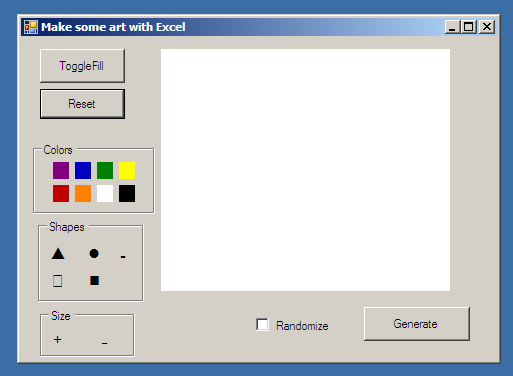
appwindow

I started by making a pretty basic app that has some simple actions. The “canvas” is a PictureBox that I save and resave some drawing objects to on each mouse event. The color selector is just 8 flat buttons set to be the color they represent. The shapes are again flat buttons with Wingdings images because I was too lazy to find a relevant .res file with some neat picture icons. Can you guess what the size toggles are? Flat buttons. Generic plus/minus from your plain boring keyboard. Okay. Basic functions.

  • MouseDown sets a pointer location.
  • MouseUp nullifies the pointer location.
  • MouseMoved is a basic drawing function. (You can find a ton of examples, but I like this one from good ol’ SO.)
  • Color buttons set a global variable, _selectedColor, to the color of the button.
  • Shape button clicks set a global variable called _selectedShape. I set it to an enum of possible shape options and I use a switch statement in the draw method. Instead of calling DrawLine or DrawRectangle, I call DrawShape(x,y) with x and y being current mouse x and y.

DrawShape is roughly this: Continue reading Thinking Outside the Spreadsheet Box: Unexpected Uses of OfficeWriter

Choosing OfficeWriter Designer or Designer .NET

Overview

OfficeWriter Designer is an add-on for Microsoft Excel and Microsoft Word that allows users to create new RDL reports and design pre-existing reports inside of Excel or Word. Until OfficeWriter 8.6, the original OfficeWriter Designer was the only tool available with this functionality.

However, as of OfficeWriter 8.6, SoftArtisans will include a second, new version of OfficeWriter Designer called the OfficeWriter Designer .NET. The OfficeWriter Designer .NET is a completely rewritten version of its predecessor, created from .NET/C# using VSTO (Visual Studio Tools for Office run time).

Benefits of OfficeWriter Designer .NET

  • Office 64-bit support
  • No dependencies on COM/VBA
  • More robust handling of modifications to queries in Visual Studio/Report Builder
  • Better parameter support with the View functionality, including support for cascading parameters

Which Designer Should I Use?

The new OfficeWriter Designer .NET does not currently support all of the features of the previous Designer. For full functionality support, use the original OfficeWriter Designer. Please see the feedback section below for more information about submitting requests for new features. Continue reading Choosing OfficeWriter Designer or Designer .NET

How to Render an SSRS Report Asynchronously using the Async\Await Keywords in C# 5.0 with .NET 4.5

The .NET Framework 4.5 introduced a simplified approach to the task-based asynchronous programming model (which was introduced as part of the Task Parallel Library API in .NET 4.0) via the utilization of the two new keywords:  “async” and “await” in C# (Async and Await in VB.NET). For detailed information, see Asynchronous Programming with Async and Await (C# and Visual Basic)  on MSDN.

In this post, I’d like to show you how we could use these new keywords when making asynchronous calls to the SQL Server Reporting Services web service.  For the purpose of simplicity, I created a very simple Windows Forms project in Visual Studio 2012 in which I just have one button which invokes the SSRS web service in the click event handler.

First we need to make sure the target framework for the project is set to .NET 4.5 in Visual Studio 2012 (from the project properties).

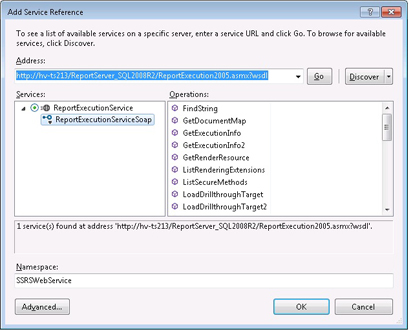
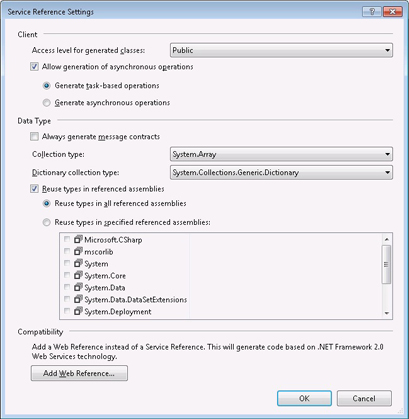
Then we add a service reference to the SSRS web service. This part is a little tricky.  In the “Add Service Reference” dialog, after we put in the URL of the ReportExecution2005.asmx file of the Reporting Services into the Address box and locate the service, in the “Services” panel it should list the “ReportExecutionService” and if you expand that, it would show the “ReportExecutionServiceSoap” underneath. Here we select the Soap service. Then, after specifying a namespace for our reference (I just named it as “SSRSWebService”), we click on the “Advanced” button at the bottom which opens the “Service Reference Settings” dialog (as seen in the screenshots). In this latter dialog, we will make sure the “Allow generation of asynchronous operations” is checked and the “Generate task-based operations” option is selected. What this does is that Visual Studio will generate the async methods for the SOAP proxy class by using the Task<> return types.  Then we click “OK” and close the dialog.

HowtorenderSSRSreport_image1 HowtorenderSSRSreport_image2

Here I would like to underline one key part. In the second step we added the reference to the SSRS web service as a “service reference” (just like a WCF service), not as the legacy web reference (which was the old way of adding web service references prior to .NET 3.5 and WCF).  One other thing I want to point out is that here I am using the ReportExecutionServiceSoapClient proxy class, not the ReportExecutionService class which would have been the case had I added the ASMX reference as a legacy web reference. The interfaces exposed by SSRS differ slightly (different method signatures and different members) between when it is added as a WCF service (in this case it is the SoapClient) versus a legacy web reference.  Since my goal is to use the new .NET 4.5 features, I had to create the service reference in the new WCF way.

In my WinForms project I render the report located at the /MyReports/Report1 directory in SSRS as a PDF file. Here is the code for the button’s click event handler: Continue reading How to Render an SSRS Report Asynchronously using the Async\Await Keywords in C# 5.0 with .NET 4.5

How to create a custom SQL Server Reporting Services error page

Problem

When SQL Server Reporting Services (SSRS) encounters an error, it returns an error message which is displayed by Report Manager. The error message can include technical details that reveal more information than necessary or are potentially confusing or intimidating to a user. One example is the scenario in which the user attempts to export a report from Report Manager using the “Excel designed by OfficeWriter” option, but the report is not created using the OfficeWriter Designer. In this case, SSRS would return the following error:

 Error SA008050: This report was not designed for the selected OfficeWriter rendering extension. 

Depending on configuration, Report Manager may also display a detailed error message and a stack trace. In this case, the error message is self-explanatory. However, often it is desirable to provide a friendly custom error page that hides the technical details of the internal exception and provides more helpful instructions to users.

Configuring a custom error page for Report Manager is no different from doing so for other ASP.NET applications. The custom error page is simply a web page that you create. You can configure ASP.NET to display a custom error page to all users. Alternatively, the custom error page can be displayed only to users accessing Report Manager from a remote machine, which is usually the case in production. For users accessing Report Manager from the same machine, the full error would be displayed. Typically, a detailed error message is helpful for debugging purpose during development.

Additionally, you can configure a custom error page to be displayed for specific HTTP status codes. For example, the OfficeWriter error above is an internal server error, which results in HTTP status code 500.

Solution

To configure a custom error page for Report Manager:

  1. Browse to Report Manager folder.
    • For SSRS 2005, its typical location is DRIVE:\Program Files\Microsoft SQL Server\MSSQL.x\Reporting Services\ReportManager, where x is the instance
    • For SSRS 2008 and SSRS 2008 R2, DRIVE:\Program Files\Microsoft SQL Server\MSRS10.SSRS\Reporting Services\ReportManager .
  2. Make a copy of the existing Web.config as backup
  3. Open Web.config in a text editor, or in Visual Studio to get Intellisense support
  4. Under the section, locate the `1 section
  5. Modify the existing section, or insert a new one, with the appropriate settings
  6. Restart the Report Server

The possible values for the mode attribute of the tag are Off, On, and RemoteOnly. The default is Off. In order to enable a custom error page, mode must be set to On or RemoteOnly. For example, the below section specifies the following: 1) a custom error page be displayed for remote users only, 2) a specific page for HTTP status code 500, and 3) a default page for all other HTTP status codes. Note that attributes are case-sensitive.

Binding bordered images to GridViews

Here’s a neat trick: bind an image with a border to a GridView!
The first rule of web development is “nothing is as easy as it seems.” I think the second rule is something about choosing from standards? I don’t really care. The point is, this seemed like it would be too easy, but the implementation threw some curves at me. Let’s hearken back to a simpler time and begin our journey with a list of possible horrors:

  • The image object links to a physical location. It does not write BLOB objects. Friggen nothing writes BLOB objects.
  • Sometimes there are null values.
  • I need a border. This will create a little empty black square if a null is encountered.
  • What the heck is the difference between <%# and <%= again? And how the heck do I search for it? (Look here for explanation and links. Please read this. You’ll be so happy you did.)

Now we follow our hero on her continued path of – yes, hero is the male form. Don’t judge me. You don’t know – discovery. The first step is, of course, to point the Image object to an HttpHandler and pass that the ID for the data row containing the image. The handler itself is a pretty straightforward interface. There’s only one method: ProcessRequest() where you need to implement a method to grab the data from SQL. There’s also one property:  good ol’ IsReusable(). IsReusable is a boolean value that indicates whether or not the HttpHandler object can be reused. There’s a lot to take into consideration here:

  • Threading
    • If you have multiple threads accessing this at the same time you can completely screw up the state. What I’m doing is getting the query string within the process request. This is fine since the variable is local to the method it will be unique to the thread. You don’t have to stick to my code, though. If you are reusing the object, remember that any thread can, at any time, be changing a global variable.
  • End state of the handler
    • This is especially important here, since we’re using a lot of data objects, we need to make sure everything is properly disposed before the method is done executing.
  • Memory considerations
    • If IsReusable is false, then a new handler will be created for each request. This can cause performance issues if you have a lot of, say, users, accessing this, say, all at once. However, a simple httphandler doesn’t usually cause a lot of memory bloat. This is one of those application-specific things.

Whether you set IsReusable to true or false really comes down to what you need this handler to do. If you’re really uncertain, leave it at false – it will at least guarantee there are no multithreading nightmares, like in the sopranos. Continue reading Binding bordered images to GridViews