Tag Archives: xml

Major Upgrades using WiX

Major Upgrades using WiX

Recently one of my colleagues wrote about his experience with WiX, and how he could create a simple installer in fifteen minutes. Today I want to talk about taking your newfound WiX installer to the next level by configuring your WiX installer to perform major upgrades.  In most cases a major upgrade means removing any previous version of an application and installing the new version.

Depending on which version of WiX you are using, you have a couple of options to perform a major upgrade.

Special Considerations:

Special considerations should be made before you start creating your installer. One of the most important ones in my opinion is deciding if your installer will be per-user or per-machine. By default WiX is a per-user install.  If you want your installer to be per machine you can add the following your solution:

<!-- Install at a per-machine level and not per-user -->
<Property Id="ALLUSERS" Value="1"/>

Any upgrade that you make should use a consistent ALLUSERS property. If you decided to change this once your application is already deployed, a major upgrade will not be looking in the same place, and any new version of the installer will not be able to detect the old installed version. This can lead to multiple versions of the software installed on one system.

WiX 3.5.1315.0 and later

In version 3.5.1315.0 of WiX the Major Upgrade Element was introduced, which makes common upgrade scenarios very simple.

It can be as simple as:

<MajorUpgrade AllowDowngrades="no" DowngradeErrorMessage="A newer version of this application is already installed."/>

If you try to run the installer on a system that already has a newer version you will receive an error with the DowngradeErrorMessage such as:
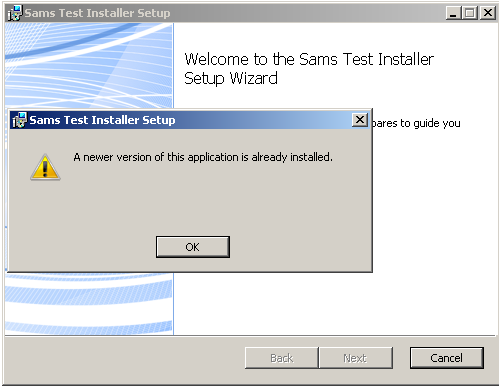
However if you are indeed installing a new version, then the installer will automatically uninstall the old version and install the new version. How easy is that?!

Pre WiX 3.5.1315.0

If you are using a version of WiX before 3.5.1315.0 then you have to perform a major upgrade in a slightly more complicated way. Seeing as everyone may not be using the newer version of WiX, I think it is still worth explaining.  Note: What defines a Major upgrade is changing the Product Version and Changing the Product ID; just changing the product version will be considered a minor upgrade.

Step  1   Define your GUIDS:

Whenever you are ready to perform a major upgrade you will need to change your product’s GUID. The product GUID is how WiX determines major versions of the product. In my case I am using *, which will generate a new unique GUID every time I build my installer.

  <!-- * means WIX will generate a new GUID -->
	<Product Id="*" Name="$(var.Product.Name)" Language="$(var.Product.Lang)" Version="$(var.Product.Version)" Manufacturer="$(var.Product.Manufacturer)" UpgradeCode="f47c5510-7e95-11e1-8027-bbc14824019b">
		<Package InstallerVersion="$(var.Package.InstallerVersion)" Compressed="yes" Platform="$(var.Platform)" />

Step 2 Define your condition message:

<Condition Message="A newer version of this application is already installed.">
      <![CDATA[Installed OR NOT NEWER_VERSION_FOUND]]>
    </Condition>	

Step 3 Define upgrade table:

The upgrade table tells the installer what the versions it should detect are and how to respond. You will notice that when I detect newer versions, OnlyDetect = “true” because I do not want to replace newer versions of my product.

<!-- Upgrade Table -->
    <Upgrade Id="f47c5510-7e95-11e1-8027-bbc14824019b">
      <UpgradeVersion
        Property="OLD_VERSION_FOUND"
        Minimum="1.0.0.0"
        Maximum="$(var.Product.Version)"
        IncludeMinimum="yes"
        IncludeMaximum="no"
        OnlyDetect="no"
        IgnoreRemoveFailure="yes"
        MigrateFeatures="yes"
        Language="1033"  />

      <UpgradeVersion
        Property="NEWER_VERSION_FOUND"
        Minimum="$(var.Product.Version)"
        IncludeMinimum="no"
        OnlyDetect="yes"
        Language="1033"  />
    </Upgrade>

Step 4 define the Install Execute Sequence

    <!--Removes the old version and then installs the new version-->
    <InstallExecuteSequence>
      <RemoveExistingProducts After="InstallInitialize"></RemoveExistingProducts>
      <InstallExecute After="RemoveExistingProducts"></InstallExecute>
    </InstallExecuteSequence>

And that’s it. I hope this helps others who are looking to perform major upgrades with their WiX installers. If you are working a lot with WiX, I recommend you check out the book WiX: A Developer’s Guide to Windows Installer XML  by  Nick Ramirez

Don’t Pay for Install Tools when WiX Works

Recently we found it beneficial to rewrite one of our Windows installers. The previous one was built with the well-known InstallShield 2008, which is a pretty powerful GUI tool built over a very basic language called InstallScript. You can do pretty much anything you need with the tool, but a lot of it can be rather arcane and not at all straightforward. This is fine and dandy if a team has a dedicated installer engineer, but when the installer is rarely touched it doesn’t tend to work out as well. InstallScript itself eventually runs into using goto statements, something abhorrent to many of us. On top of that, the tool is a few grand per license. We needed to make some major changes to our installer, and knowing the state of the tool and code for the existing one we thought it better to seek out alternatives.

Why WiX? WiX actually comes out of Microsoft, and was amongst the first of their projects to be delivered open source under the Common Public License. Since it’s open source, it’s also free. Before, we had to log into the one machine that can actually make changes to the installer, as we only had the one license. Now, every developer can just have WiX installed on their box outright. Additionally, WiX comes with Votive, a Visual Studio plugin. As we’re already using Visual Studio to develop OfficeWriter, the project in question, this is simply a nice feature we get for free. One doesn’t need Visual Studio or the plugin to develop a WiX installer, however. Continue reading Don’t Pay for Install Tools when WiX Works

SharePoint 2010 Sandbox Solution Failure with Single Dot Path

Converting a SharePoint 2007 solution to SharePoint 2010 is straightforward. In fact, other than recompiling the Visual Studio project with the SharePoint 2010 DLLs, you do not have to do anything else at all. When it comes to deploying the solution in SharePoint 2010, you can deploy it as a farm solution or a sandboxed solution. A farm solution is the same as a SharePoint 2007 solution; it is scoped to the farm level and operates with full trust. A sandboxed solution is scoped to a site collection and is limited in capabilities, but it offers certain benefits to both farm administrator and developers. The distinction between a farm and sandboxed solution lies in the deployment process, not in the solution package (which is the same in both cases).

After recompiling a project for SharePoint 2010, I was able to deploy it successfully as a farm solution. I then attempted to deploy the same solution package as a sandboxed solution. The first step was to add the solution package to the solution store with the following PowerShell cmdlet:

add-spusersolution -literalpath C:\solutions\SoftArtisansTutorial.wsp -site http://echo/sites/postone

However, this immediately resulted in the following error:

Add-SPUserSolution : The manifest.xml file could not be found within “SoftArtisansTutorial.wsp”. Continue reading SharePoint 2010 Sandbox Solution Failure with Single Dot Path

Amazingly Simple (and Fast) XML Formatting Trick

While pre-populating a SharePoint list instance with data, I find myself having to insert a large amount of unformatted data into an XML file in Visual Studio 2008. When formatted, the XML data consist of roughly 12000 lines. After I pasted the data into the file, Visual Studio took several agonizing minutes to format them into nicely human-readable form. Moreover, during this time, my computer’s CPU usage was also pegged at or near the maximum, rendering it practically unusable.

However, I found that if the XML data are already mostly formatted, then Visual Studio leaves them alone. So I tried to load the XML data into a text editor to see whether it could do the job faster. Unfortunately, my text editor isn’t capable of automatically formatting XML, and using regular expressions is too manual of a process.

Finally, I noticed that Internet Explorer loads and formats an XML file almost instantaneously. This suggests the simple trick of opening the XML file in IE, pasting the formatted XML content into a text editor to remove the extraneous hyphens, then pasting the results into Visual Studio. Doing so reduces the amount of time for the process from several minutes to just a few seconds.

MBTA Bus Locator

I wrote an app for my G1 to get information from the real-time MBTA bus location feed and display it in Google Maps as bus icons. It was an interesting experience to develop for.

The Android eclipse environment has its fair share of hiccups unfortunately, simple things like how a down arrow usually behaves, or not being able to scroll all the way to the bottom of a list using your mouse scrollwheel. The emulator and eclipse’s debugging capabilities were really helpful, and robust for the most part. The most difficult thing in developing for it was figuring out how to do what I wanted to do, what functions and classes to use. I guess that’s inherent in developing for a new platform.

The app is pretty simple. It’s one screen, with most of it taken up by Google Maps and a bar at the top containing space for a refresh button and a status update box. It defaults to Watertown square when it starts, although that could easily be changed to use GPS or something else. When the app starts and when the refresh button is pushed, it retrieves a list of bus locations from the feed XML. Those locations are sorted by distance to get the 20 closest buses to where the center of the map is. (The distance is currently computed by sqrt(latitude^2 + longitude^2). This is slightly incorrect since a difference in latitude may be smaller or larger than a difference in longitude. I’ll fix that soon using this. Overlays are then created using a bus picture I got from Wikipedia and inserted into Google Maps. Continue reading MBTA Bus Locator

Reducing the Length of XML Data Returned from a Web Service

I’m working on a project for a large consulting customer.  The application we’re developing has a SOA that uses WCF services to return data.  A requirement is that the data be communicated using XML for maximum interoperability between potential heterogenous (Microsoft and non-Microsoft) environments.

The problem I’ve run into is that some of the data sets can be quite large.  We’re using the built-in functionality of the ASP.NET DatSet object to serialize the data and table schema information to XML.  This is very fast and convenient to code, but the generated XML is very verbose and adds a lot of overhead.  This resulted in errors in clients of the web service with the message “The maximum message size quota for incoming messages (n) has been exceeded“.  I increased the MaxReceivedMessageSize property on the binding in the web.config file to 50000000 (yes, that’s 50Mb), but I still ran into the same error.  I really didn’t want to keep increasing the max message size and be sending 50Mb, or even more, of XML across the wire.  Continue reading Reducing the Length of XML Data Returned from a Web Service