Category Archives: Knowledge Base

Save PDF file to HttpResponse

In a previous blog post we discussed how OfficeWriter 10.0 introduced the ability to save an Excel workbook to a PDF document. When working in a web environment it is common to want to send the generated file to the browser for your end user to download and view on their own machine.

Step 1:
Generate your workbook. A very simple example might be:

var xla = new ExcelApplication();
var wb = xla.Create(ExcelApplication.FileFormat.Xlsx);
var ws = wb[0];
ws.Cells[0, 0].Value = "Hello";
ws.Cells[0, 1].Value = "World!";

Step 2:
Define a helper method to write the file byte to the current response stream:

public static void WriteFileToResponse
(HttpContext context, byte[] bytes, string fileName)
{

var bytesLength = bytes.Length.ToString(CultureInfo.InvariantCulture);
var response = context.Response;
response.Clear();
response.Buffer = true;
response.AddHeader("Content-Length", bytesLength);
response.AddHeader("Content-Disposition", "attachment; filename=" + fileName);
response.ContentType = MimeMapping.GetMimeMapping(fileName);
response.BinaryWrite(bytes);
response.Flush();
response.End();
}

Step 3:
Save the PDF to a memory stream and call our helper method we just defined. This has the benefit of avoiding disk IO. This may vary if your application actually needs to persist the generated PDF.

using (var memoryStream = new MemoryStream())
{
var fileName = "generatedfile.pdf";
wb.SavePdf(false, memoryStream);
memoryStream.Seek(0, SeekOrigin.Begin);
WriteFileToResponse(HttpContext.Current, memoryStream.ToArray(), fileName);
}

And that’s it!

How to Save an Excel Workbook to a PDF Document

OfficeWriter 10.0 introduces the ability to save a Workbook, Worksheet, or Area to a PDF document. This makes it possible to produce a searchable, vector-format rendering of your spreadsheet.

Using the Imaging Extension DLL

The PDF functionality is included in the rendering extensions DLL (SoftArtisans.OfficeWriter.ExcelWriter.Imaging.dll). The first thing you will need to do is include this DLL as a reference in your project in Visual Studio. You will also need to tell the compiler to use the imaging namespace in your source file. This can be accomplished by adding a using statement to the top of the file where you want to save a PDF document:

using SoftArtisans.OfficeWriter.ExcelWriter.Imaging;

Setting up your workbook

In order to save an Excel workbook to a PDF document, you first need a workbook with contents in it. For this example, let’s create a simple workbook with three worksheets:

ExcelApplication xla = new ExcelApplication();
Workbook WB = xla.Create(ExcelApplication.FileFormat.Xlsx);
Worksheet ws0 = WB[0];
Worksheet ws1 = WB.Worksheets.CreateWorksheet("Sheet2");
Worksheet ws2 = WB.Worksheets.CreateWorksheet("Sheet3");

ws0[0, 0].Value = “Sheet 1, Cell A1”;
ws1[0, 0].Value = “Sheet 2, Cell A1”;
ws2[0, 0].Value = “Sheet 3, Cell A1”;

For this example, we are just exporting some cells with text in them. However, the rendering extensions support more dynamic content as well, such as cell formatting, charts, images, comments, or conditional formats. We could also use a workbook that we opened from a file, that already had contents and formatting applied.

Saving a PDF document

There are three ways to save a PDF document: through the workbook, through a worksheet, or through a specific area. Specific PDF rendering options can be specified by setting a worksheet’s PageSetup properties; this will be covered in a later tutorial. If you have not set any of the worksheet’s PageSetup properties, then default settings will be used.

You can save multiple PDF files from one workbook. First, let’s save multiple worksheets to a single PDF document. This can be achieved by using the Workbook.SavePdf method. The first parameter is a Boolean; if this is set to true, then only selected worksheets will be saved. Otherwise all visible worksheets will be saved.

For this example, lets save the first and the third worksheet to a single PDF document. Continuing from the code above, we can achieve this with the following two lines of code:

WB.Worksheets.Select(new object[]{0, 2});
WB.SavePdf(true, “MultipleWorksheets.pdf”);

We can also save the remaining worksheet to a separate PDF file containing only the contents of that worksheet:

ws1.SavePdf(“sheet2.pdf”);

This allows to either generate multiple PDF documents, each containing one worksheet, or a single PDF document containing multiple sheets.

Calls to SavePdf must be made before saving a workbook to an xlsx/xlsm file. Once you have exported all of the PDF documents that you want, you can then also save the workbook to an Excel file as you normally would:

xla.Save(WB, “workbook.xlsx”);

Putting it all together

Here’s what the final code looks like:

using SoftArtisans.OfficeWriter.ExcelWriter;
using SoftArtisans.OfficeWriter.ExcelWriter.Imaging;

public class SampleProgram
{
public static void Main(string[] args)
{
ExcelApplication xla = new ExcelApplication();
Workbook WB = xla.Create(ExcelApplication.FileFormat.Xlsx);

// Set up the workbook with some content
Worksheet ws0 = WB[0];
Worksheet ws1 = WB.Worksheets.CreateWorksheet(“Sheet2”);
Worksheet ws2 = WB.Worksheets.CreateWorksheet(“Sheet3”);
ws0[0, 0].Value = “Sheet 1, Cell A1”;
ws1[0, 0].Value = “Sheet 2, Cell A1”;
ws2[0, 0].Value = “Sheet 3, Cell A1”;

// Select two worksheets and save them to a single PDF document
WB.Worksheets.Select(new object[]{0, 2});

// The ‘true’ argument tells the rendering method to only save worksheets
// that are currently selected. If it were ‘false’, then all worksheets
// would be saved to the PDF.
WB.SavePdf(true, “MultipleWorksheets.pdf”);

// Save one worksheet to a separate PDF
ws1.SavePdf(“sheet2.pdf”);

// Finally, save the workbook to an Excel file in case we need to edit it later
xla.Save(WB, “workbook.xlsx”);
}
}
How to Calculate Unsupported or Custom Formulas on the Server with ExcelWriter

Beginning in OfficeWriter 9.1, ExcelApplication’s calculation engine will offer the ability to implement custom formulas. This feature should prove helpful to users whom would like to calculate their own custom formulas or calculate formulas not currently supported by ExcelWriter on the server using ExcelWriter. This tutorial will show you how to implement these formulas.

Creating Your Own Formula

  1. Create a class that implements an interface provided by ExcelWriter called IFunction. The IFunction interface implements a method called Calculate.
  2. Inside of your class, create the Calculate method with this signature:
    FunctionValue Calculate(IList<FunctionValue> args, Cell currentCell)
  3. Inside of the Calculate Function, code the logic of the formula you would like to implement.
    1. The first argument of Calculate is a list of FunctionValue objects. FunctionValue objects are how we pass values in and out of formulas. FunctionValues have several properties available to them, so please see the documentation for more information about how you can use the properties in your formula logic.
    2. The second argument of Calculate is the cell that contains the formula. Please see the documentation for more information about Cell objects and their available properties and methods.

Registering the Formula with ExcelWriter

  1. Once the formula is written, register the function using Workbook.RegisterCustomFunction.
    WB.RegisterCustomFunction("MyFormula", new MyClass());

Calculating the Formula and Removing it From a Workbook

Once your formula is registered, you can use WB.CalculateFormulas to have ExcelWriter calculate the value of any cells that use the formula in your Workbook. If you are generating Excel output using ExcelApplication.Save, please note that if you have implemented a custom formula that it is not recognized by Microsoft Excel, the end user will not see the calculated values in the output workbook when opened in Excel. To get around this issue, you can use Workbook.RemoveFormulas or Worksheet.RemoveFormulas to remove the formulas from the worksheet or workbook, while leaving the last calculated values in the cells.

Here is an example of what your finished code should look like:

public class sample
{
   MyMainMethod()
   {
      ExcelApplication xla = new    ExcelApplication(ExcelApplication.FileFormat.Xlsx);
      Workbook WB = xla.Create(ExcelApplication.FileFormat.Xlsx);
      WB[0]["A1"].Formula = "=COUNTARGUMENTS(4, 5, 6)";
      WB.RegisterCustomFunction("COUNTARGUMENTS", new Formula());
      WB.CalculateFormulas();
      //Optionally remove all formulas from the workbook, so only values remain. This is good in case you are using a custom formula that Excel will not be able to calculate.
      WB.RemoveFormulas();
      xla.Save("output.xlsx");
   }
}

class Formula : IFunction
{
   public FunctionValue Calculate(IList<FunctionValue> args, Cell cell)
   {
      //Returns the number of arguments
      return new FunctionValue(args.Count);
   }
}

Saving Your Report’s Data in CSV Format

If you have ever filed a support incident with SoftArtisans Technical Services concerning your OfficeWriter reports, you know that one of the most important steps in resolving an issue is having a Technical Services Engineer reproduce it. While there are many components to reproducing a customer issue, one of the most critical aspects is having sample data to run the affected report with. Unfortunately, this can be a special challenge because a Technical Services Engineer does not have access to your data sources. The inability to run the report can delay or even halt Technical Service’s ability to troubleshoot an issue. However, do not fret, as CSV files can save the day!

Steps to Save Your Report Data as a CSV File

  1. Download the attached template Collecting_Data_For_SA. The template will allow you to gather data for up to 10 datasources with up to 35 columns each.
  2. Run this template through your application:
    1. If you have a custom web application that uses ExcelTemplate: run this template through your application.
    2. If you have a custom web application that uses  ExcelApplication or Word Application: run this template through your application using ExcelTemplate with code that looks something like this:
      ExcelTemplate xlt= new ExcelTemplate();
      
      //Open the collecting_data_for_sa template
      xlt.Open("collecting_data_for_SA.xlsx"));
      
      //Bind each of your datasources to the template
      xlt.BindData([YOUR DATA SOURCE], "Something", xlt.CreateDataBindingProperties());
      xlt.BindData([YOUR DATA SOURCE2], "Something2", xlt.CreateDataBindingProperties());
      xlt.BindData([YOUR DATA SOURCE3], "Something3", xlt.CreateDataBindingProperties());
      
      xlt.Process();
      xlt.Save("data_collected.xlsx");
    3. If you are using SSRS integration:
      1. Create a copy of your affected RDL.
      2. Open the copy RDL in the OfficeWriter Designer or OfficeWriter Designer .NET for Microsoft Excel.
      3. Click “Import Template” in the Designer tab and overwrite your existing template with the collecting_data_for_sa file.
      4. The copy rdl should now contain the collecting_data_for_sa template.
      5. Upload the rdl to SSRS and run the report.
  3. Send the results to SoftArtisans Technical Services

Adding SSRS Formulas, Global Variables, and Parameters to Your Designer .NET Report

The original OfficeWriter Designer allowed users to add the equivalent to SSRS expressions in their Designer report by using a feature built-in to the Designer called the formula manager. However, in recent months, SoftArtisans has released a new, beautiful, more robust designer called the Designer .NET. The only complication is that the Designer. NET does not yet have a built in formula manager. Fortunately, you can still add many calculated values, parameters, and other report information to your report by using SSRS calculated fields in Visual Studio.

NOTE:  Currently Reporting Services does not allow Visual Studio calculated fields to contain user-defined variables, aggregate, RowNumber, RunningValue, Previous, or lookup functions when rendering the report.

Adding Expressions to Your DataSet

  1. Open your RDL in Visual Studio.
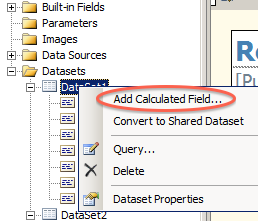
  2. Right click the dataset you want to add the expression to and click “Add Calculated Field…”
    Add a Calculated Field...
  3. A dialog should appear with two columns: Field Name and Field Source.
  4. Enter any name into Field Name
  5. Click the fx symbol to create a formula for the value of your field.
    Click the "fx" button
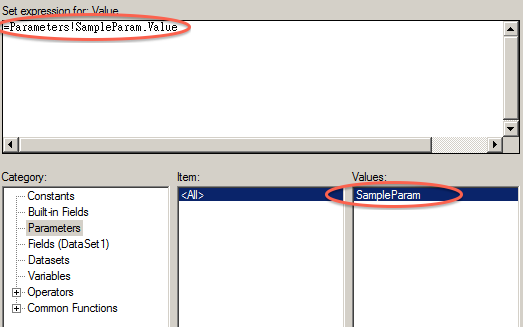
  6. In the new dialog, you decide what formula you want your field to express. Let’s say you want to display a parameter in your report. In this case, you would click “Parameters”, and then double-click the parameter you want to add. You should now see a formula at the top of the window.
    Add a parameter by double-clicking the one you want to add
  7. Hit “Ok” and exit out of the dialogs.
  8. Save your RDL and open it in the Designer .NET.
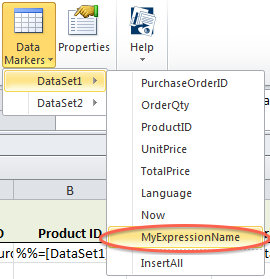
  9. While designing the report, add the data marker that corresponds to your expression into your report.
    ExpressionDataMarker
  10. When you’re finished designing the report, deploy it to SSRS from the OfficeWriter Designer .NET

How to Use Process Monitor (ProcMon) to Troubleshoot Web Applications

Process Monitor is a great tool that can help you troubleshoot applications when error messages alone just aren’t enough information to solve a problem. Process Monitor works by logging in-depth about the actions of particular processes. It will give you in-depth information about file access, registry access, threading, and permissions. In this how-to tutorial, we will show you how to collect information on the process that ASP and ASP.NET web applications run on – wpw3.exe.

Step 1:  Download Process Monitor

You can download Process Monitor here. http://technet.microsoft.com/en-us/sysinternals/bb896645.aspx

Step 2:  Open Your Web Application

Go to the page in your web application before your error occurs. You need to be easily able to trigger the event that causes the error while ProcMon is running to avoid collecting too much information.

Step 3:  Monitor the w3wp.exe Process

  1. Reset the filter by clicking Filter -> Reset Filter
  2. Add the w3wp.exe process to the filter by going to Filter -> Filter…
  3. A dialog box will appear.
  4. Create a rule that says “Process Name is w3wp.exe”
    Process is w3wp.exe Rule
  5. Click “Add”
  6. Click “Apply” and then “OK” to exit the Dialog

Step 4:  Collect Information from ProcMon

  1. Please make sure that the Capture icon (shaped like a magnifying class) is enabled. There should NOT be a red “X” through it.
    Capture Events
  2. Go to your web application and trigger the error.
  3. Once the error occurs, go back to ProcMon and click the Capture Icon to stop capturing events.

Step 5:  Examine the ProcMon Logs

  1. The first thing you should do when examining the logs is to see if anything in the “Result” column is not “SUCCESS”. Please take notes of any warnings or errors.
  2. Once you find the errors, determine if they are relevant to your issue.
  3. If you would like to save the logs, you can by going to File -> Save.

How to Avoid Extra Page at Document End When Using WordTemplate

When you want part of your WordTemplate document to repeat on every page, you must set a PageBreak on that page. However, if you set a default PageBreak, Word will automatically insert what is called a Page Break After. The Page Break After  will result in an extra page at the end of your document. In order to fix this, you will need to set a Page Break Before  at the beginning of the page you want to repeat.

Instructions on Setting a Page Break Before

  1. Click on the top left corner of the page where you want your page break to occur.
  2. In the “Home” tab, there should be a “Paragraph” section. Click the arrow on the bottom-right of the Paragraph Section.
    Screenshot 2014-06-20 11.30.19
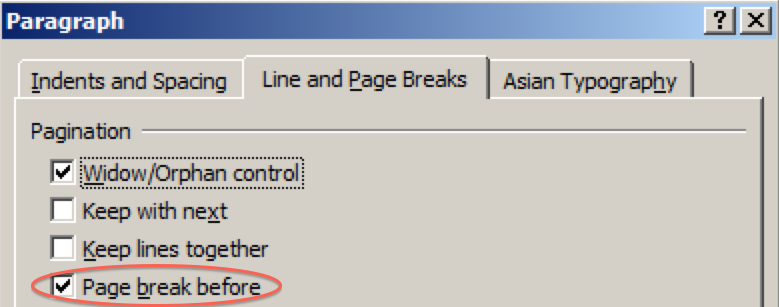
  3. Go to the “Line and Page Breaks” tab and check the “Page Break Before” option.
    Screenshot 2014-06-20 11.35.51
  4. Click “Ok”.

Word will have now inserted a PageBreak before at the spot where you cursor lay in the document. Your document should now generate the correct number of pages.

How to Send OfficeWriter Output in an E-mail

Sending OfficeWriter output in an e-mail is possible while either using OfficeWriter in .NET or with SSRS integration. When using the OfficeWriter .NET API, you can use the .NET MailMessage class to send your OfficeWriter output as an attachment in an e-mail. In SSRS, you can send the output as a subscription-based e-mail.

Sending OfficeWriter Output Using the .NET MailMessage Class

In order to send OfficeWriter in an e-mail output using .NET, you need to use the MailMessage object. If you save the workbook,  document, or presentation to a stream, you can create an attachment out of the file in the stream. This attachment can be added to the MailMessage object and sent to the workbook’s or document’s end users.

//Open Word Template
WordTemplate wt= new WordTemplate();

//Do some databinding and processing here
//YOUR CODE HERE

//Create a file stream that will save the output file on the server
FileStream myStream = new FileStream(@"C:\temp\outfile.xlsx", FileMode.Create);

//Save the output to the stream
wt.Save(myStream);

//Create an Attachment of the file in the stream
Attachment myAttachment= new Attachment(myStream, "output.xlsx");

//Create a mailmessage obj
MailMessage mailObj = new MailMessage("From Address", "To Address", "Subject", "Body");

//Add the attachment
mailObj.Attachments.Add(myAttachment);

//Connect to the server that will send the email
SmtpClient SMTPServer = new SmtpClient("thenameofyourhost");

//Set credentials
SMTPServer.UseDefaultCredentials = true;

//Try sending
try
{
    SMTPServer.Send(mailObj);
}
//Basic error handling
catch (Exception ex)
{
    Response.Write(ex.ToString());
}

Sending OfficeWriter Output Using a SSRS Subscription

If you are integrating OfficeWriter with SSRS, it also possible to send OfficeWriter output by using subscriptions. Be aware that the credentials to run the report must be stored inside of the report.

  1. After uploading your report to the SSRS server, open Report Manager
  2. Find your report and from the Drop Down, select “Manage”
  3. In the left-hand menu, select “Subscriptions” and then “New Subscription”
  4. Fill out the form, including:
    1. Who you want to send the report to
    2. When you want to send it
    3. What parameters the report should run with
    4. Be sure to select either “Excel designed by OfficeWriter” or “Word designed by OfficeWriter” as the rendering format.
      RenderFormat
  5. Click “Ok”
  6. Your new subscription should now appear in the Subscriptions list for your report and will run at the time you specified.

Using OfficeWriter .NET on a 64-bit machine

What version of OfficeWriter do I need for 64-bit support?

  • Full 64-bit support for OfficeWriter’s pure .NET classes was introduced in OfficeWriter 3.9.1 (ExcelWriter 6.9.1). The OfficeWriter .NET dlls are compiled with the /anycpu flag so they will work fine on either 32-bit or 64-bit systems.
  • OfficeWriter’s COM dlls are still 32-bit. If you have old ASP.NET applications that are still using the .NET wrapper classes for ExcelWriter COM, you will need to run those applications in a 32-bit application pool or change your code to use the pure .NET objects. See Using OfficeWriter COM.

What is the difference between the 32-bit and 64-bit installers?

  • There are no significant differences between OfficeWriter’s 32-bit and 64-bit installers. Both contain the same .NET dlls which are compatible with both 32-bit and 64-bit systems.
  • The 64-bit installer will create the OfficeWriter program folder in Progam Files rather than Program Files (x86)
  • You can run the 32-bit installer on a 64-bit OS. However if you are installing OfficeWriter in SSRS integration mode, the 32-bit installer may have trouble finding a 64-bit instance of SSRS.
  • There is no problem manually deploying files from a 32-bit installation to a 64-bit machine

OutOfMemory Exceptions with Large Excel Reports

At times customers have experienced OutOfMemory exceptions when generating very large Excel reports with OfficeWriter. Generating reports with millions of cells will necessarily use a significant amount of memory, especially when using the ExcelApplication object. Note that ExcelWriter is not just keeping a file in memory, it is populating an entire object model in order to be able to manipulate the file. For example, each cell has associated objects for the value, formula, formatting, and more. The ExcelTemplate object (which is also used behind the scenes in our Reporting Services integration) has a smaller object model, so it uses less memory than ExcelApplication. However, a very large report can still require a significant amount of memory with ExcelTemplate.

This article provides tips about how to avoid memory issues when generating large reports.

Try to use the latest version of OfficeWriter
Make sure your application is compiled as 64-bit when possible
Use the ExcelApplication API in the most efficient manner
Cache reports if possible
Queue reports if necessary

Try to use the latest version of OfficeWriter

Many performance improvements have been implemented in ExcelWriter over time. To take advantage of these optimizations, upgrade to the latest version when possible. See the OfficeWriter Change Log for details about changes in every release since OfficeWriter version 4.0 (ExcelWriter version 7.0).

Make sure your application is compiled as 64-bit if possible

A 32-bit application will have never have more than 2 GB of memory available to it, even you are running the application on a 64-bit OS with a huge amount of RAM. The pure .NET ExcelWriter objects (in the namespace SoftArtisans.OfficeWriter.ExcelWriter) are fully 64-bit compatible (see Using OfficeWriter .NET on a 64-bit machine). If you are using the pure .NET objects and running on a 64-bit machine, make sure your project is compiled as a 64-bit application. If you have an ASP.NET application that was written against a very old version of ExcelWriter, it may have dependencies on ExcelWriter COM which is 32-bit, in which case compiling for 64-bit will not be an option (see this KB article for more information)

Use the ExcelApplication API in the most efficient manner

There are a number of steps that will improve performance when working with large reports with the ExcelApplication API (For more details, see Best Practices with Large Reports) :

  • Populate data with ExcelTemplate, and use ExcelApplication beforehand for any necessary runtime file manipulations. ExcelTemplate is the most efficient way to import data but it cannot make fine-grained changes to the workbook. If you need to modify the workbook at runtime, modify the template programmatically before passing it to ExcelTemplate to avoid having to open a fully populated report with ExcelApplication. See Preprocessing vs. Postprocesssing.
  • Avoid referencing Empty Cells. Any time you touch an empty cell with ExcelApplication, a Cell object (and all its associated objects) is created even if it didn’t already exist. If you need to loop through cells to look for something, used Worksheet.PopulatedCells to get an Area containing only populated cells. Note that PopulatedCells will return cells that have only formatting and no data. For this reason is it important to apply formatting in the most efficient manner. More information about this below.
  • Apply Styles to Columns and Rows, not Cells. Setting styles on a cell-by-cell basis or applying a style to an area, causes a separate Style object to be created for every Cell. On the other hand, if you Set a Style on a column or row, using ColumnProperties.Style or RowProperties.Style, there will only be one formatting record for the entire column or row. Currently there is no option to set conditional formatting at the column or row level with the ExcelWriter API. A workaround is to set the conditional formatting on the columns or rows in your input file, and ExcelWriter will preserve it.

Cache reports if possible

If you have a report that requires a lot of memory and is requested by many concurrent users, investigate whether it might be possible to keep a cached copy of the report and serve it to multiple users. Does the data change constantly or only at certain intervals? Are there parameters that tend to be different for every user or do multiple users run the report with the same parameters? If you have multiple users requesting a report with the same data and the same parameters, this report could be a good candidate for caching. You could run the report at a certain time with a background process, or you could cache a copy the first time any user generates the report within a certain timeframe.

If you are using OfficeWriter in a custom .NET application, you would implement caching in your own code. If you are using OfficeWriter in SSRS-integration mode, you can use SSRS’s built-in caching functionality.

Queue reports if necessary

If you have a report being accessed by multiple users that requires a great deal of memory in a memory-constrained environment (i.e. your server is 32-bit or you have to compile your application as 32-bit for some reason), and caching isn’t an option (i.e. every time a user runs the report it is different), then queuing reports may be something to consider. Instead of delivering every report on-demand, you can restructure your application to store the users’ requests, process them sequentially in a background process, and notify the users by email or some other means when their reports are ready. This approach should not cause your users to have to wait much longer for a report than if it was being generated on-demand, but of course the user experience will be a little different. One option is to implement logic in your application to only queue very large reports but deliver smaller reports on-demand.

If you are using OfficeWriter in SSRS-integration mode, you can accomplish queuing by using SSRS subscriptions.