Category Archives: OfficeWriter

Why Do Some Blank Cells Return Different Values in OOXML?

Problem

Some blank cells in OOXML file formats return an empty string, while other blank cells return null.  The same file in BIFF format returns only null values.

This problem occurs because OOXML (.xlsx /.xlsm) preserves any empty strings in cells when the file is saved.  When saving a file in BIFF (.xls) any cells containing an empty string will be set to a null value.

This can be a concern for users switching to the OOXML file formats. Code that checks worksheets for null values may need to be amended to account for the change in behavior.

Example 


The following code illustrates how this discrepancy might affect users:

           ExcelApplication xlapp = new ExcelApplication();
		   Workbook wb = xlapp.Open("SampleFile.xlsx")  
		   Worksheet ws = wb[0];

		   //Trim a range of cells. 
		   //Because A1 is empty, its value will be 'empty string' after trimming.
		   for(int i = 0; i<= 20; i++)
           {
		   	  for(int j = 0; j<= 20; i++)
              {
                  string value = (string)ws.Cells[i, j].Value;
				  ws.Cells[i, j].Value = value.Trim();
              }
           }

 		   //Save and reopen the file in the OOXML format
           xlapp.Save(wb, Directory + "SampleFile.xlsx");
           wb = xlapp.Open(Directory + "SampleFile.xlsx");
           ws = wb.[0];
           if (ws.Cells[0, 0].Value == null)
            {
               // This code would be reached in .xls
			   // but not in .xlsx  
            }

Users who currently check for cells containing null values may find that their code produces unexpected results when switching to OOXML files.


Solution

In order to ensure that code will return correct results when dealing with blank cells, it is important to use logic that handles all possible values.  There are 2 ways that we suggest implementing this logic.

Solution 1 – Use IsNullOrEmpty when checking for blank cells

Use logic that checks whether a cell is either null or an empty string.

Example:

            if(string.IsNullOrEmpty((string)ws.Cells[0, 0].Value))
            {
               //With this new logic, it could be either file format
                ws.Cells[1, 1].Value = "This is a .xls or an .xlsx file";   
            }

Solution 2 – Keep empty string values from being assigned to cells

Check if a cell is null before performing any operations that would assign an empty string value to a null cell.

Example:

           //Check that the cell is not empty before trimming
           if( ws.Cells[0,0].Value != null)
           {
                  string value = (string)ws.Cells[0, 0].Value;
				  ws.Cells[0, 0].Value = value.Trim();
           }
Related Information:

If your worksheet contains formulas, best practice would be to check the cell for formulas as well. More information on how to check for empty cells can be found here.


Introduction to VSTO Document-Level Customizations

For many years, the only way to add interactivity to an Office workbook or document was to use VBA Macros. However, in more recent years, Microsoft has offered a newer .NET developer tool called Visual Studio Tools for Office (VSTO). To customize a particular document or workbook using VSTO, you can use a project type called “document-level customization.” While the end-user functionality of these solutions overlap, they have very different development processes and practical implementations. In this article, we will discuss how to use VSTO document-level customizations and how they differ from their predecessor.

VSTO in a Nutshell

VSTO offers a developer two different project types: document-level customizations and application-level add-ins. Document-level customizations are projects based around a single workbook or document. Application-level add-ins, on the other hand, are add-ins affecting the UIs of Microsoft Word, Microsoft Excel, Microsoft PowerPoint, Microsoft Outlook, or Microsoft InfoPath applications themselves. In this article, we will talk about document-level customizations.

By leveraging the .NET framework, VSTO can turn a document into a full-fledged application that must be installed onto an end user’s computer. While using .NET offers a programmer nearly limitless possibilities and integration with many other services and libraries, it also means that it requires Visual Studio and strong coding skills to develop the customizations. Updates to a customization will be issued from a  server or disk where the customization is deployed. However, the updates are not without limitations. VSTO updates the code attached to a document, but it does not update the visual formatting done to workbook via Visual Studio’s Designer or Excel. All visual formatting must be done in code to be included in automatic updates. A second limitation is that a user will not be able to have more than one version of the customization on their machine at one time.

VSTO Advantages VSTO Disadvantages
  • Offers full .NET framework integration
  •  A lot of developer and client requirements
  • More robust projects
  •  Because it requires VS Premium or Ultimate, it may be more expensive to develop
  • Offers new project type: Task Pane
  •  Cannot have multiple versions of a project installed on a client machine
  •  All distributed applications will be updated to be the most recent version of the application
  • Must have strong coding skills to use
  •  Uses Visual Studio to develop code
  •  VSTO will update the code attached  to a document, but it will not update designer or template formatting
  •  Can use VBA macros inside of documents containing VSTO document-level customizations
  •  VSTO code is not located within the document, but is installed separately

Compared with VBA

VBA has been around since 1993 and is the simplest way to add interactivity to an Office document. The basic advantages and disadvantages of using VBA are outlined below: Continue reading Introduction to VSTO Document-Level Customizations

Released in OfficeWriter 8.6.1 – IEnumerable Feature

In OfficeWriter 8.6.1, we added a new feature that may have been flying under your radar, and I wanted to let you in on the story of how it came about.

When I first arrived at SoftArtisans I went through training of our entire product line.  As I was reviewing the training material, I came across the ExcelWriter Template section. I saw how to add data markers to my spreadsheet, and it seemed intuitive, so I went ahead and tried it:

ienumerable

At that moment, I was thinking “This is pretty slick. Now, I can just pass things into the spreadsheet!”  I’m not the greatest at reading documentation; I just like to learn by doing, so I opened Visual Studio and started writing code:


class Expense

{

double Amount { get; set; }

string Description = "";

bool Approved { get { return (Amount > 1000); } }

}

&nbsp;

for (int i=0; i<1000; i++)

expenses.Add(new Expense(i));


Looking good so far.  What I did next, however, was my downfall:


ExcelTemplate xlt = new ExcelTemplate();

xlt.BindData(expenses);

Creating Holiday Cards and Other Unexpected OfficeWriter Projects

Last week, our VP of Development Sam and Senior Sales Engineer Chad were challenged to look at different ways to use OfficeWriter. The result? They put together a project designed to keep you in touch with your friends and family this holiday season. They looked at using OfficeWriter’s mail merge feature in a new way. Plus, they took that one step further, looking at how the technologies from this project can be applied to business applications within your company. Before heading home for the holidays, take a little inspiration from this behind-the-scenes video of unexpected ways to use OfficeWriter in building your reports and company documents.

Read the original post, get the code, and take a behind-the-scenes tour of the technologies it runs on.

Embedly Powered

via Vimeo

Want to get straight to the point? Skip to the end of the video to discover how this project could be applied to your business.

How to Use Worksheet Protection Properties In ExcelWriter

How to Use Worksheet Protection Properties In ExcelWriter

In ExcelWriter 8.6.1, the ability to set specific worksheet protection properties was added with the new Sheet Protection Object. Worksheet Protection Properties allow the user to add permissions to do certain actions on protected worksheets.

The Excel Protection Properties

Excel Worksheet Protection Property ExcelWriter SheetProtection Object Property
Select Locked cells SheetProtection.AllowSelectLockedCells
Select Unlocked Cells SheetProtection.AllowSelectUnlockedCells
Format Cells SheetProtection.AllowFormatCells
Format columns SheetProtection.AllowFormatColumns
Format Rows SheetProtection.AllowFormatRows
Insert Columns SheetProtection.AllowInsertColumns
Insert Rows SheetProtection.AllowInsertRows
Insert Hyperlinks SheetProtection.AllowInsertHyperlinks
Delete Columns SheetProtection.AllowDeleteColumns
Delete Rows SheetProtection.AllowDeleteRows
Sort SheetProtection.AllowSort
Use Autofilter SheetProtection.AllowUseAutoFilter
Use PivotTable reports SheetProtection.AllowUsePivotTableReports
Edit Objects Not Supported by ExcelWriter
Edit Scenarios Not Supported by ExcelWriter

Protection Properties Limitations

Microsoft Excel has a limitation on four of the protection properties: AllowSort, AllowDeleteColumns, AllowDeleteRows, and AllowInsertHyperlinks. These properties require that affected cells be editable when the worksheet is locked. This is because these properties entirely remove cells or alter the content of cells that are protected. Therefore, in order to use the properties you must unlock cells, put cells in an editable range, or use a macro.

Using the Protection Properties in Excel Writer

Steps to Use Protection Properties in ExcelWriter: 

  1. Create a new sheet protection object
  2. Set the worksheet protection properties as desired. By default, Select Locked cells and Select Unlocked Cells are set to true
  3. Call Protect() on the worksheet Continue reading How to Use Worksheet Protection Properties In ExcelWriter

Create your Holiday Cards with OfficeWriter, The Sequel

seasonsgreetingsThe holiday season is back! Stores are stocking their shelves with the season’s must-haves and calendars are quickly filling up with travel and office parties. With all the hustle, bustle and festivities, occasionally remember to send out those holiday cards and thank-you notes gets lost in the tinsel and taffeta. Well, you’re in luck, because this year we’ve put together a project for you to easily send out holiday thank-you notes and cards the nostalgic, old-fashioned way.

Last year, Sam showed us how to Automate Your Holiday Cards with OfficeWriter, and this year we’ve added thank-you notes to the mix. So you can spend less time on holiday prep and more time on the things that matter most – friends and family.

Using a few built-in tools with the .NET Framework, OfficeWriter, and templates, you can personalize every card for each one of your friends and family. See the example below. Then make your own by following these steps:

STEP 1 – DOWNLOAD OFFICEWRITER:

To get started, you will need to have OfficeWriter installed in order to be able to use the sample code below. In my solution, I used OfficeWriter and its built-in WordTemplate functionality to do a server-side mail merge. If you do not have OfficeWriter, you can download a free evaluation here.

STEP 2 – DOWNLOAD SAMPLE CODE:

Next, you will need the sample code. Download the sample solution here. This solution comes bundled with:

  • Sample code
  • Easily modifiable templates for holiday cards, mailing labels, and thank-you letters.
  • Dummy data from a Gmail Contact Export

Open the solution, run the generator, and you can see the three items:

SAMPLE OUTPUT:

SAMPLE CODE:

OfficeWriter makes it easy to generate the finished holiday cards, labels, and thank-you cards. With about 5 lines of OfficeWriter code for each template, within minutes you can go from nothing to a finished, picture-perfect file. The sample code below is a simple way to parameterize the code to handle all of our template files. Continue reading Create your Holiday Cards with OfficeWriter, The Sequel

Thinking Outside the Spreadsheet Box: Unexpected Uses of OfficeWriter

If you leave me alone for too long, I do foolish things like make a mini-paint app that writes the image to 1×1 cells in Excel. And so can you! But before I show you how to make a mini-paint app (the easiest thing you will ever do in your life), let me explain to you what part of me said, “Yeah, Champ, this is a great idea! Who wouldn’t want to make a weird spreadsheet that contains an image made with the background color on cells?” It all began when I was thinking about this awesome idea by my art crush, Evan Roth (*swoon*). He said, “Hey world! I want work to be art,” and decided to make a double-mouse that outputs to an art program on one screen and his regular work on the other. So I figured, why not put some art in Excel too?

Then I got more and more excited as I realized there are actually a ton of cool things you can do…

  • Use the formulas in Excel as transformations on your picture.
  • Randomize cell size to introduce weirdness.
  • Flip the project to input an Excel template and output an image, using Excel calculations and System.Draw to make a simple ray tracer.
  • Do some stuff with conditional formats, or all those light transform equations you learned in high school for no reason…until now!
  • Make a mock tool that lets users draw a spreadsheet design and output it to a real spreadsheet! (I thought a lot about this, and it’s not necessarily simple, but it is a really cool idea. If anyone puts that together, please let me know. I mean you, Evan Roth….Call me?)

The Mini-Paint

For the sake of simplicity, I’m showing you the randomized cell idea. I’ve made it an optional setting in this example, but, you know, make it your own and all. Oh, also, get at me with your art! For this app you’ll need WinForms and OfficeWriter.

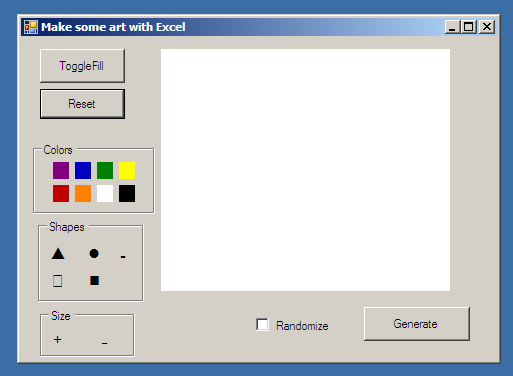
appwindow

I started by making a pretty basic app that has some simple actions. The “canvas” is a PictureBox that I save and resave some drawing objects to on each mouse event. The color selector is just 8 flat buttons set to be the color they represent. The shapes are again flat buttons with Wingdings images because I was too lazy to find a relevant .res file with some neat picture icons. Can you guess what the size toggles are? Flat buttons. Generic plus/minus from your plain boring keyboard. Okay. Basic functions.

  • MouseDown sets a pointer location.
  • MouseUp nullifies the pointer location.
  • MouseMoved is a basic drawing function. (You can find a ton of examples, but I like this one from good ol’ SO.)
  • Color buttons set a global variable, _selectedColor, to the color of the button.
  • Shape button clicks set a global variable called _selectedShape. I set it to an enum of possible shape options and I use a switch statement in the draw method. Instead of calling DrawLine or DrawRectangle, I call DrawShape(x,y) with x and y being current mouse x and y.

DrawShape is roughly this: Continue reading Thinking Outside the Spreadsheet Box: Unexpected Uses of OfficeWriter

Webinar: Ghouls, Goblins, and Data

Register for the October Webinar!

Learn how OfficeWriter can put data in the hands of your business users.

When: Friday, October 18th at 1 P.M.

In this webinar:

We’re looking at what the average American spends on Halloween each year from costumes to candy to decorations. Importing this data into Excel using OfficeWriter, we’ll see which costumes outrank the rest. Is it Miley Cyrus, your favorite decade garb, or the ever-popular witches and ghosts? We’ll find out, along with what Americans spend on these once-a-year ensembles, mounds of candy, and gobs of decorations. You’ll take away new tricks for creating reports in Excel and maybe a DIY Halloween costume idea or two.

What we’ll cover:

  • Building a report in SSRS from start to finish
  • Using charts and sparklines to display your data
  • Plotting multiple data sets on one graph
  • OfficeWriter’s new .NET designer ribbon for Excel


How to Sort Locked Cells in Protected Worksheets

Problem

When creating workbooks with protected sheets, it is common to want to allow users to get different views of the data by sorting and filtering,  without allowing them to change the data. However, while filtering works fine on locked cells, sorting does not. Even if Sort is enabled in the worksheet protection settings, if a user attempts to sort locked cells when a worksheet is protected, Excel throws the error “the cell or chart you are trying to change is protected and therefore read-only.” There is no obvious way to allow users to sort data on a protected worksheet.

Details

Locked VS. Unlocked Cells in Excel

The purpose of locking a cell is to prevent a user from editing the content of a cell when a worksheet is protected. This means when worksheet protection is turned off, a locked cell is no different from an unlocked cell. By default, all cells in an Excel worksheet are locked.

In order to unlock cells in Excel:

  1. Unprotect the sheet you are working on
  2. Right-click the cell, select “Format Cells”
  3. Select the “Protections” tab
  4. Uncheck the “Locked” checkbox property
  5. Click “OK”

Lock Cells Dialog

Lock Cells Dialog Box

It is also possible to unlock specific ranges of cells in Excel using the Allow Users to Edit Ranges feature in the Review tab. Making ranges editable for ranges of cells makes the cells behave like unlocked cells for the most part (e.g. their content is editable). However, the cell’s official locked/unlocked status does not actually change. See this Microsoft Excel article  for more details about how to unlock ranges of cells.


About Worksheet Protection Properties

When you protect a sheet, Excel allows you to select from 15 different permissions you want to give to all viewers of the worksheet. You can allow users of the worksheet to:

  • Select Locked Cells
  • Select Unlocked Cells
  • Format Cells
  • Format Columns
  • Format Rows
  • Insert Columns
  • Insert Rows
  • Insert Hyperlinks
  • Delete Columns
  • Delete Rows
  • Sort
  • Use Autofilter
  • Use PivotTable Reports
  • Edit Objects
  • Edit Scenarios

Protect Sheet Dialog

properties

How Protection Properties are Affected By Locked Cells

When a cell is locked, not all worksheet protection properties operate as you’d expect. Four of the properties do not work when a cell is locked:

  • AllowSort
  • AllowDeleteColumns
  • AllowDeleteRows
  • AllowInsertHyperlinks

This is because in order to use these features the affected cell’s content must be changed. For example, using “Sort” does not just change the order of how the cells are viewed, it actually changes the values of the cells so that they are sorted. Due to this implementation of “Sort,” this worksheet protection property does not work when the cells are locked.

Solution

There are two approaches we can take to solve this issue:

Solution 1: Using “Allow Users to Edit Ranges” to Allow Locked Cell Sorting (RECOMMENDED)

This solution takes advantage of how allowing users to edit ranges makes locked cells behave like unlocked cells.

Step 1: Make cells editable so that sorting will work.

Add cells we want to sort to a range and make that range editable in “Allow Users to Edit Ranges.” This allows users to edit these cells when the worksheet is protected, even if they are locked cells.

  1. Select all the cells you would like the user to be able to sort, including their column headings.
  2. Go to the Data tab and click Filter. An arrow should appear next to each column header.
  3. Go to Review tab-> Allow Users to Edit Ranges
    1. Click “New…”
    2. Give the range a title.
    3. “Refers to Cells” should already contain the cells you want to allowing sorting on.
    4. If you want to allow only certain people to sort, give the range a password.
    5. Click “OK”

Step 2: Prevent users from editing these cells

When protecting the worksheet, uncheck “Select Locked Cells” worksheet protection property. This will prevent users from editing the cells.

  1. In the “Allow Users to Edit Ranges” dialog:
    1. Click “Protect Sheet…”
    2. Give the worksheet a password
    3. Uncheck the worksheet protection property called “Select Locked Cells”
    4. Check the “Sort” property and the “AutoFilter” properties
    5. Click “OK”

This solution allows users to use the Auto Filter arrows in the column names or the Sort buttons in the Data tab to sort data. Another benefit is that you have the option of allowing only certain users to sort by giving the range a password. Please note that this range password is separate from the password you set to protect the sheet.

Solution 2: Using Macros to Allow Locked Cell Sorting

To use a Macro to allowed the sorting of locked cells, you will need to make a macro for every sort operation you would like to allow. For example, ascending sorts and descending sorts would have to be written in separate macros. In addition, not all users have macros enabled because they are a security risk. However, the advantage of macros is that you don’t need to configure your template in any special way.

The macro we will write unprotects the sheet, selects a range called “range1,” sorts range1, and protects the sheet again:

Sub Macro1() 
' 
' Macro1 Macro 
' 
' Keyboard Shortcut: Ctrl+d 
'    
     //unprotect sheet 
     ActiveSheet.Unprotect
     //selects range     
     Application.Goto Reference:="range1"     
     //clears sort
     ActiveWorkbook.Worksheets("Sheet1").Sort.SortFields.Clear     
     //does descending sort, sets sort properties 
     ActiveWorkbook.Worksheets("Sheet1").Sort.SortFields.Add Key:=Range("A1"), _
         SortOn:=xlSortOnValues, Order:=xlDescending, DataOption:=xlSortNormal
With ActiveWorkbook.Worksheets("Sheet1").Sort
         .SetRange Range("A1:A4")
         .Header = xlNo
         .MatchCase = False
         .Orientation = xlTopToBottom
         .SortMethod = xlPinYin
         .Apply
     End With
     //protects the work sheet again
     ActiveSheet.Protect DrawingObjects:=False, Contents:=True, Scenarios:= _
         False
 End Sub

What’s New in OfficeWriter 8.6

64-bit Support in OfficeWriter Designer

OfficeWriter 8.6 marks the initial release of the OfficeWriter Designer .NET, a redesign of the original OfficeWriter Designer, using the latest technologies and best practices.

DesignerdotNetRibbon

The OfficeWriter Designer .NET is available for both 64-bit and 32-bit Excel and includes:

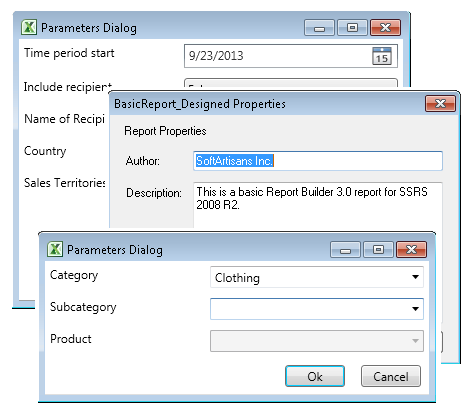
  • Better user experience with updated dialog boxes
  • Improved access to Report Properties
  • Stronger support for viewing reports with parameters
  • New import template functionality (also available in the original OfficeWriter Designer)

DesignerDotNetNewDialogs

The Designer .NET does not currently have full backwards compatibility with the original OfficeWriter designer. To find out if the Designer .NET will support your reports, review our quick guide or read about all of the differences in full in our documentation.

The OfficeWriter Designer .NET is available for download from our product updates page or through our evaluation sign-up.

Classic Pivot Tables

Starting in OfficeWriter 8.6, you can create PivotTables with the classic grid layout using the PivotTableSettings.ClassLayout property. This is the same as setting the classic layout property under PivotTable options. Continue reading What’s New in OfficeWriter 8.6