Tag Archives: excelwriter

Save PDF file to HttpResponse

In a previous blog post we discussed how OfficeWriter 10.0 introduced the ability to save an Excel workbook to a PDF document. When working in a web environment it is common to want to send the generated file to the browser for your end user to download and view on their own machine.

Step 1:
Generate your workbook. A very simple example might be:

var xla = new ExcelApplication();
var wb = xla.Create(ExcelApplication.FileFormat.Xlsx);
var ws = wb[0];
ws.Cells[0, 0].Value = "Hello";
ws.Cells[0, 1].Value = "World!";

Step 2:
Define a helper method to write the file byte to the current response stream:

public static void WriteFileToResponse
(HttpContext context, byte[] bytes, string fileName)
{

var bytesLength = bytes.Length.ToString(CultureInfo.InvariantCulture);
var response = context.Response;
response.Clear();
response.Buffer = true;
response.AddHeader("Content-Length", bytesLength);
response.AddHeader("Content-Disposition", "attachment; filename=" + fileName);
response.ContentType = MimeMapping.GetMimeMapping(fileName);
response.BinaryWrite(bytes);
response.Flush();
response.End();
}

Step 3:
Save the PDF to a memory stream and call our helper method we just defined. This has the benefit of avoiding disk IO. This may vary if your application actually needs to persist the generated PDF.

using (var memoryStream = new MemoryStream())
{
var fileName = "generatedfile.pdf";
wb.SavePdf(false, memoryStream);
memoryStream.Seek(0, SeekOrigin.Begin);
WriteFileToResponse(HttpContext.Current, memoryStream.ToArray(), fileName);
}

And that’s it!

How to Calculate Unsupported or Custom Formulas on the Server with ExcelWriter

Beginning in OfficeWriter 9.1, ExcelApplication’s calculation engine will offer the ability to implement custom formulas. This feature should prove helpful to users whom would like to calculate their own custom formulas or calculate formulas not currently supported by ExcelWriter on the server using ExcelWriter. This tutorial will show you how to implement these formulas.

Creating Your Own Formula

  1. Create a class that implements an interface provided by ExcelWriter called IFunction. The IFunction interface implements a method called Calculate.
  2. Inside of your class, create the Calculate method with this signature:
    FunctionValue Calculate(IList<FunctionValue> args, Cell currentCell)
  3. Inside of the Calculate Function, code the logic of the formula you would like to implement.
    1. The first argument of Calculate is a list of FunctionValue objects. FunctionValue objects are how we pass values in and out of formulas. FunctionValues have several properties available to them, so please see the documentation for more information about how you can use the properties in your formula logic.
    2. The second argument of Calculate is the cell that contains the formula. Please see the documentation for more information about Cell objects and their available properties and methods.

Registering the Formula with ExcelWriter

  1. Once the formula is written, register the function using Workbook.RegisterCustomFunction.
    WB.RegisterCustomFunction("MyFormula", new MyClass());

Calculating the Formula and Removing it From a Workbook

Once your formula is registered, you can use WB.CalculateFormulas to have ExcelWriter calculate the value of any cells that use the formula in your Workbook. If you are generating Excel output using ExcelApplication.Save, please note that if you have implemented a custom formula that it is not recognized by Microsoft Excel, the end user will not see the calculated values in the output workbook when opened in Excel. To get around this issue, you can use Workbook.RemoveFormulas or Worksheet.RemoveFormulas to remove the formulas from the worksheet or workbook, while leaving the last calculated values in the cells.

Here is an example of what your finished code should look like:

public class sample
{
   MyMainMethod()
   {
      ExcelApplication xla = new    ExcelApplication(ExcelApplication.FileFormat.Xlsx);
      Workbook WB = xla.Create(ExcelApplication.FileFormat.Xlsx);
      WB[0]["A1"].Formula = "=COUNTARGUMENTS(4, 5, 6)";
      WB.RegisterCustomFunction("COUNTARGUMENTS", new Formula());
      WB.CalculateFormulas();
      //Optionally remove all formulas from the workbook, so only values remain. This is good in case you are using a custom formula that Excel will not be able to calculate.
      WB.RemoveFormulas();
      xla.Save("output.xlsx");
   }
}

class Formula : IFunction
{
   public FunctionValue Calculate(IList<FunctionValue> args, Cell cell)
   {
      //Returns the number of arguments
      return new FunctionValue(args.Count);
   }
}

Using OfficeWriter COM

The COM version of OfficeWriter has been deprecated.   However, some customers have existing applications that use the ExcelWriter and WordWriter COM dlls. The officially supported versions of OfficeWriter (v8.x and v9.x) no longer include the COM dlls.   The latest versions of the COM dlls are ExcelWriter 7.6.1 and WordWriter 4.6.1.   The last automated installer which contained the COM dlls was OfficeWriter version 4.5.1.

One of the most important things to know is that OfficeWriter’s COM dlls are 32-bit. If you are migrating an existing application to a 64-bit server, any application using OfficeWriter COM will need to be assigned to a 32-bit application pool.

This article provides more information about the points mentioned above, as well as anything else you may need to know about using OfficeWriter COM.

How do I know if my application is using OfficeWriter COM?
What functionality is included in the COM version of OfficeWriter?
Getting the Documentation
Getting the COM dlls
Installing ExcelWriter COM
Installing WordWriter COM

How do I know if my application is using OfficeWriter COM?

If your application is classic ASP, it is obviously using the COM dlls.

But there is another possible scenario. If you have an ASP.NET application using a very old version of ExcelWriter, your application may have a dependency on the ExcelWriter COM dll.  This is because before the pure .NET version of ExcelWriter was released, we provided a .NET wrapper for the COM version.  Note: If you are using OfficeWriter in .NET, we highly recommend migrating your code to use the pure .NET objects which are fully supported, more up-to-date, and fully 64-bit compatible.

Note: ASP.NET applications using only WordWriter will never have a dependency on COM. This is because WordWriter, a newer product than ExcelWriter, has always been a pure .NET product. (A COM-callable wrapper was provided for use with classic ASP)

To determine whether your .NET application has ExcelWriter COM dependencies:

  1. First check if your code is using the SoftArtisans.ExcelWriter namespace.  This namespace contains all the interop classes provided by our .NET wrapper (The pure .NET objects, on the other hand, are all in the namespace SoftArtisans.OfficeWriter.ExcelWriter)
  2. If your application uses both the ExcelTemplate and ExcelApplication object and it was written using certain versions of ExcelWriter, you may find that your code references both namespaces mentioned above.  This is because the pure .NET ExcelTemplate object was released before the pure.NET ExcelApplication object.  ExcelTemplate .NET was released in ExcelWriter v5 (OfficeWriter v2) and ExcelApplication .NET was released in ExcelWriter v6 (OfficeWriter v3)
  3. If you see a reference to “SAEXCELLib” rather than SoftArtisans.ExcelWriter,  your developers probably imported the ExcelWriter COM dll into a .NET project rather than using our custom .NET wrapper.   The .NET framework will create a default wrapper if a COM dll is imported into a .NET project in Visual Studio.

What functionality is included in the COM version of OfficeWriter?

ExcelWriter COM Functionality and Limitations
ExcelWriter was already a mature COM product before the .NET version was introduced.   The ExcelWriter COM dll has no dependency on the .NET dll, and it includes full ExcelTemplate and ExcelApplication functionality.  However, in recent years, as most customers migrated to the .NET, many new features were added only to the .NET version.   Therefore the COM version of ExcelWriter has some significant limitations, including:

  1. No support for OOXML file formats (.xlsx, .xlsm)
  2. No automatic grouping and nesting functionality (released in ExcelWriter .NET v7.1.0)
  3. Does not support all new Excel formulas introduced in Excel 2007 and above
  4. No server-side calculation engine (released in v9)

Wordwriter COM Functionality and Limitations
WordWriter is a pure .NET product with a COM-callable wrapper (CCW) provided for use with classic ASP.  The CCW includes only the WordTemplate object. If you are using WordWriter in classic ASP, all the template-based functionality is available.  However, since 4.6.1 was the last release, the COM version does not include any fixes or enhancements added to later versions.  See the OfficeWriter change log to determine which new features and fixes were introduced after 4.6.1 and therefore are not included in WordWriter COM.

Getting the COM dlls

OfficeWriter version 4.5.1 was the last public release that included COM dlls in the installation package.   It includes ExcelWriter 7.5.1 COM and WordWriter 4.5.1 COM.  The latest versions of the COM dlls, ExcelWriter 7.6.1 and WordWriter 4.6.1, are available by request for customers with an active support contract.  This request may be made using regular support channels.

Note:  If you are planning to do a manual installation, you will also need a copy of LicenseManager.exe v4 or above in order to enter your OfficeWriter v4 (or ExcelWriter v7) license key.  LicenseManager.exe is included in the automated installer package, or you can request a copy from Support together with your request for the COM dlls.

Getting the Documentation

The latest documentation for using ExcelWriter and WordWriter in classic ASP is included in the OfficeWriter v4 documentation, which can be downloaded here: http://support.softartisans.com/download/OfficeWriter4Documentation.zip

  • ExcelWriter ASP documentation is in the file “EW-COM-7.pdf”
  • Instructions for using WordWriter in classic ASP are included in the main WordWriter v4 documentation – “WW-4.pdf”

If you are using ExcelWriter COM through the interop in an ASP.NET application, there is no up-to-date documentation available for this configuration.   However, there are some resources in older versions of the documentation that may be helpful.

Installing ExcelWriter COM

Installation instructions can also be found in the ExcelWriter v4 documentation.

  1. Install an ExcelWriter v7 (or OfficeWriter v4) license key
    The License Key can be entered using the full OfficeWriter installer or the LicenseManager.exe utility (version 4 or above)
    • LicenseManager.exe can be found in the program folder of an OfficeWriter installation on a different box
    • or you can request a copy of LicenseManager from SoftArtisans support.
  2. Register the COM dll – “SAXW7COM.dll”
    In versions 4.5.1 and below, the OfficeWriter installer will register the COM dll automatically, but it won’t be the newest version of the dll.  If you have an installer for  v4.5.1 or below, one option is to run the installer and then copy over the newer dll and register it.  That way you will have the full program folder in addition to the dlls.

    If you are doing a manual installation, or if you are updating a previous installation with the newer version of the dll:

    1. navigate to the directory containing the dll and enter:
      regsvr32 SAXW7COM.dll

      Note: On a 64-bit OS, make sure to use the 32-bit version of regsvr32, usually located in C:\Windows\SysWOW64. So you would enter:

      C:\Windows\SysWOW64\regsvr32 SAXW7COM.dll
    2.  Reset IIS by entering:
      iisreset
  3. Make sure your application is running in a 32-bit process
  4. Since ExcelWriter COM is 32-bit dll, if your server is 64-bit you must assign your virtual application to an application pool running in 32-bit mode:

    1. Open the IIS management console
    2. Create a new app pool or select an existing one
    3. Click on “Advanced Settings”
    4. Set “Enable 32-Bit Applications” to True
    5. Click “OK”

    Installing WordWriter COM

    Instructions for installing WordWriter for ASP can also be found in the WordWriter v4 documentation.

    These are the main steps for installing WordWriter COM:

    1. Check the system requirements
      • The COM-callable wrapper (CCW), WordTemplateCCW.dll, is a COM object that makes internal calls to the WordWriter .NET assembly.  Therefore, to use WordWriter in ASP, all of the system requirements for running WordWriter in ASP.NET must also be satisfied.
      • Version 4.x of the CCW also has a requirement for the Microsoft Visual C++ 2005 SP1 Redistributable. If this is a 64-bit OS, make sure to get the 32-bit version of the C++ 2005 SP1 Redistributable. Download Visual C++ 2005 SP1 Redistributable for x86 systems
    2. Install a v4 license key
      The license key can be installed using the automatic installer or (if you are doing a manual installation) the LicenseManager.exe utility (version 4 or above)
      1. LicenseManager.exe can be found in the program folder of an OfficeWriter installation on a different box
      2. or you can request a copy of LicenseManager from SoftArtisans support.
    3. Put the WordWriter .NET assembly “SoftArtisans.OfficeWriter.WordWriter.dll “ in the GAC.
      SoftArtisans.OfficeWriter.WordWriter.dll is a .NET assembly.  The CCW allows you to use the .NET WordTemplate object from ASP. The assembly must be installed in the Global Assembly Cache (GAC) to allow the CCW to work.

      In versions 4.5.1 or below, the OfficeWriter installer will automatically put the WordWriter.NET assembly in the GAC, however it won’t be the latest version of the dll. Here is how to manually add the .NET assembly to the GAC:

      1. On versions of Windows prior to Windows 2008 or Windows 7, copy the file “SoftArtisans.OfficeWriter.WordWriter.dll” to C:\WINDOWS\Assembly.
      2. On Windows 7 or Windows 2008 and above, use gacutil.exe. Unless you have Visual Studio installed on the machine (which most servers do not), you may need to download the Windows SDK to get a copy of gacutil.exe.
        Open a command prompt and navigate to the directory with the .NET dll and enter:
        gacutil /i SoftArtisans.OfficeWriter.WordWriter.dll
      3. Register the COM dll “WordTemplateCCW.dll” with regsvr32
        In versions 4.5.1 and below, the OfficeWriter installer will register the COM dll automatically, but it won’t be the newest version of the dll. If you have an installer for v4.5.1 or below, one option is to run the installer and then copy over the newer dll and register it. That way you will have the full program folder in addition to the dlls.

        If you are doing a manual installation, or if you are updating a previous installation with the newer version of the dll:

        1. navigate to the directory containing the dll and enter:
          regsvr32 SAXW7COM.dll

          Note: On a 64-bit OS, make sure to use the 32-bit version of regsvr32, usually located in C:\Windows\SysWOW64. So you would enter:

          C:\Windows\SysWOW64\regsvr32 WordTemplateCCW.dll
        2. Reset IIS by entering:
          iisreset
      4. Make sure your application is running in a 32-bit process
        The WordWriter .NET assembly is compiled with /anycpu and can run natively on 64-bit operating systems. However the CCW dll is 32-bit and must run in a 32-bit process.If your server is 64-bit, assign your virtual application to an application pool that is set to run in 32-bit compatability mode.
        • Open the IIS management console
        • Create a new app pool or select an existing one
        • Click on “Advanced Settings”
        • Set “Enable 32-Bit Applications” to True
        • Click “OK”

What’s New in OfficeWriter 9

OfficeWriter version 9 is now available! Here is a breakdown of what you can find in the latest version of OfficeWriter.

Calculation Engine

OfficeWriter version 9 kicks off with the initial release of the calculation engine for ExcelWriter. Now you can evaluate the formulas in your XLSX and XLSM files before delivering spreadsheets. Applications that can’t evaluate formulas, such as mobile apps, Outlook preview, or Excel in protected view, will show the updated values when workbooks are opened. You can also use the calculation engine to update formulas before reading them with ExcelApplication.

Currently, the calculation engine supports evaluating all of the formulas in a given workbook through the method Workbook.CalculateFormulas. This will update all the cell values based on the formulas. Check out our list of the formulas that the calculation engine supports.  If there’s a formula you need that we don’t have yet, contact our support team to submit a request!

PowerPointWriter

v9Blog5

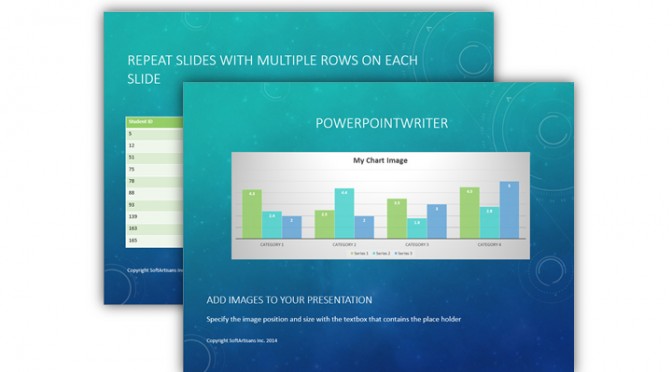
The PowerPointWriter beta program has been going strong, and we’re excited for the official release. PowerPointWriter introduces a template-based approach to generating PowerPoint presentations (PPTX) dynamically.  Taking the best principles from ExcelWriter and WordWriter, PowerPointWriter is flexible and easy to learn.

Learn more about what PowerPointWriter can do for you with our Features overview,  use cases, and API Introduction and Tutorials.

New Excel Features

Pivot tables from multiple data sources

In OfficeWriter version 8.2, the PivotTable API for ExcelApplication was added to ExcelWriter. In OfficeWriter version 9 you can build multiple consolidation range pivot tables.  These pivot tables are created from multiple consolidation ranges and automatically generate pivot fields using the data. We have a short video to help explain how these special pivot tables work: [5 minutes with Chris – PivotTables]

v9Blog3

WORKSHEET PROTECTION PROPERTIES

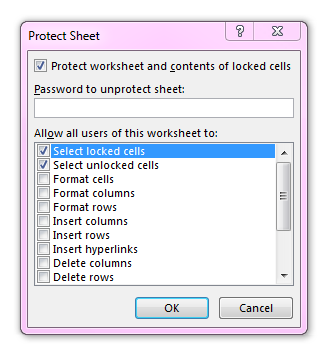
ExcelWriter now offers the same protection options as Excel that change how a worksheet is locked down when it’s protected. Set SheetProtection properties to customize what users can interact with after Worksheet.Protect is called.  Check out our knowledge base article for more on how to use this new feature!

Binding custom objects to Excel

In OfficeWriter version 9 ExcelTemplate supports the ability to bind lists of custom objects to templates.  For example, you have some custom Order objects that contain information about OrderID, DeliveryDate, PurchaseAmount, and CustomerID. These Order objects are in a list called ListOfOrders.

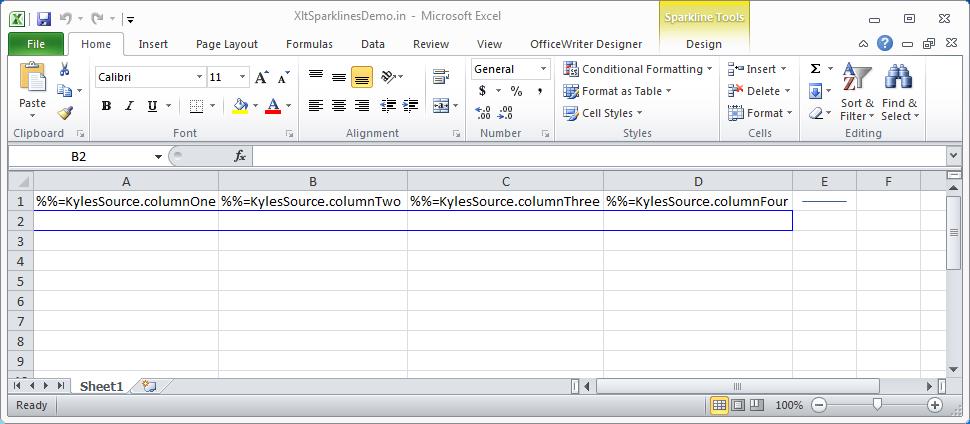
In your template, you can reference the object properties in the data marker: %%=ListOfOrders.OrderID. ExcelWriter will treat each object in the list as though it were a row of data in a table.

For more information about how ExcelWriter imports data, please visit our documentation: ExcelWriter Basic Tutorials.

And more!

For more information about additional information about all of the changes in OfficeWriter, see our Change Log.

Upgrading from OfficeWriter 8.x to 9.0

If you are upgrading from OfficeWriter 8.x to OfficeWriter 9, there are a couple important things to note before you install OfficeWriter 9. Running the OfficeWriter 9.0 automatic installer, remove any previous versions of OfficeWriter on your server. If you intend on having OfficeWriter 8 and OfficeWriter 9 run on the same server, special installation steps will need to be followed. Another issue to consider when upgrading is that several deprecated objects have now been removed from the API.

Running OfficeWriter 8.X to 9.0 on the Same Server

Running the OfficeWriter 9.0 automatic installer will remove any previous OfficeWriter 8 installations on the server.

  1. Any version 8 license keys will be removed from the registry
  2. The Program Files folder will be overwritten by the new version
  3. OfficeWriter integration with SSRS installation will also be overwritten.

You will need to preserve the OfficeWriter 8 license key if you have applications on the server that use OfficeWriter 8.

If you want to run OfficeWriter 8.X and 9. 0 on the same server, please choose one of the two following installation paths before beginning to install OfficeWriter 9.

Option 1 Add v8 License Key after Running v9 Installer

Your first option is to record or backup your OfficeWriter 8 license key before running the OfficeWriter 9 installer. During the installation process, your OfficeWriter 8 license key will be removed from the registry and any applications using this license key will not work. However, once the installation is complete, you can run the License Manager program found in the SoftArtisans program files folder and re-add your OfficeWriter 8 license key there.

  1.  Record your license key
    1. Write down your OfficeWriter 8 license key
      1. Open C:\Program Files\SoftArtisans\OfficeWriter\LicenseManager.exe
      2. Click the dropdown to see the installed keys
      3. Copy your installed OfficeWriter 8 license key
    2. OR Export the OfficeWriter 8 license key in the registry.
      1. Enter regedit.exe to get to the registry
      2. Navigate to HKEY_CLASSES_ROOT\Licenses\SoftArtisans
      3. Go to File->Export and enter a file name. Make sure Export Range is set to HKEY_CLASSES_ROOT\Licenses\SoftArtisans
      4. Save the file to your desktop.
  2. OPTIONAL: Back up the C:\\Program Files\SoftArtisans folder.
  3. Run the OfficeWriter 9 installer
  4. Add your OfficeWriter 8 License Key
    1. If you wrote down the license key:
      1. Run License Manager by going to C:\Program Files\SoftArtisans\OfficeWriter\LicenseManager.exe
      2. Enter your version 8 key in the “New Key” field
      3. Click “Add/Upgrade”
      4. Hit “OK”.
    2. If you exported the version 8 license keys
      1. Go to the registry
      2. Import the keys by clicking File->Import and selecting the registry keys file on the Desktop.

Option 2 Manual v9 Installation

You can also do a manual installation of OfficeWriter 9 to prevent your version 8 license key from being removed.

  1.  Download the OfficeWriter 9 Installer to your desktop
  2. Unpack the V9 Installation Files without Installing OfficeWriter 9
    1. Open Command Prompt and navigate to the desktop by entering: cd desktop
    2. Enter the command msiexec /a C:\Users\YOURUSERNAME\Desktop\OfficeWriterInstaller-9.0.0-x64.msi /qb TARGETDIR=C:\Users\YOURUSERNAME\Desktop\OW9UNPACKED
    3. This will unpack the installer files into a folder on your desktop called “OW9UNPACKED”
  3. Copy the SoftArtisans folder inside of OW9UNPACKED
  4. Paste the SoftArtisans folder into C:\\Program Files.
  5. Run the License Manager inside of the OW9UNPACKED folder
    1. Enter your version 9 key in the “New Key” field
    2. Click “Add/Upgrade”
    3. Hit “OK”.
  6. If you are integrating with SSRs, follow these manual SSRS integration instructions.

API Methods and Properties Removed in Version 9

Some API methods and properties that were deprecated in OfficeWriter 8 have now been completely removed from the OfficeWriter 9 API. For more information, please visit this link.

How to Format Rows or Columns only if they Contain Values

Problem

You want to apply particular styles or formats, but only to rows or columns that actually contain values. Here are some examples of styles and formats that you might want to apply to specific rows or columns:

  • Background/Foreground colors
  • Borders
  • Fonts
  • Text orientation, justification, indentation, orientation, number format
  • Horizontal/vertical alignment
  • Cell locked/unlocked when worksheet is protected

Notes:

Conditional formatting is useful if you wish to apply particular formatting that changes depending on the actual values in the cells. Go to Conditional formatting resources.

A similar technique can be used to format just an area. For specifics, see Format an area instead of rows or columns.

Solution

This solution has several steps:

  1. Define an area that contains the populated cells in order to determine which rows and columns to format.
  2. Create the style to apply.
  3. Loop through the rows or columns in the area and apply the style to each row or column.

Step 1:

Get the populate cells in the worksheet. There are two ways to do this:

A. Worksheet.Populated Cells – 

Use Worksheet.PopulatedCells to return an area of all the cells that are populated starting with the top left cell that contains a value or formatting, down to the bottom right cells. It includes both cells with values/formulas as well as cells that contain formatting (e.g. background color, conditional format etc.)

ExcelApplication xla = new ExcelApplication();
Workbook wb = xla.Open("MyUnformattedWB.xlsx");
Worksheet ws = wb.Worksheets["SheetToFormat"];
 
Area populatedArea = ws.PopulatedCells;


B. Use a named range

Add a named range in the template file around the area that will contain the populated cells and then use Worksheet.GetNamedRange(String) or Workbook.GetNamedRange(String) to retrieve the named range. Use Range.Areas to get a handle on the desired area.

This is less expensive than Worksheet.PopulatedCells since ExcelWriter does not need to go through the worksheet to figure out which cells contain values.  There are some limitations to this approach:

  • The number of columns in the named range will not change after data is imported. If there are columns in the populated named range that do not contain data, the named range won’t reflect that.
  • The number of rows in the named range will only change after data is imported if  the named range is wrapped around ExcelTemplate data markers and new rows are inserted.
  • If you are using Worksheet.ImportData, the named range will not update to reflect where the live data is.
ExcelApplication xla = new ExcelApplication();
Workbook wb = xla.Open("MyUnformattedWB.xlsx");
Range myRange = wb.GetNamedRange("AreaWithValues");
 
Area populatedArea = myRange.Areas[0];

Step 2:

Create the desired Style with Workbook.CreateStyle().

For this example, we want to leave the populated cells unlocked, but leave the rest of the cells locked when the worksheet is protected. This is done by setting Style.CellLocked.

Style unlockStyle = wb.CreateStyle();
unlockStyle.CellLocked = false;

Step 3:

Determine the first row/column in the area with Area.FirstColumn or Area.FirstRow. Get the total number of rows/columns in the populated area with Area.RowCount or Area.ColumnCount.

int colStart = populatedArea.FirstColumn;
int totalCol = populatedArea.ColumnCount;

Step 4:

Iterate through the rows/columns with Worksheet.GetColumnProperties(int) or Worksheet.GetRowProperties(int). Call ApplyStyle on the appropriate RowProperties or ColumnProperties with ColumnProperties.ApplyStyle(Style) or RowProperties.ApplyStyle(Style). Applying the style on an entire row or column will consume less memory than applying the styles to individual cells.

for(int i = colStart; i < totalCol; i++)
{
     ws.GetColumnProperties(i).ApplyStyle(unlockStyle);
}
 
//For worksheet protection, we also need to protect the worksheet
ws.Protect("MyPassword");

Additional References:

Applying Formatting to just an Area instead of Rows or Columns

If you want to apply the formatting just to specific cells, you can use Area.ApplyStyle()  or Area.SetStyle() instead of looping through the area to apply the style to each row or column.

IMPORTANT: This is only recommended for small areas.  Area.ApplyStyle and Area.SetStyle apply the style to each cell within the area, which increases the time and memory needed to process the file.  Applying styles on a per-row or per-column basis is the recommended best practice since the style is applied to the RowProperties or ColumnProperties object, instead to each individual cell.

Conditional Formatting

Charts not rendering correctly when viewed in non-Excel applications

Problem

An ExcelWriter-generated file with charts displays correctly when opened in Excel.  When the same file is opened in an application that does not have the full Excel functionality, such as Outlook preview or in a mobile application, the charts are missing data or have the wrong data.

When a workbook is opened in Excel, all of the cell values are updated based on the current state of the file. Excel caches these most recent cell values and writes them out to the file. Many mobile apps or applications with a “preview” functionality where the file is locked from being updated, do not have the ability to recalculate the cell values and rely on those cached values to render the charts. When the cached values are not available, the charts may be rendered incorrectly so they may appear to have no data, wrong data, or may not appear in the file at all.

Below are common scenarios where the workbook cannot be fully updated:

  • Mobile applications
  • Applications with “preview,” such as Outlook’s attachment preview
  • Excel’s protected mode, which is activated when files are downloaded from the internet and opened in Excel before saving to disk

Starting in v8.3, ExcelWriter writes out the cached cell values to integrate better with applications that don’t have the ability to update the workbook. However, there are still some limitations that prevent charts from being rendered correctly. This article describes the limitations and expected behavior of rendering charts in files that were generated in ExcelWriter v8.3 or later. 

If you are experiencing issues

Jump to:

Details

iOS Applications

Charts are missing – Certain charts are not supported by iOS, regardless of whether they are in files generated by Excel, ExcelWriter, or some other application. An example of this is the bubble chart. These charts may not be rendered at all, depending on the application. More information is available in this article: Charts in ExcelWriter files are missing when viewed on iOS devices.

Charts are visible, but incorrect – If the chart is visible, but the data appears to be incorrect, then the chart may have data that contains formulas, formatted numbers, or it may be a PivotChart (see below for more info).

Chart data contains formulas

As of v9.0, ExcelWriter has the ability to calculate formulas with the Workbook.CalculateFormulas method. However, for the initial release, only a limited number of formulas are supported.

If ExcelWriter is unable to evaluate formulas (i.e. the formulas you are using are not yet supported or you are using a version prior to v9.0), or Workbook.CalculateFormulas is not called, then the most up-to-date values will not be available. Instead, if there is a formula in the cell, we will write a “0” to the cached chart field. Despite not being an accurate value, having the cached value reduces the risk of the chart not being rendered or the the application from crashing due to the missing data.

Chart data contains values with number formats applied

ExcelWriter does not have the ability to render numbers based on number formats (e.g. percentage). In the case that a number has a number format applied, the underlying value will be used for the cached field. For example, 6.5% has actual numerical value 0.065, which is the value that ExcelWriter will write to the cached field. This also applies to dates, which are stored as serial numbers in the file and then Excel uses the number format to render the formatted date. For more information about dates in Excel, please see this article: http://www.cpearson.com/excel/datetime.htm.

PivotCharts

PivotCharts have a different structure than regular charts and depend on the entire PivotCache being refreshed to be updated.  Updating the PivotCache is an operation that must be performed in Excel or an application that has the ability to do so. ExcelWriter does not have the ability to refresh the PivotCache and update the PivotCharts. The file will need to be opened in Excel (not in protected mode) in order to update the PivotCache.

Charts in ExcelWriter files are missing when viewed on iOS devices

Problem

An ExcelWriter-generated file with charts displays correctly when opened in Excel, but when the same file is opened on an iPad or iPhone, the charts are missing from the file. There are two causes for this behavior:

  1. The chart type is not supported by iOS. – Some chart types are not supported in iOS and will never appear when viewed on an iPad or iPhone, regardless of whether the file was created in Excel or ExcelWriter. An example of this is the “bubble chart.” This is an issue with iOS mobile applications – not ExcelWriter.
  2. Charts in files generated by ExcelWriter v8.2 and earlier are not visible when viewed on iOS devices. – These chart types are supported in iOS and appear correctly on iPads or iPhones when the charts were created in Excel. If the file was generated by ExcelWriter, the charts are missing when viewed on iOS mobile devices. This is a known issue and was resolved in OfficeWriter 8.3.

This article describes why the second scenario occurs and the expected behavior when viewing charts created by OfficeWriter 8.3 or later.

Solution

When a workbook is opened in Excel, all of the cell values are updated based on the current state of the file. Excel caches these most recent cell values and writes them out to the file. Many mobile apps or applications with a “preview” functionality where the file is locked from being updated, do not have the ability to recalculate the cell values and rely on those cached values to render the rest of the file, including charts.

For iOS devices specifically, if the cached cell values are not available, most applications will not render the charts at all. ExcelWriter was not writing out cached values for the cells. Starting in OfficeWriter 8.3, ExcelWriter will copy the cell values to the cached field. This allows iOS applications to render the charts.

Limitations of Rendering Charts

In certain cases, the charts will be visible but may not look as expected. This is due to limitations in ExcelWriter’s ability to write out the cached values. For more information, please see Charts in ExcelWriter files not rendering correctly outside of Excel.

Excel Charts Don’t Follow “Move and Size with Cells” Option

Problem

Excel’s “Move and Size with Cells” option allows you to automatically re-size charts if the cells that contain the chart are added or re-sized.

With ExcelWriter, when the “Move and Size with Cells” option is selected in Excel, charts are not re-sized based on rows that are added from data being imported into data markers using the ExcelTemplate object (or OfficeWriter’s SSRS integration). Charts are re-sized if rows are added explicitly using Worksheet.InsertRow.

Example 

The pictures below show a file that has “Move and Size with Cells” option selected, before and after it has been processed by ExcelWriter.

Template

KB_ChartExample1

Incorrect output – Note that the chart remained the same size as before the data was imported.

ExcelWriter Chart

The correct output should look like the following:

ExcelWriter Chart Continue reading Excel Charts Don’t Follow “Move and Size with Cells” Option

Can I Print ExcelWriter Generated Files from the Server?

Problem

I am trying to print ExcelWriter generated files. What are my options?

Solution

ExcelWriter does not currently support printing directly from the server.  In order to print, the contents of the Excel file must first be rendered. As ExcelWriter does not currently have the ability to render content, rendering is handled by Excel when the output file is opened by the client. This means that in order to support printing directly from a web server it would be necessary to have Excel on the server. However, having Excel on a web server is not recommended.

There are two workarounds that we recommend to meet your printing needs:

  • Save files to a dedicated printing server
  • Automate printing using a VBA macro, when the file is opened on the client

The ability to render Excel files is being planned for a future release of ExcelWriter.

Setting Print Options

Before printing you can set all your print options programatically through ExcelApplication.      Example code is below: Continue reading Can I Print ExcelWriter Generated Files from the Server?