Tag Archives: excelwriter

Can ExcelWriter Handle Formulas with External References?

Problem

External references are references to a cell or range on a worksheet in another Excel workbook, or a reference to a defined name in another workbook.

ExcelWriter does not currently have the ability to parse formulas with external references. External references in formulas will cause ExcelWriter to throw an “Unable to parse formula: Error: Could not match input” error.

Solutions

Depending on how the formulas are being used, there are two workarounds to handle external references.

Solution 1: Avoid making API calls that would cause the formulas to be parsed

The ability to delay the parsing of formulas was added in ExcelWriter version 8.5.1.  Before this version, ExcelWriter parsed every formula in a worksheet automatically.  In 8.5.1 and later versions, formulas are only parsed if it is necessary. This means that as long as there are no calls in your code that would require ExcelWriter to parse the formulas, the formulas will be preserved. Calling CopySheet, or inserting or deleting sheets, columns, or rows will all cause ExcelWriter to parse the formulas.

Solution 2: Excel’s INDIRECT Function

If you need to set a formula programmatically or use methods that would cause ExcelWriter to parse the formulas with external references, Excel’s INDIRECT function can be used with the formula string passed as a parameter. For example:

wb.Worksheets[0].Cells[0,0].Formula = "+INDIRECT(\"'C:\\Temp\\[Book2.xlsx]Sheet1'!A1\")";

ExcelWriter will generate the correct ourput when the INDIRECT function is used. However, in order for the external reference in the formula to take effect, the source workbook needs to be open as well. If the source workbook is not open, the cell’s value will display “invalid cell reference error (#REF!)” Continue reading Can ExcelWriter Handle Formulas with External References?
Why Do Some Blank Cells Return Different Values in OOXML?

Problem

Some blank cells in OOXML file formats return an empty string, while other blank cells return null.  The same file in BIFF format returns only null values.

This problem occurs because OOXML (.xlsx /.xlsm) preserves any empty strings in cells when the file is saved.  When saving a file in BIFF (.xls) any cells containing an empty string will be set to a null value.

This can be a concern for users switching to the OOXML file formats. Code that checks worksheets for null values may need to be amended to account for the change in behavior.

Example 


The following code illustrates how this discrepancy might affect users:

           ExcelApplication xlapp = new ExcelApplication();
		   Workbook wb = xlapp.Open("SampleFile.xlsx")  
		   Worksheet ws = wb[0];

		   //Trim a range of cells. 
		   //Because A1 is empty, its value will be 'empty string' after trimming.
		   for(int i = 0; i<= 20; i++)
           {
		   	  for(int j = 0; j<= 20; i++)
              {
                  string value = (string)ws.Cells[i, j].Value;
				  ws.Cells[i, j].Value = value.Trim();
              }
           }

 		   //Save and reopen the file in the OOXML format
           xlapp.Save(wb, Directory + "SampleFile.xlsx");
           wb = xlapp.Open(Directory + "SampleFile.xlsx");
           ws = wb.[0];
           if (ws.Cells[0, 0].Value == null)
            {
               // This code would be reached in .xls
			   // but not in .xlsx  
            }

Users who currently check for cells containing null values may find that their code produces unexpected results when switching to OOXML files.


Solution

In order to ensure that code will return correct results when dealing with blank cells, it is important to use logic that handles all possible values.  There are 2 ways that we suggest implementing this logic.

Solution 1 – Use IsNullOrEmpty when checking for blank cells

Use logic that checks whether a cell is either null or an empty string.

Example:

            if(string.IsNullOrEmpty((string)ws.Cells[0, 0].Value))
            {
               //With this new logic, it could be either file format
                ws.Cells[1, 1].Value = "This is a .xls or an .xlsx file";   
            }

Solution 2 – Keep empty string values from being assigned to cells

Check if a cell is null before performing any operations that would assign an empty string value to a null cell.

Example:

           //Check that the cell is not empty before trimming
           if( ws.Cells[0,0].Value != null)
           {
                  string value = (string)ws.Cells[0, 0].Value;
				  ws.Cells[0, 0].Value = value.Trim();
           }
Related Information:

If your worksheet contains formulas, best practice would be to check the cell for formulas as well. More information on how to check for empty cells can be found here.


How to Use Worksheet Protection Properties In ExcelWriter

How to Use Worksheet Protection Properties In ExcelWriter

In ExcelWriter 8.6.1, the ability to set specific worksheet protection properties was added with the new Sheet Protection Object. Worksheet Protection Properties allow the user to add permissions to do certain actions on protected worksheets.

The Excel Protection Properties

Excel Worksheet Protection Property ExcelWriter SheetProtection Object Property
Select Locked cells SheetProtection.AllowSelectLockedCells
Select Unlocked Cells SheetProtection.AllowSelectUnlockedCells
Format Cells SheetProtection.AllowFormatCells
Format columns SheetProtection.AllowFormatColumns
Format Rows SheetProtection.AllowFormatRows
Insert Columns SheetProtection.AllowInsertColumns
Insert Rows SheetProtection.AllowInsertRows
Insert Hyperlinks SheetProtection.AllowInsertHyperlinks
Delete Columns SheetProtection.AllowDeleteColumns
Delete Rows SheetProtection.AllowDeleteRows
Sort SheetProtection.AllowSort
Use Autofilter SheetProtection.AllowUseAutoFilter
Use PivotTable reports SheetProtection.AllowUsePivotTableReports
Edit Objects Not Supported by ExcelWriter
Edit Scenarios Not Supported by ExcelWriter

Protection Properties Limitations

Microsoft Excel has a limitation on four of the protection properties: AllowSort, AllowDeleteColumns, AllowDeleteRows, and AllowInsertHyperlinks. These properties require that affected cells be editable when the worksheet is locked. This is because these properties entirely remove cells or alter the content of cells that are protected. Therefore, in order to use the properties you must unlock cells, put cells in an editable range, or use a macro.

Using the Protection Properties in Excel Writer

Steps to Use Protection Properties in ExcelWriter: 

  1. Create a new sheet protection object
  2. Set the worksheet protection properties as desired. By default, Select Locked cells and Select Unlocked Cells are set to true
  3. Call Protect() on the worksheet Continue reading How to Use Worksheet Protection Properties In ExcelWriter

Thinking Outside the Spreadsheet Box: Unexpected Uses of OfficeWriter

If you leave me alone for too long, I do foolish things like make a mini-paint app that writes the image to 1×1 cells in Excel. And so can you! But before I show you how to make a mini-paint app (the easiest thing you will ever do in your life), let me explain to you what part of me said, “Yeah, Champ, this is a great idea! Who wouldn’t want to make a weird spreadsheet that contains an image made with the background color on cells?” It all began when I was thinking about this awesome idea by my art crush, Evan Roth (*swoon*). He said, “Hey world! I want work to be art,” and decided to make a double-mouse that outputs to an art program on one screen and his regular work on the other. So I figured, why not put some art in Excel too?

Then I got more and more excited as I realized there are actually a ton of cool things you can do…

  • Use the formulas in Excel as transformations on your picture.
  • Randomize cell size to introduce weirdness.
  • Flip the project to input an Excel template and output an image, using Excel calculations and System.Draw to make a simple ray tracer.
  • Do some stuff with conditional formats, or all those light transform equations you learned in high school for no reason…until now!
  • Make a mock tool that lets users draw a spreadsheet design and output it to a real spreadsheet! (I thought a lot about this, and it’s not necessarily simple, but it is a really cool idea. If anyone puts that together, please let me know. I mean you, Evan Roth….Call me?)

The Mini-Paint

For the sake of simplicity, I’m showing you the randomized cell idea. I’ve made it an optional setting in this example, but, you know, make it your own and all. Oh, also, get at me with your art! For this app you’ll need WinForms and OfficeWriter.

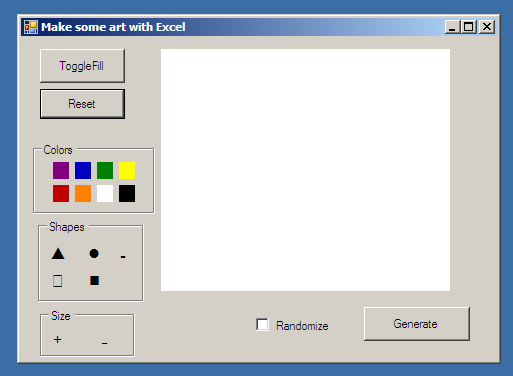
appwindow

I started by making a pretty basic app that has some simple actions. The “canvas” is a PictureBox that I save and resave some drawing objects to on each mouse event. The color selector is just 8 flat buttons set to be the color they represent. The shapes are again flat buttons with Wingdings images because I was too lazy to find a relevant .res file with some neat picture icons. Can you guess what the size toggles are? Flat buttons. Generic plus/minus from your plain boring keyboard. Okay. Basic functions.

  • MouseDown sets a pointer location.
  • MouseUp nullifies the pointer location.
  • MouseMoved is a basic drawing function. (You can find a ton of examples, but I like this one from good ol’ SO.)
  • Color buttons set a global variable, _selectedColor, to the color of the button.
  • Shape button clicks set a global variable called _selectedShape. I set it to an enum of possible shape options and I use a switch statement in the draw method. Instead of calling DrawLine or DrawRectangle, I call DrawShape(x,y) with x and y being current mouse x and y.

DrawShape is roughly this: Continue reading Thinking Outside the Spreadsheet Box: Unexpected Uses of OfficeWriter

Choosing OfficeWriter Designer or Designer .NET

Overview

OfficeWriter Designer is an add-on for Microsoft Excel and Microsoft Word that allows users to create new RDL reports and design pre-existing reports inside of Excel or Word. Until OfficeWriter 8.6, the original OfficeWriter Designer was the only tool available with this functionality.

However, as of OfficeWriter 8.6, SoftArtisans will include a second, new version of OfficeWriter Designer called the OfficeWriter Designer .NET. The OfficeWriter Designer .NET is a completely rewritten version of its predecessor, created from .NET/C# using VSTO (Visual Studio Tools for Office run time).

Benefits of OfficeWriter Designer .NET

  • Office 64-bit support
  • No dependencies on COM/VBA
  • More robust handling of modifications to queries in Visual Studio/Report Builder
  • Better parameter support with the View functionality, including support for cascading parameters

Which Designer Should I Use?

The new OfficeWriter Designer .NET does not currently support all of the features of the previous Designer. For full functionality support, use the original OfficeWriter Designer. Please see the feedback section below for more information about submitting requests for new features. Continue reading Choosing OfficeWriter Designer or Designer .NET

Sparklines in OfficeWriter

[In OfficeWriter 8.6 we introduced support for sparklines in your Excel reports. Sparklines are mini graphs that live within a cell of your Excel spreadsheet to quickly visualize and identify trends in your data. Below is an example of how to use sparklines within OfficeWriter reports.]

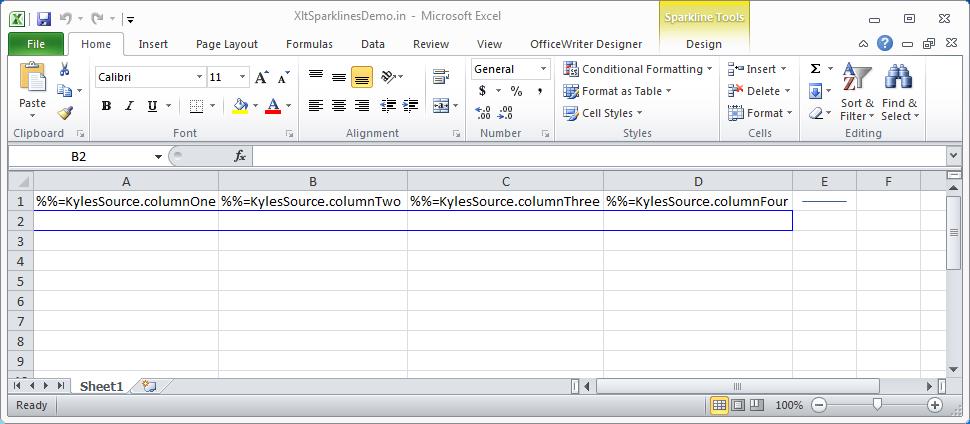
Hi! My name is Kyle and I worked on developing support for sparklines in ExcelTemplate. For those unfamiliar, a sparkline is basically a small chart that lives in a single cell. Sparklines are a great way to quickly visualize trends in data, especially if they are located in cells near their data source.

sparklines_image1

Below we’ve put together a demo of using sparklines within OfficeWriter’s ExcelTemplate. The first step is to insert data markers and sparklines into the file. Here I’ve inserted a sparkline next to the row of data markers and created a group of sparklines immediately below the data markers. The data source for the sparkline in cell E1 is A1:D1. The data source for the sparkline in cell A2 is A1 and so on for the rest of the group. Continue reading Sparklines in OfficeWriter

How to create stock charts using ExcelApplication

Problem

You need to create stock charts like the High-Low-Close or candlestick charts that Excel provides, but ExcelApplication does not have an enumeration for these charts.

Solution

Introduction to Stock Charts

Excel can create four kinds of charts intended for analyzing stock data. These are often referred to as high-low-close or candlestick charts because of their distinctive shape. These charts can be easily created with the Chart Wizard in Excel.

It is possible to use these charts with ExcelTemplate as you would any other chart. While ExcelApplication contains enumerations for many kinds of charts it does not have one for stock charts. Because of this, they cannot be created directly. In this article I’ll explain how to use a line chart and some special formatting to create charts that look exactly like each type of stock chart provided by Excel.

Setting up the data

Stock charts require very specific data in a very specific order. If you look at the names of the charts in Excel, you’ll note that each of them is actually a list of the data that chart needs, in the order that chart needs it. The four kinds of charts are High-Low-Close, High-Low-Open-Close, Volume-High-Low-Close and Volume-High-Low-Open-Close. As you can see, there is significant overlap and the data always appears in the same order; only the presence or absence of Volume and Open Data is different. For all of the following examples, we’ll use the same data pictured below:

For simplicity, we’ll create areas for each section of data and name them volumeAreaopenAreahighArealowArea and closeArea. Now that we have that, we can start creating stock charts.

A Basic High-Low-Close Chart

The simplest chart to create is a High-Low-Close chart. This chart displays the high and low values for a stock as a vertical line, with a tick mark at the point where the stock closed for the day. To begin creating this chart, we’ll follow a formula that will remain the same for all of the other stock charts.

First, create Continue reading How to create stock charts using ExcelApplication

How to create a drill-down report in Excel with hyperlinks

Problem

Reporting Services provides drill-down report behavior, where clicking on a populated data field generates another report based on the value of the data field clicked. This post addresses how to acheive similar behavior within Excel with OfficeWriter using Reporting Sevices URL access and Excel’s HYPERLINK function.

Solution

Overview

When the OfficeWriter renderer populates the Excel report with data, it inserts new rows for each row of data. This means that all Excel formulas are updated, including the HYPERLINK function formula. This approach uses this formula update functionality and imported data values to dynamically create hyperlinks that point to the Reporting Services URLs.

For the sake of example, “SalesReport” is the original report that contains a list of invoice IDs. “InvoiceReport” is the linked report that takes an InvoiceID as a parameter.

Reporting Services URL Access

Typically, Reporting Service reports are rendered through an application, such as the Report Manager. Reporting Services also allows for rendering reports using just URLs. The basic syntax to render a report wtith a parameter is:

 http://[servername]/reportserver?/[File path to report on Report Server] &rs:Command=Render&rs:Format=[Rendering Format]&[ParamID]=[Param Value] 

The URL for rendering the “InvoiceReport” in the OfficeWriter for Excel format, with Invoice ID 12345, is as follows:

 http://myservername/reportserver?/ InvoiceReport&rs:Command=Render&rs:Format=XLTemplate&InvoiceID=12345 

Notes:

How to open a report from SQL Server Reporting Services with the Application object

Problem

You want to modify your reports with the WordApplication or ExcelApplication object after they’ve been populated with data by SQL Server Reporting Services. The ExcelApplication or WordApplication object’s Open method can’t pull a report from a report server, so how do you open a SSRS report with OfficeWriter?

Solution

For simplicity and ease of reading the code examples and text in this article refer to the ExcelApplication object exclusively. However, the exact same techniques can be used with the WordApplication object. The only strict requirement for opening reports from SSRS is for the Open method to have an overload that takes a Stream argument, which both objects have.

SQL Server Reporting Services exposes a web service that lets programs access and work with the reports on the server. The web service has a number of functions for interacting with a report server and in fact is the same API that the Report Manager tool is built on top of. One of its functions will let us retrieve a fully rendered report that we can then pass to the ExcelApplication object. Once the ExcelApplication object has opened the report, it can be used as if it were any other file.

Getting a Reference to the Report Server

There are a number of different ways to access a report server to manage your reports. The MSDN documentation has detailed instructions for all the different techniques. The most powerful way, and the one that the Report Manager application uses, is to use the report server’s web service, or SOAP API. The easiest way to use the web service is to add the report server as a web reference in Visual Studio. This will allow us to make web service calls to the report server as though it were any other object in a .NET project. I’ll provide a brief overview of the steps to add a report server as a web reference; details can be found at MSDN. Continue reading How to open a report from SQL Server Reporting Services with the Application object

Workbook colors are not displayed as expected in older versions of Excel

Problem

When using ExcelWriter’s ExcelApplication object to generate a new workbook, custom colors that are assigned in code to fonts, charts, cell backgrounds, etc., display incorrectly on the client when the workbook is generated.

OR

When creating an Excel File or an Excel file to use as a template with the ExcelTemplate object using Excel 2007 and above, colors are not colors are not preserved in Excel 2003 or older.

Continue reading Workbook colors are not displayed as expected in older versions of Excel