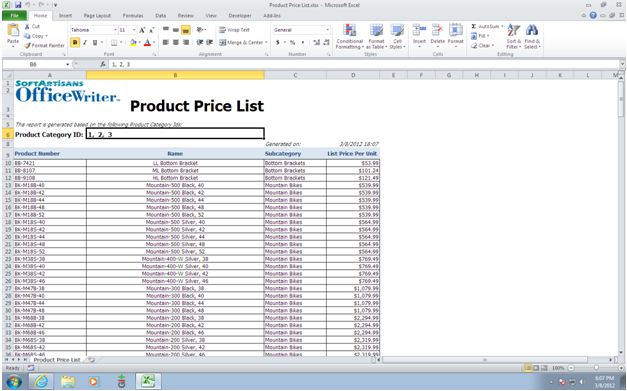
What’s New in OfficeWriter 8.1

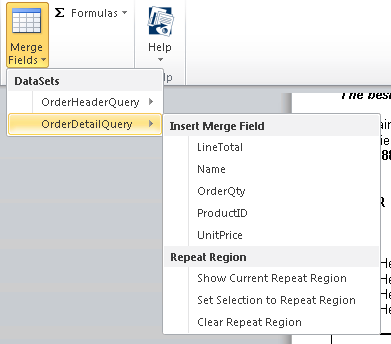
OfficeWriter 8.1 marks the first maintenance release of OfficeWriter 8 and we focused on adding support of Office 2010 in the OfficeWriter Designer, including a brand new look that integrates with the Office 2007/2010 ribbon:

The OfficeWriter 8.1 Designer features full support for creating and viewing reports in Excel and Word 2010.

    The functionality is unchanged, but we’ve improved the icons and labels to make it easier to design reports in Excel and Word for OfficeWriter.

In addition to the work on the OfficeWriter Designer, we’ve added some new features to the OfficeWriter API:

  • Ability to unlink IF Fields in WordTemplate DOCX/DOCM files – Remove IF fields once they have been evaluated by WordTemplate using UnlinkIFFields
  • Support for Linked to Source in ExcelApplication – Detect whether chart labels are linking to the data source for number formatting  with SeriesDataLabel.LinkedToSource and Axis.LinkedToSource.
  • Improved support for tables in ExcelApplication for OOXML files

For a full list of features and fixes included in this release, check out our change log.

Spring/Summer 2012 Conference Wishlist: DevCon, SQLBits, TechEd, and More


[Image via Huffington Post]

It’s 81 degrees out right now. In March. In Boston. We’re racing the kayaks out on the Charles this afternoon. El Niño, te amo. Nice weather tends to give me Magellan syndrome, and what better way to (semi) productively harness that than by researching cool sessions at upcoming conferences? The following were selected for their edgy subject matter. You may translate “edgy” any way you like.

I would love to see a conference devoted to SQL Azure Labs projects like Data Explorer, but that aside, I think this list sums up my current MSFT-related interests. If I’ve skipped yours, do chime in in the comments!

  • Topic: BI Reports
  • Conference: DevConnections
  • Session: Data Visualization Choices
  • By: Paul Turley (b | t)
  • Hook: Get the scoop behind Reporting Services, PowerPivot, Tabular Semantic Models, Report Builder, BIDS, SharePoint, PerformancePoint, Excel, Excel Services and the new Power View reporting tool.
  • Where: Las Vegas, NV
  • When: 3/26-3/29 (better book those plane tickets now!)
  • How much: $1595
  • Topic: Data Quality Services and Master Data Services
  • Conference: SQLBits X
  • Session: Take Good care of your Data: Introducing SQL 2012 DQS &MDS
  • By: David Faibish (in)
  • Hook: “The new exciting Data Quality Services and the improved Master Data Services in conjunction with SSIS provides the IT and IW with an attractive solution that allows full lifecycle data management.”
  • Where: Novotel London West, London
  • When: 3/29 (yep, same “buy those tickets stat” admonishment!)
  • How much: £350.00
  • Topic: Azure
  • Event: Windows Azure Kickstart
  • Hook: “You have chance to spend a day with some of the nation’s leading cloud experts and to learn how to build a web application that runs in Windows Azure. “
  • By: Microsoft Azure team
  • Where: Minneapolis, Independence, Columbus, Overland Park, Omaha, Mason, Southfield, Houston, Creve Coeur, Downder’s Grove, Franklin, and Chicago
  • When: 3/30-5/8 (check the listing for your city’s date)
  • How much: Free
  • Topic: Hadoop on Azure
  • Conference: Hadoop Summit
  • Session: Unleash Insights on All Data with Microsoft Big Data*
  • By: Alexander Stojanovic (b| t)
  • Hook: “Accelerate your analytics with a Hadoop service that offers deep integration with Microsoft BI and the ability to enrich your models with publicly available data from outside your firewall. “
  • Where: San Jose Convention Center
  • When: 6/13-6/14
  • How much: $499 (until 3/31), $599 (4/1-6/3), $700 (on-site)
  • Topic: Exchange 2010 SP2
  • Conference: TechEd Europe
  • Session: Microsoft Exchange Server 2010 SP2: In’s and Out’s
  • By: Exchange Product Team
  • Hook: “Come and see how we have tamed this beast and turned it into something even your own mother could understand.”
  • Where: Amsterdam RAI
  • When: 6/26-6/29
  • How much: €1,695 + VAT (before 3/31), €1,995 + VAT (after 3/31)


*Sessions for Hadoop Summit are selected by the community. Results coming soon.

How to Set Up Sinatra on Bluehost

sinatra rubygems

I recently had to install Sinatra on bluehost. It proved troublesome so I’m documenting what I did. One curious handicap I had is I could not ssh into bluehost due to silly administrative reasons. Here’s what I did:

Install the needed RubyGems

First, from cPanel, I went into RubyGems (under Software/Services) and I installed the following packages:

  1. sinatra (version 1.3.2)
  2. tilt (version 1.3.3)
  3. rack (version 1.4.1)
  4. fcgi (version 0.8.8)

You likely already have some of these so be sure to check the list first.

Install the “.htaccess” file

From the cPanel, I went to FileManager (under Files) and chose to browse the web root (Note: make sure you check “Show hidden files”). In public_html, I put in a new file called “.htaccess” and put the following fluff inside of it:

# General Apache options
AddHandler fcgid-script .fcgi
AddHandler cgi-script .cgi
#Options +FollowSymLinks +ExecCGI

# If you don't want Rails to look in certain directories,
# use the following rewrite rules so that Apache won't rewrite certain requests
#
# Example:
#   RewriteCond %{REQUEST_URI} ^/notrails.*
#   RewriteRule .* - [L]

# Redirect all requests not available on the filesystem to Rails
# By default the cgi dispatcher is used which is very slow
#
# For better performance replace the dispatcher with the fastcgi one
#
# Example:
#   RewriteRule ^(.*)$ dispatch.fcgi [QSA,L]
RewriteEngine On

# If your Rails application is accessed via an Alias directive,
# then you MUST also set the RewriteBase in this htaccess file.
#
# Example:
#   Alias /myrailsapp /path/to/myrailsapp/public
#   RewriteBase /myrailsapp

RewriteBase /
RewriteRule ^$ index.html [QSA]
RewriteRule ^([^.]+)$ $1.html [QSA]
RewriteCond %{REQUEST_FILENAME} !-f
RewriteRule ^(.*)$ dispatch.fcgi [QSA,L]

# In case Rails experiences terminal errors
# Instead of displaying this message you can supply a file here which will be rendered instead
#
# Example:
#   ErrorDocument 500 /500.html

ErrorDocument 500 "<h2>Application error</h2>Ruby application failed to start properly"

This file was taken, in large part, from the bluehost forum post linked at the bottom of the page.

Install the “dispatch.fcgi” file

In the same directory, I created the “dispatch.fcgi” file and put the following into that:

#!/usr/bin/ruby
#
# Sample dispatch.fcgi to make Sinatra work on Bluehost
#
# http://www.sinatrarb.com/
#

require 'rubygems'

# *** CONFIGURE HERE ***
# You must put the gems on the path
ENV["GEM_HOME"] = "/home#/XXXXX/ruby/gems"

# sinatra should load now
require 'sinatra'

module Rack
  class Request
    def path_info
      @env["REDIRECT_URL"].to_s
    end
    def path_info=(s)
      @env["REDIRECT_URL"] = s.to_s
    end
  end
end

# Define your Sinatra application here
class MyApp < Sinatra::Application
  get '/hi' do
    "Hello World!"
  end
end

builder = Rack::Builder.new do
  use Rack::ShowStatus
  use Rack::ShowExceptions

  map '/' do
    run MyApp.new
  end
end

Rack::Handler::FastCGI.run(builder)

You need to replace “/home#/XXXX” with the appropriate path in your system.

Correct all the date times in your gemspec files

At this point, most other sources said I should be done, but I kept getting an error along the lines of:

Invalid gemspec in [D:/RailsInstaller/Ruby1.8.7/lib/ruby/gems/1.8/specifications
/tilt-1.3.3.gemspec]: invalid date format in specification: "2011-08-25 00:00:00
.000000000Z"

So what I had to do to fix it was go to “/ruby/gems/specifications/tilt-1.3.3.gemspec” in the file manager and change the line:

s.date = %q{2011-08-25 00:00:00 .000000000Z}

to

s.date = %q{2011-08-25}

If that wonky date format shows up on any other gemspecs, you’ll likely have to alter them as well.

Hopefully, this will get you up and running. It did for me anyway.

Sources

Everything I learned I learned from the following sites and posts:

How to Migrate Lists from MOSS 2007 to SQL Server 2008 R2

These list migrations have been tested on MOSS2007 to SQL 2005 and 2008 R2.

How to migrate non-Lookup items:

The lists can be migrated as templates, as explained here:

1. Create the tables in SQL. A simple script to do so:

use MYDB
CREATE TABLE myTable
(
ID int PRIMARY KEY,
name varchar(50),
someData varchar(50),

)

2. Once the templates are converted and installed, and the tables are set up, a client object program has to be used to push them into SQL.  Unfortuantely, SharePoint’s client OM does not work in MOSS, so you’ll have to transfer the templates first. For my program I chose a console application. Here’s a simplified script for a non-specific list:

using System.Collections.Generic;
using Microsoft.SharePoint;
using System.Data.SqlClient;
using Microsoft.SharePoint.Client;
using SP = Microsoft.SharePoint.Client;
using System.Data.Sql;
//Note that I cut out the first half of the references since they're all standard system assemblies
namespace ListToSQL
class Program
 {
string connString = "Data Source=ucla2010db;Initial Catalog=REACTOR;Integrated Security=SSPI";

	static void Main(string[] args)
 	{
		Program prog = new Program();
 		prog.GetListItems();
 	}  

         private void GetListItems()
         {

	  string SPSite = "http://MySite/siteName";

	  using (SP.ClientContext context = new SP.ClientContext(SPSite))
 	  {
 			SP.Web web = context.Web;
 			SP.List myList = web.Lists.GetByTitle("MyList");
 			SP.CamlQuery qry = new SP.CamlQuery();

			//No need to actually filter the query. We want all the items
 			qry.ViewXml = @"";

 			SP.ListItemCollection listColl = myList.GetItems(qry);
 			context.Load(listColl,
				items => items.Include(
 				item => item["Title"],
 				item => item["Date"],
 				item => item["OtherField"]));
 				context.ExecuteQuery();

 			BulkUpdateSQL(BuildTable(listColl),"myDataTableName");
            }
        }

       private DataTable BuildTable(SP.ListItemCollection contextList)
      {
           DataTable dt = new DataTable();

           //Select any ListItem at all and loop through the field names
           ListItem colItem = contextList[0];

           foreach (string name in colItem.FieldValues.Keys)
           {
	       //Make the field names into column names
                 dt.Columns.Add(name);
           }

           foreach (ListItem item in contextList)
           {
                 //Create a new row for each ListItem
                 dt.Rows.Add(dt.NewRow());

                 foreach (string name in item.FieldValues.Keys)
                 {
	            //Add each FieldValue item to the row
                      dt.Rows[dt.Rows.Count - 1][name] = item[name];
                 }
           }

         return dt;
       }

       private void BulkUpdatePI(DataTable dt, string destName)
       {
             using (SqlConnection conn = new SqlConnection(connString))
             {
                 conn.Open();
                 using (SqlBulkCopy copy = new SqlBulkCopy(conn))
                 {
 /* Note that you can use ColumnMappings [i.e. "copy.ColumnMappings.Add("Title", "name")"]
  * With either ordinal or string-based mapping,
  * But every column you don't map will get ignored if you explicitly map
  */
                        copy.DestinationTableName = destName;
                        copy.WriteToServer(dt);
                 }
          }
}


TADA! Lists in SQL!

But what about… LOOKUPLISTS!?

The only way to do this from MOSS2007 and maintain the lookup info is to export the list to Excel:

    1. In the Data View list view there is an option to export to excel.
    2. Save the file in a location accessible by your DB
    3. From there, go to the DB you want the data in
    4. Right click the management folder and select “Import Data”
    5. In the Import Data Wizard, select “Microsoft Excel” from the dropdown
  • This will prompt you to enter the file name for the excel file. Do that.
  • Leave “first row has column names” checked, since that is the SP export default
  • Click next (but you already knew that)
  • Select the following:
    • Destination:

    Whatever type of DB your MOSS server is, if you are  unsure, use SQL Native Client.

    • Server Name: The name of your MOSS server. If you are unsure, try “MOSS.”
    • Authentication: Most likely windows
    • Database: The database you wanto to import the excel file into.
    • And… Next
  • Now you can copy the data or write a specific query. I tend to just copy all the data so it’s in SQL if I need it
  • On the “Select Source Tables and Views” screen you will see bizarrely named source options. Select the first (possibly only) option. You can change the mappings or preview the table from this screen.
  • Then hit finish. You can schedule the operation or run it now.
  • Great.
  • We’re still not done.
  • From there you can go to your 2010 server and basically perform the same import operation, only add the MOSS Excel table into your new database.
  • This doesn’t actually create primary key lookups, it only imports the data as-is, but now you have it, so you can manipulate it as needed!
  •  

    How to display all selected values for an SSRS multi-select parameter in an Excel report

    It is very common when designing reports that you may need to define a multi-select report parameter in order to give the users some filter options and generate the report based on the user-selected values. You may also want to display those selected values on the Excel report. This can easily be achieved with OfficeWriter by creating an SSRS formula that uses the required report parameter and inserting that formula into the report template through our OfficeWriter Designer add-in in Excel, as described in the following steps:

    1. Open the RDL file using the Open Report button in our add-in Continue reading How to display all selected values for an SSRS multi-select parameter in an Excel report

    Super Short Tips: Working with pivot tables in VBA

    Sometimes you just need to write macros for pivot tables. It’s a fact of life.

    Maybe your pivot table is dynamically populated with data and you need to make some custom changes once the data is in the table, but you can only do that after the file is opened in Excel and the pivot table refreshes. Perhaps your plagued with the error that happens when you open a file with a pivot table directly from Internet Explorer. Whatever your reason, you need to write some VBA for pivot tables.

    Here’s my super short list of tips for working with pivot tables in VBA:

    #1 – Record a macro of yourself to get started

    If you know what you want to do, but you’re not sure what the VBA code should be, record a macro of yourself doing the desired action. Not only will this give you a hint about where to start in your VBA, but you’ll also verify the exact method calls for your version of Excel and your pivot table version. All of my pivot table macros start with me performing operations in Excel and then generalizing the VBA from there.

    #2 – Base your VBA on pivot fields

    Pivot fields come from the column names in the data source for your pivot table. Even as the data is changing, the pivot fields remain constant because the construction and layout of the pivot table depends on the pivot fields. The fact that they remain constant can be very useful when writing VBA.

    If you create macros that are based on particular pivot table items, you can’t be sure that those values will be there when the workbook is populated. For example, you want to make sure that all the groups for a particular row label are collapsed when the user first encounters the pivot table. You can manually collapse each of these groups. Problem: you create a macro that collapses groups “A”, “B”, “C”, etc separately. What if group “A” isn’t in your data set when the report is generated? Excel will throw an errror.

    You can take the chance that group “A” may or may not appear in your data set, or you can create a macro that focuses on the pivot field that group “A” belongs to, rather than the individual entries.

    ActiveSheet.PivotTables("PivotTable1").PivotFields("PivotField1").ShowDetail = False

    This will collapse all the groups within ‘PivotField1’.

    In short, avoid making macros that are dependent on specific data, because you can’t be sure that the VBA will execute without error.

    #3 – VBA for pivot tables in Excel 2003 is different than in Excel 2007/2010

    Excel 2003 had our best friend, the Pivot Table Wizard. Everything for the pivot table was done through a wizard menu, so the VBA in Excel 2003 follows suite. Starting in Excel 2007, Excel reworked how users interacted with pivot tables, and the Pivot Table Wizard was banished for eternity. Thus, VBA in Excel 2007/2010 is drastically different.

    If you have end-users who are going to be opening a report with pivot table VBA in Excel 2003, 2007, and 2010, you’ll want to detect what version of Excel is being opened, then execute the 2003 or 2007/2010 based on this.

    To determine what version of Excel the VBA is executing in, check Application.Version. This will return a string representing the version of Excel (e.g. 10.0, 12.0, 14.0 etc.)

    #4 – Pivot tables have versions too

    Just as there are differences between XLS and XLSX files in terms of what features can be supported, there are differences between pivot tables created in XLS files vs those created in XLSX files. What’s more, there are also differences between pivot tables created in Excel 2007 and 2010. It’s important to note what version of pivot table you’re targeting.

    Luckily you can check the PivotTable.Version property to see which of the versions your pivot table is.

    So there you have it – my cheat sheet for creating VBA for pivot tables.
    Super Short Tips: Creating Workbooks with Excel VBA

    Let’s say you want to write an Excel macro that will create a new workbook and save it to a specific location and then close the new file. This is really easy with Excel VBA:

    Sub AddNewWorkbook()
         Set NewWb = Workbooks.Add
         With NewWb
              .SaveAs Filename:="C:\Path to directory\NewFile.xls"
              .Close
         End With
    End Sub

    You run this once and it works perfectly. You run it again and Excel tells you that “A file named ‘C:\Path to directory\NewFile.xls’ already exists in this location. Do you want to replace it?”

    Well, of course you do. Why is Excel bothering you with these trivial questions?

    So you want to supress the Excel alert. To do this, just set Application.DisplayAlerts to False before you save the file, and then turn it back on after you’re done:

    Sub AddNewWorkbook()
         Set NewWb = Workbooks.Add
         Application.DisplayAlerts = False
         With NewWb
              .SaveAs Filename:="C:\Path to directory\NewFile.xls"
              .Close
          End With
         Application.DisplayAlerts = True
    End Sub

    Easy-peasy.

    This technique is also handy for supressing the oh-so-lovely Do you want to save the changes you made to workbook X? alert. Microsoft has some additional tips for hiding the saving changes alert in this KB article: How to suppress “Save Changes” prompt when you close a workbook in Excel.

    The 10 links I used in everyday VSTO development

    There’s a wealth of information out there on VSTO and Office add-in development, but it can be hard to sift the wheat from the chaff. Here are the links I kept close at hand the last time I did Office development.

    Docs for the Excel and Word interop namespaces:
    http://msdn.microsoft.com/en-us/library/microsoft.office.interop.word.aspx
    http://msdn.microsoft.com/en-us/library/microsoft.office.interop.excel.aspx

    3-part series on making stuff for the ribbon:
    http://msdn.microsoft.com/en-us/aa338202.aspx
    http://msdn.microsoft.com/en-us/aa338199.aspx
    http://msdn.microsoft.com/en-us/aa722523.aspx

    Argument lists for built-in dialog box objects:
    http://msdn.microsoft.com/en-us/library/bb208812.aspx
    http://msdn.microsoft.com/en-us/library/bb211087.aspx

    http://office.microsoft.com/en-us/excel-help/CH006252819.aspx

    There are a surprising number of things that can be done by using the right Excel function instead of writing a bunch of .NET code, and it almost always makes your life easier.

    WPF and Silverlight aren’t VSTO-specific, but I used them on a regular basis to make custom views.

    Silverlight 3 control reference: http://msdn.microsoft.com/en-us/library/system.windows.controls(VS.95,loband).aspx

    WPF control reference: http://msdn.microsoft.com/en-us/library/system.windows.controls.aspx

    Adding Ribbons to VBA Add Ins

    It’s fairly easy to update an old Office Add In to use the new Ribbon user interface.

    There are two major steps to the process: creating an XML file to hold the ribbon information, and updating the macros to use IRibbonControls.  These directions will focus on Excel 2010, but the process will work for any Office 2007 or 2010 application with only minor changes.

    Creating the Ribbon XML

    The easiest way to get started is to use the Visual Studio tools for Office projects.  This will allow you to create the basic toolbar using drag and drop style tools.  In Visual Studio, create a new project and select Visual C# -> Office -> 2007 -> Excel 2007.  Right click in the project and select Add -> Office -> Ribbon(Visual Designer).  Right click on the created file and open the Designer.  Drag and drop and rename to your heart’s content.  When you’re done, right click on Ribbon and click “Export Ribbon to XML.”  Now you have the XML file that you will be using in future steps.

    In order for the buttons on the ribbon to actually do anything, they need to have callbacks associated with them.  They will need to be added manually to your XML file.  All items have the option to set whether they are visible or enabled (using getVisible and getEnabled attributes).  Buttons have an onAction attribute, which is called when the button is pressed.  All of these are just the names of the macro that you want to call.

    Example XML

    <?xml version="1.0" encoding="UTF-8"?>
    <customUI xmlns="http://schemas.microsoft.com/office/2006/01/customui">
        <ribbon>
             <tabs>
                   <tab id="Tab1" label=”TabName”>
                       <group id=”Group1” label=”GroupName”>
                           <button id=”button” label”ExampleButton” imageMso=”PercentStyle” 
                             onAction=”ButtonAction”/>
                           <menu id=”Menu1” label=”MenuName” size=”large”>
                               <checkBox id=”Checkbox1” label=”CheckboxName” 
                                onAction=”ToggleCheckbox” getPressed=”CheckCheckbox”/>
                           </menu>
                       </group>
                    </tab>
              </tabs>
         </ribbon>
    </customUI>


    Creating the Add In File

    Create a new workbook in Excel 2010.  Save it as an Excel Add In (.xlam).

    Navigate to the new file in Explorer.  Rename the file to be a .zip file.  Modern office files are generally just zip files filled with xml files.  Extract the zip file so we can make some changes to it.

    • First, open _rels/.rels and add

    <Relationship Id=”customUIRelID” Type=”http://schemas.microsoft.com/office/2006/relationships/ui/extensibility” Target=”customUI/customUI.xml”/>

    beneath the other Relationships in the file.

    •   Next, create a folder in the top level of the zip file called customUI.  Copy your XML file into that folder and rename it customUI.xml.  Turn the zip file back into an .xlam (or whatever the original suffix was).  If you open the file, you should have a new ribbon on your tool bar.  It may throw errors if some of the callback macros don’t exist yet, but that is fine.


    Hooking everything up

    We’ll need to create or adjust the macros used in the XML file.  If you’re updating an existing add in, many of those macros probably already exist.  They won’t work out of the box, though.  All onAction macros require an IRibbonControl to be passed to it:

    Sub ExampleMacro(control As IRibbonControl)

    Other macros (such as getVisible or getEnabled) also need a return value:

    Sub ExampleGetVisible(control As IRibbonControl, ByRef visible)

         visible = false

    End Sub

    These can all go in a module in the add in file.


    At this point you should have a working add in with a ribbon interface.  The Microsoft website also has some good information on this process.

    Jason Thomas Reviews OfficeWriter’s SSRS Integration

    The following is a review of OfficeWriter written by Jason Thomas, a BI consultant specializing in SSRS.  Read the full review here.

    “As a BI consultant specializing in SSRS, I have had lots of frustrations and hard times because of Excel. Every now and then, I have some or other business user coming up to me and asking for some feature which is there in Excel but not in SSRS. If you have been following my blog, you would already know that I am more of a work-around man, trying to find some alternative for features which are not supported out of the box. But when it comes to Excel related features, most of my attempts end in disappointment. So naturally, my ears perked up when I was asked to review a plugin which claimed to build SSRS reports using Excel and Word.

    So I downloaded OfficeWriter v8 and spent close to a week playing around with it. Even though I encountered some minor quirks (v8.0 doesn’t run on the 64 bit version of Office 2010 yet – luckily I had a home pc with a 32 bit version of Office; got some minor issues when editing and deploying an existing SSRS report with shared data sources – got around it by setting the data sources once again from the report manager), overall I have been very pleased and of course, excited at the different prospects that this plugin opens up.”

    [Click here to read the full review]

    Blogged