Category Archives: SharePoint

What’s new in OfficeWriter 8.5

Spring has sprung, bringing with it our newest release of OfficeWriter: OfficeWriter 8.5!  What’s in store for this maintenance release? Scroll down to see the latest additions our development team has been working on.

WordTemplate – Embed DOCX files into templates

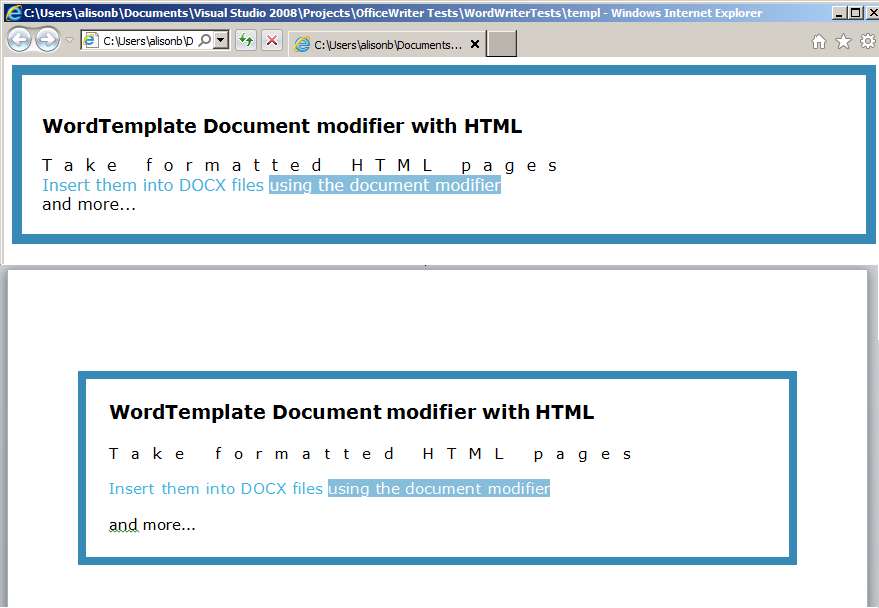
In OfficeWriter 8.0, we added the ability to embed RTF or HTML documents in Word files with WordTemplate.  The feature uses the document modifier to signify that a RTF or HTML document will be inserted. To learn more about using the document modifier, see our guide on inserting an embedded document under our WordTemplate Tutorials.

HTMLtoWord

We have also extended the feature to include DOCX files. Now you can embed other Word documents into your WordWriter templates. Continue reading What’s new in OfficeWriter 8.5

OfficeWriter and the Microsoft Application Platform

Curious to know more about how OfficeWriter fits in with the Microsoft Application Platform? We’ve partnered with Andrew Brust from Blue Badge Insights to bring you an overview of the additive value OfficeWriter provides to the Microsoft stack.

In this powerpoint:

  • You’ll learn about OfficeWriter’s object and template models
  • Scenerios in which to use OfficeWriter
  • How OfficeWriter plays into Microsoft Dynamics, SharePoint, and Azure


All Kinds of Things You Can Do With SPUser Objects

The SPUser object is a really useful tool, but sadly not very intuitive. Here are some of my favorite SPUser snippets.

People picker list columns don’t return a user object, which is frustrating, but not foreign to those of us with picker experience. An ID is generally returned by a lookup field. Not so for people pickers, which return a domain\user string that is frequently pre-pended by nonsense.

This is how you get a user directly from the list item:

protected SPUser GetUserfromItem(SPListItem userItem)

{

SPFieldUser userField = (SPFieldUser)userItem.Fields.GetField(“User”);

SPFieldUserValue fieldValue = (SPFieldUserValue)userField.GetFieldValue(userItem[userField.Id].ToString());

return fieldValue.User;

}

Now let’s look at a neat little method that grabs some properties by current user! As a side note, there are a lot of issues that are purportedly resolved by setting the context to null – I have never found this helpful. Never. In my lifetime.

//User Properties by user

private bool GetProperty(string userName)

{

//Your return value is a bool

bool found = false;

//Create a profile manager

UserProfileManager profMan;

//Get your site in a “using” so there’s no disposing

using (SPSite site = new SPSite(SPContext.Current.Site.ID))

{

//Make everything unsafe. Just kidding. This is so that you have permissions to edit the profile property.

//If you don’t plan on making changes, you can access the property without this.

Web.AllowUnsafeUpdates = true;

//Okay. Get your web on!

using (SPWeb newWeb = site.OpenWeb())

{

//Get the context and set the profile manager

SPServiceContext context = SPServiceContext.GetContext(site);

profMan = new UserProfileManager(context);

//Get your user profile object

UserProfile prof = profMan.GetUserProfile(userName);

//This is important. Remember to check the Property.Value. Otherwise you are checking to see

//if the property itself is null. And since you know it exists – guess what? It isn’t null. Continue reading All Kinds of Things You Can Do With SPUser Objects

Everything You Need to Know About OfficeWriter: The Whitepaper

Looking for a comprehensive overview of OfficeWriter? You’ve come to the right place. We’ve partnered with Andrew Brust of Blue Badge Insights to give you an inside look at how OfficeWriter can benefit your company’s business intelligence.
OfficeWriter Whitepaper
Microsoft Office and Data: A Love Story
Excel and Word are the Will and Kate of the Office software world, but if you try to use them for data analysis, they’ll morph into Milli-Vanilli. OfficeWriter prevents that from happening.
In this whitepaper, you’ll learn:
  • How OfficeWriter’s API and templates provide bridges between Microsoft Office & databases
  • How OfficeWriter enhances SQL Server Reporting Services
  • How OfficeWriter turns SharePoint lists & libraries into full-fledged Office docs
That is simply the beginning. Get a full overview of OfficeWriter today.

SPTechCon Boston 2012 Wrap Up

Going through SPTechCon withdrawals? So are we. That’s why we’re bringing you a (relatively) quick recap from the Twittosphere. We can’t thank everyone who came out to booth #505 enough. We enjoyed meeting/tweeting all of you and learning from the SharePoint community! If you weren’t able to join in the exciting conversation or view OfficeWriter demos on how it can enhance reporting with SharePoint, fear not we have more demos online and the chance to download a free evaluation of OfficeWriter so you can take it for a test drive yourself. In the interim, take a look inside the four days of sessions, networking, and SharePoint learning.

[To view the wrap up on Storify]

Continue reading SPTechCon Boston 2012 Wrap Up

PowerPivot Part 4: Sharing PowerPivot Workbooks

So now you have a PowerPivot workbook that’s far too awesome to keep to yourself. How do you go about sharing PowerPivot workbooks?

You could just distribute the workbook wholesale, but that’s not optimal because any user who wants to take advantage of the PowerPivot features needs to have PowerPivot for Excel 2010 installed on their machine to fully run the report.

Where else can you turn?

Luckily, SharePoint 2010 introduced PowerPivot for SharePoint that is comprised of two main pieces:

  • Server software that can retrieve the data for the report
  • The PowerPivot Gallery

The SharePoint PowerPivot Gallery is a special document library that has document management and preview for PowerPivot workbooks (along with a few other document types). With the PowerPivot Gallery’s live preview, you can interact with a PowerPivot workbook, just as you would in Excel.  You can also create workbooks from published PowerPivot workbooks and schedule data refreshes for added versatility. The gallery also has several customization options for how the reports are listed.

What’s the catch?

Continue reading PowerPivot Part 4: Sharing PowerPivot Workbooks

5 Things to Do in Boston Other Than SharePoint

SP Tech Con is fast approaching. If you’re new to Boston here are a few things you don’t want to miss – some touristy, some local.

  1. Duck Tour – Definitely touristy, but you should go until you get every driver. They are unbelievably fun and you get a nice overview of the history of the city – Or y’know you could do those segway tours but you better have confidence of steel because between you and me, people judge.
  2. Brewery Tours – Take your pick. Tickets tend to sell out fast so I recommend getting there early.
  1. Harpoon – Tour ($5) or a tasting (free). Tours are on the weekends and tastings are weekdays at 2pm and 4pm. Either way learn about the brewing process while drinking. Leave with a souvenir glass.
  2. Sam Adams – Free. Take the Orange line and follow the signs to the brewery. Learn about the brewing process while enjoying free tastings. Afterward, hop aboard the complimentary party trolley, which will take you to Doyle’s, one of my favorite bars. Continue reading 5 Things to Do in Boston Other Than SharePoint

SP Tech Con Prize Giveaway: Call Me Maybe?

Coming to SP Tech Con in Boston this July? Visit us at booth #505 and enter to win a POP Phone. We will be raffling off 5 POP phones throughout the conference. A throwback to the 50’s style Bakelight design phone, these plug into all mobile phones, tablets, and computers. Plus they add an additional cool factor when you’re Skyping or video chatting with friends. See below for prize giveaway details.

Prize details:

Where:

Booth #505

When:

July 24th – 25th

Tuesday, 11am – 7pm

Wednesday, 11am – 4pm

How to Enter:

Continue reading SP Tech Con Prize Giveaway: Call Me Maybe?

How to Migrate Lists from MOSS 2007 to SQL Server 2008 R2

These list migrations have been tested on MOSS2007 to SQL 2005 and 2008 R2.

How to migrate non-Lookup items:

The lists can be migrated as templates, as explained here:

1. Create the tables in SQL. A simple script to do so:

use MYDB
CREATE TABLE myTable
(
ID int PRIMARY KEY,
name varchar(50),
someData varchar(50),

)

2. Once the templates are converted and installed, and the tables are set up, a client object program has to be used to push them into SQL.  Unfortuantely, SharePoint’s client OM does not work in MOSS, so you’ll have to transfer the templates first. For my program I chose a console application. Here’s a simplified script for a non-specific list:

using System.Collections.Generic;
using Microsoft.SharePoint;
using System.Data.SqlClient;
using Microsoft.SharePoint.Client;
using SP = Microsoft.SharePoint.Client;
using System.Data.Sql;
//Note that I cut out the first half of the references since they're all standard system assemblies
namespace ListToSQL
class Program
 {
string connString = "Data Source=ucla2010db;Initial Catalog=REACTOR;Integrated Security=SSPI";

	static void Main(string[] args)
 	{
		Program prog = new Program();
 		prog.GetListItems();
 	}  

         private void GetListItems()
         {

	  string SPSite = "http://MySite/siteName";

	  using (SP.ClientContext context = new SP.ClientContext(SPSite))
 	  {
 			SP.Web web = context.Web;
 			SP.List myList = web.Lists.GetByTitle("MyList");
 			SP.CamlQuery qry = new SP.CamlQuery();

			//No need to actually filter the query. We want all the items
 			qry.ViewXml = @"";

 			SP.ListItemCollection listColl = myList.GetItems(qry);
 			context.Load(listColl,
				items => items.Include(
 				item => item["Title"],
 				item => item["Date"],
 				item => item["OtherField"]));
 				context.ExecuteQuery();

 			BulkUpdateSQL(BuildTable(listColl),"myDataTableName");
            }
        }

       private DataTable BuildTable(SP.ListItemCollection contextList)
      {
           DataTable dt = new DataTable();

           //Select any ListItem at all and loop through the field names
           ListItem colItem = contextList[0];

           foreach (string name in colItem.FieldValues.Keys)
           {
	       //Make the field names into column names
                 dt.Columns.Add(name);
           }

           foreach (ListItem item in contextList)
           {
                 //Create a new row for each ListItem
                 dt.Rows.Add(dt.NewRow());

                 foreach (string name in item.FieldValues.Keys)
                 {
	            //Add each FieldValue item to the row
                      dt.Rows[dt.Rows.Count - 1][name] = item[name];
                 }
           }

         return dt;
       }

       private void BulkUpdatePI(DataTable dt, string destName)
       {
             using (SqlConnection conn = new SqlConnection(connString))
             {
                 conn.Open();
                 using (SqlBulkCopy copy = new SqlBulkCopy(conn))
                 {
 /* Note that you can use ColumnMappings [i.e. "copy.ColumnMappings.Add("Title", "name")"]
  * With either ordinal or string-based mapping,
  * But every column you don't map will get ignored if you explicitly map
  */
                        copy.DestinationTableName = destName;
                        copy.WriteToServer(dt);
                 }
          }
}


TADA! Lists in SQL!

But what about… LOOKUPLISTS!?

The only way to do this from MOSS2007 and maintain the lookup info is to export the list to Excel:

    1. In the Data View list view there is an option to export to excel.
    2. Save the file in a location accessible by your DB
    3. From there, go to the DB you want the data in
    4. Right click the management folder and select “Import Data”
    5. In the Import Data Wizard, select “Microsoft Excel” from the dropdown
  • This will prompt you to enter the file name for the excel file. Do that.
  • Leave “first row has column names” checked, since that is the SP export default
  • Click next (but you already knew that)
  • Select the following:
    • Destination:

    Whatever type of DB your MOSS server is, if you are  unsure, use SQL Native Client.

    • Server Name: The name of your MOSS server. If you are unsure, try “MOSS.”
    • Authentication: Most likely windows
    • Database: The database you wanto to import the excel file into.
    • And… Next
  • Now you can copy the data or write a specific query. I tend to just copy all the data so it’s in SQL if I need it
  • On the “Select Source Tables and Views” screen you will see bizarrely named source options. Select the first (possibly only) option. You can change the mappings or preview the table from this screen.
  • Then hit finish. You can schedule the operation or run it now.
  • Great.
  • We’re still not done.
  • From there you can go to your 2010 server and basically perform the same import operation, only add the MOSS Excel table into your new database.
  • This doesn’t actually create primary key lookups, it only imports the data as-is, but now you have it, so you can manipulate it as needed!
  •