Category Archives: Reporting Services

Adding SSRS Formulas, Global Variables, and Parameters to Your Designer .NET Report

The original OfficeWriter Designer allowed users to add the equivalent to SSRS expressions in their Designer report by using a feature built-in to the Designer called the formula manager. However, in recent months, SoftArtisans has released a new, beautiful, more robust designer called the Designer .NET. The only complication is that the Designer. NET does not yet have a built in formula manager. Fortunately, you can still add many calculated values, parameters, and other report information to your report by using SSRS calculated fields in Visual Studio.

NOTE:  Currently Reporting Services does not allow Visual Studio calculated fields to contain user-defined variables, aggregate, RowNumber, RunningValue, Previous, or lookup functions when rendering the report.

Adding Expressions to Your DataSet

  1. Open your RDL in Visual Studio.
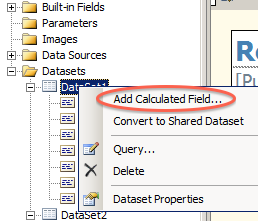
  2. Right click the dataset you want to add the expression to and click “Add Calculated Field…”
    Add a Calculated Field...
  3. A dialog should appear with two columns: Field Name and Field Source.
  4. Enter any name into Field Name
  5. Click the fx symbol to create a formula for the value of your field.
    Click the "fx" button
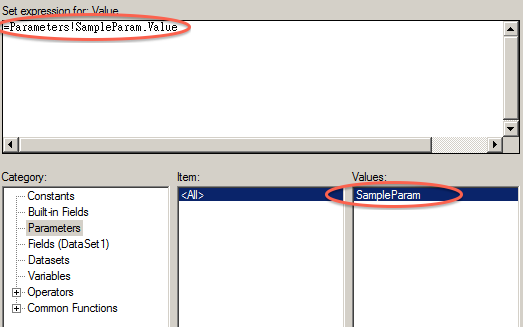
  6. In the new dialog, you decide what formula you want your field to express. Let’s say you want to display a parameter in your report. In this case, you would click “Parameters”, and then double-click the parameter you want to add. You should now see a formula at the top of the window.
    Add a parameter by double-clicking the one you want to add
  7. Hit “Ok” and exit out of the dialogs.
  8. Save your RDL and open it in the Designer .NET.
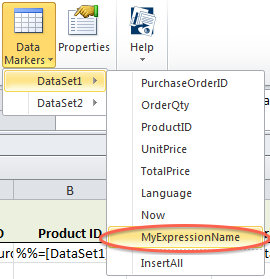
  9. While designing the report, add the data marker that corresponds to your expression into your report.
    ExpressionDataMarker
  10. When you’re finished designing the report, deploy it to SSRS from the OfficeWriter Designer .NET

How to Send OfficeWriter Output in an E-mail

Sending OfficeWriter output in an e-mail is possible while either using OfficeWriter in .NET or with SSRS integration. When using the OfficeWriter .NET API, you can use the .NET MailMessage class to send your OfficeWriter output as an attachment in an e-mail. In SSRS, you can send the output as a subscription-based e-mail.

Sending OfficeWriter Output Using the .NET MailMessage Class

In order to send OfficeWriter in an e-mail output using .NET, you need to use the MailMessage object. If you save the workbook,  document, or presentation to a stream, you can create an attachment out of the file in the stream. This attachment can be added to the MailMessage object and sent to the workbook’s or document’s end users.

//Open Word Template
WordTemplate wt= new WordTemplate();

//Do some databinding and processing here
//YOUR CODE HERE

//Create a file stream that will save the output file on the server
FileStream myStream = new FileStream(@"C:\temp\outfile.xlsx", FileMode.Create);

//Save the output to the stream
wt.Save(myStream);

//Create an Attachment of the file in the stream
Attachment myAttachment= new Attachment(myStream, "output.xlsx");

//Create a mailmessage obj
MailMessage mailObj = new MailMessage("From Address", "To Address", "Subject", "Body");

//Add the attachment
mailObj.Attachments.Add(myAttachment);

//Connect to the server that will send the email
SmtpClient SMTPServer = new SmtpClient("thenameofyourhost");

//Set credentials
SMTPServer.UseDefaultCredentials = true;

//Try sending
try
{
    SMTPServer.Send(mailObj);
}
//Basic error handling
catch (Exception ex)
{
    Response.Write(ex.ToString());
}

Sending OfficeWriter Output Using a SSRS Subscription

If you are integrating OfficeWriter with SSRS, it also possible to send OfficeWriter output by using subscriptions. Be aware that the credentials to run the report must be stored inside of the report.

  1. After uploading your report to the SSRS server, open Report Manager
  2. Find your report and from the Drop Down, select “Manage”
  3. In the left-hand menu, select “Subscriptions” and then “New Subscription”
  4. Fill out the form, including:
    1. Who you want to send the report to
    2. When you want to send it
    3. What parameters the report should run with
    4. Be sure to select either “Excel designed by OfficeWriter” or “Word designed by OfficeWriter” as the rendering format.
      RenderFormat
  5. Click “Ok”
  6. Your new subscription should now appear in the Subscriptions list for your report and will run at the time you specified.

OutOfMemory Exceptions with Large Excel Reports

At times customers have experienced OutOfMemory exceptions when generating very large Excel reports with OfficeWriter. Generating reports with millions of cells will necessarily use a significant amount of memory, especially when using the ExcelApplication object. Note that ExcelWriter is not just keeping a file in memory, it is populating an entire object model in order to be able to manipulate the file. For example, each cell has associated objects for the value, formula, formatting, and more. The ExcelTemplate object (which is also used behind the scenes in our Reporting Services integration) has a smaller object model, so it uses less memory than ExcelApplication. However, a very large report can still require a significant amount of memory with ExcelTemplate.

This article provides tips about how to avoid memory issues when generating large reports.

Try to use the latest version of OfficeWriter
Make sure your application is compiled as 64-bit when possible
Use the ExcelApplication API in the most efficient manner
Cache reports if possible
Queue reports if necessary

Try to use the latest version of OfficeWriter

Many performance improvements have been implemented in ExcelWriter over time. To take advantage of these optimizations, upgrade to the latest version when possible. See the OfficeWriter Change Log for details about changes in every release since OfficeWriter version 4.0 (ExcelWriter version 7.0).

Make sure your application is compiled as 64-bit if possible

A 32-bit application will have never have more than 2 GB of memory available to it, even you are running the application on a 64-bit OS with a huge amount of RAM. The pure .NET ExcelWriter objects (in the namespace SoftArtisans.OfficeWriter.ExcelWriter) are fully 64-bit compatible (see Using OfficeWriter .NET on a 64-bit machine). If you are using the pure .NET objects and running on a 64-bit machine, make sure your project is compiled as a 64-bit application. If you have an ASP.NET application that was written against a very old version of ExcelWriter, it may have dependencies on ExcelWriter COM which is 32-bit, in which case compiling for 64-bit will not be an option (see this KB article for more information)

Use the ExcelApplication API in the most efficient manner

There are a number of steps that will improve performance when working with large reports with the ExcelApplication API (For more details, see Best Practices with Large Reports) :

  • Populate data with ExcelTemplate, and use ExcelApplication beforehand for any necessary runtime file manipulations. ExcelTemplate is the most efficient way to import data but it cannot make fine-grained changes to the workbook. If you need to modify the workbook at runtime, modify the template programmatically before passing it to ExcelTemplate to avoid having to open a fully populated report with ExcelApplication. See Preprocessing vs. Postprocesssing.
  • Avoid referencing Empty Cells. Any time you touch an empty cell with ExcelApplication, a Cell object (and all its associated objects) is created even if it didn’t already exist. If you need to loop through cells to look for something, used Worksheet.PopulatedCells to get an Area containing only populated cells. Note that PopulatedCells will return cells that have only formatting and no data. For this reason is it important to apply formatting in the most efficient manner. More information about this below.
  • Apply Styles to Columns and Rows, not Cells. Setting styles on a cell-by-cell basis or applying a style to an area, causes a separate Style object to be created for every Cell. On the other hand, if you Set a Style on a column or row, using ColumnProperties.Style or RowProperties.Style, there will only be one formatting record for the entire column or row. Currently there is no option to set conditional formatting at the column or row level with the ExcelWriter API. A workaround is to set the conditional formatting on the columns or rows in your input file, and ExcelWriter will preserve it.

Cache reports if possible

If you have a report that requires a lot of memory and is requested by many concurrent users, investigate whether it might be possible to keep a cached copy of the report and serve it to multiple users. Does the data change constantly or only at certain intervals? Are there parameters that tend to be different for every user or do multiple users run the report with the same parameters? If you have multiple users requesting a report with the same data and the same parameters, this report could be a good candidate for caching. You could run the report at a certain time with a background process, or you could cache a copy the first time any user generates the report within a certain timeframe.

If you are using OfficeWriter in a custom .NET application, you would implement caching in your own code. If you are using OfficeWriter in SSRS-integration mode, you can use SSRS’s built-in caching functionality.

Queue reports if necessary

If you have a report being accessed by multiple users that requires a great deal of memory in a memory-constrained environment (i.e. your server is 32-bit or you have to compile your application as 32-bit for some reason), and caching isn’t an option (i.e. every time a user runs the report it is different), then queuing reports may be something to consider. Instead of delivering every report on-demand, you can restructure your application to store the users’ requests, process them sequentially in a background process, and notify the users by email or some other means when their reports are ready. This approach should not cause your users to have to wait much longer for a report than if it was being generated on-demand, but of course the user experience will be a little different. One option is to implement logic in your application to only queue very large reports but deliver smaller reports on-demand.

If you are using OfficeWriter in SSRS-integration mode, you can accomplish queuing by using SSRS subscriptions.
Options for Importing HTML snippets into a Word document

If you are generating a Word document with OfficeWriter and you wish to import some HTML-formatted text, there are various  options, depending on the version of OfficeWriter you are using and the file format of your document (.doc or .docx/.docm)

The Template-based Approach
The Programmatic Approach

Template-based approach

With WordWriter’s template-based approach, using the WordTemplate API or  OfficeWriter’s SSRS integration, HTML-formatted text can be imported by using special merge field modifiers.  This functionality was introduced in version 8.0 with some limitations   (i.e. no SSRS support).     Further enhancements were added in version 9.0 and 9.1.    Using version 9.1 is highly recommended, as it provides the most comprehensive support for this functionality in both custom .NET applications and SSRS integration mode.

Advantages of template-based approach

  1. No complex coding required, everything is controlled through your template and data
  2. Allows HTML-formatted text to be used with WordWriter’s mail merge and grouping functionality

Limitations of template-based approach

  1. Only supports the OOXML file format.  The template must be a .docx or .docm file
  2. The feature relies on Word’s “altChunk” functionality.  Each HTML snippet is embedded as a separate little file, and Word renders the contents when the file is opened on the client machine.   Therefore, if you are viewing the output file in something other than Word (i.e. a mobile device), the HTML may not be rendered correctly. Note: If you resave the output in MS Word, the HTML will be merged into the main document and can be viewed in any Word-compatible application.

How to Use It

Version 8.0 through 9.0 – use the document(html) modifier

  • Your merge field should look something like this:
    <<DataSourceName.ColumnName(document(html)>>
  • Your HTML-formatted text must be passed in as a byte array, since the “document(format)” modifier expects a file rather than a string.
  • Starting in Version 9.1, it is possible for your data to include a filepath or URL rather than a byte array, by using  the new AllowURIs property. However, in 9.1 the “document(format)” modifier is no longer the best way to import HTML snippets.  In 9.1 and above, the “document(format)” modifier should be reserved for cases where you wish to embed an entire document (HTML, DOCX or RTF)
  • Prior to version 9.0, the data must contain an opening and closing <html> tag.  Beginning in version 9.0, WordWriter will add the opening and closing tags for you.
  • For more information about using the document modifier, see Inserting an Embedded Document

Version 9.1 and above – use the new HTMLSnippet modifier

  •  Instructions for using the new HTMLSnippet modifier are in the WordWriter documentation.
  •  Your merge field for the field containing the HTML-formatted text should look like this: <<DataSourceName.ColumnName(HTMLSnippet)>>
  • The data being bound to a merge field with an HTMLSnippet modifier must be a string.  The string does not need to include opening and closing <html> tags.


Programmatic approach

If you have OfficeWriter Enterprise Edition, you can import HTML snippets using the WordApplication API together with our open source project HTMLToWord.

Advantages of the Programmatic Approach

  1. The HTML snippets are converted into true Word formatting, unlike the altChunk approach used by the WordTemplate object.     Therefore the output file will be viewable in any Word-compatible application.
  2. HTMLToWord provides very fine-grained control of the HTML import. For example:
    • Using the HTMLInsertProperties settings, you can specify a default font to override fonts in the HTML, and you can specify whether to ignore unknown tags or insert their contents as text.
    • Using the delegate methods (like InsertDelegate) you can override the default behavior when processing certain tags, or write your own code to handle custom tags in your XHTML.
  3. HTMLToWord is open source project so you can modify the source code as desired.

Limitations of the programmatic approach

  1. WordApplication only supports the .doc file format.  HTMLToWord cannot be used with .docx or .docm files.
  2. This approach is code-intensive
  3. The string must be valid XHTML
  4. HTMLToWord is an open source project, separate from the OfficeWriter product itself.  OfficeWriter support contracts do not cover support for HTMLToWord.

How to Use it

  1. Make sure you have WordWriter Enterprise Edition version 4.0 or above
  2. Download the HTMLToWord project from sourceforge
  3. Follow instructions in Using HTMLToWord for compiling the dll and referencing it in your application
  4. For detailed information about how to use the API, see the section of the documentation under Inserting HTML with WordApplication

Can OfficeWriter 3 or ExcelWriter 6 run on a 64-bit OS?

OfficeWriter version 3.x includes ExcelWriter version 6.x and WordWriter version 3.x.

OfficeWriter v3.x is no longer supported, and upgrading to the current version is highly recommended.   However, if for some reason you need to use version 3.x on a 64-bit system, this article provides all the information you need.

OfficeWriter 3.9.1 and 3.9.2

The first version of OfficeWriter to include 64-bit support was version 3.9.1.  The 3.9.1 installer will run on a 64-bit machine.   The .NET assemblies in 3.9.1 and above are compiled with the /anycpu flag, which means they will work with both 32-bit and 64-bit processes.  The COM dlls, however, are 32-bit.  Here are all the considerations when using 3.9.1 or 3.9.2 on a 64-bit system:

  1. If you are using OfficeWriter in a classic ASP application or an ASP.NET application that is using our legacy .NET wrapper classes for ExcelWriter COM, you will need to set your application pool to 32-bit mode   (For more information about OfficeWriter COM, see Using OfficeWriter COM)
    1. Open the IIS management console
    2. Create a new app pool or select an existing one
    3. Click on “Advanced Settings”?
    4. Set “Enable 32-Bit Applications” to True
    5. Click OK
  2. If your application is ASP.NET, whether it is using the pure .NET objects or the wrapper classes, you will need to install the 64-bit version of the J# runtime before running the OfficeWriter installer.  OfficeWriter 3.x had a dependency on J#.   This was removed in version 4.  You can get the 64-bit J# redistributable here.   Note that the version of J# must match the version of the .NET framework you are using for your application.   Microsoft has deprecated J# and there is no version of J# later than 2.0.

OfficeWriter 3.0 to 3.8.1

Versions of OfficeWriter 3 prior to version 3.9.1 do not officially have 64-bit support, however the dlls may be used on a 64-bit system with certain limitations. The automatic installer is not 64-bit compatible and the .NET assembles are not compiled with the /anycpu flag.  Therefore, both the .NET and COM dlls are 32-bit.  OfficeWriter 3.0 – 3.8.1 can be used on a 64-bit system only in the following manner:

  1. You must do a manual installation:
    1. If your application is ASP.NET, make sure the 64-bit J# runtime is installed.  See step 2 above.
    2. Copy the OfficeWriter dlls and LicenseManager.exe from an OfficeWriter program folder on a 32-bit machine
    3. Enter the OfficeWriter v3 (or ExcelWriter v6) license key with LicenseManager.exe
    4. If you are using OfficeWriter in classic ASP or if you are using the .NET wrapper classes for the COM objects, register the COM dlls (see Using OfficeWriter COM)
    5. Copy the .NET dlls to the bin directory of your application(s)
  2. You must be using OfficeWriter in a custom application rather than in SQL Server Reporting Services.   A 32-bit dll cannot run in a 64-bit process.  64-bit SSRS does not have an option to set it to run in 32-bit mode.  Therefore in order to use OfficeWriter in 64-bit SSRS, you must use version 3.9.1 or above.
  3. You must assign your application to a 32-bit application pool:
    1. Open the IIS management console
    2. Create a new app pool or select an existing one
    3. Click on “Advanced Settings”?
    4. Set “Enable 32-Bit Applications” to True
    5. Click OK

Upgrading from v3.x

If you have an ASP.NET application and you wish to upgrade from version 3.x in order to eliminate the dependency on J# and take advantage of  fixes and enhancements in later versions, you will need to make some changes to your code.  See these pages in the documentation:

Enabling ExcelTemplate and WordTemplate Properties for SSRS

OfficeWriter SSRS Integration allows users to generate OfficeWriter output from RDLs in Report Manager. To enhance the level of customization that SSRS integration provides, users are able to set ExcelTemplate and WordTemplate properties by adding keys to specific configuration files. This article will describe how to enable supported ExcelTemplate and WordTemplate properties in SSRS. Please note that these properties are global: they will apply to OfficeWriter output generated by every report in Report Manager. To see what ExcelTemplate properties are supported in SSRS, visit this link.

Generating Reports On-Demand

One possibility for generating reports from RDLs is to click on the RDL in report manager and export the RDL to ExcelWriter or WordWriter formats.

If you would like to use this functionality, you will need to add your property keys to:  C:\Program Files\Microsoft SQL Server\[SQL INSTANCE]\Reporting Services\ReportServer\web.config

SSRS Subscriptions

SSRS subscriptions allow reports to be generated from RDLs to a fileshare or delivered to users via e-mail on a schedule. However, it is important to note that SSRS subscriptions run in a different context and process from the rest of SSRS. The result is that you will need to add your property keys to a different configuration file for subscriptions than you will for generating reports on the fly.

If you would like to use this functionality, you will need to add your property keys to:  C:\Program Files\Microsoft SQL Server\[SQL INSTANCE]\Reporting Services\ReportServer\bin\ReportingServicesService.exe.config

Instructions for Adding Keys to A Configuration File

Here are the steps to enabling supported ExcelTemplate and WordTemplate properties to the above configuration files:

  1. Open the configuration file you would like to modify. See above for which configuration file will enable the functionality you desire. You can add properties for reports generated on-demand, by subscription, or both.
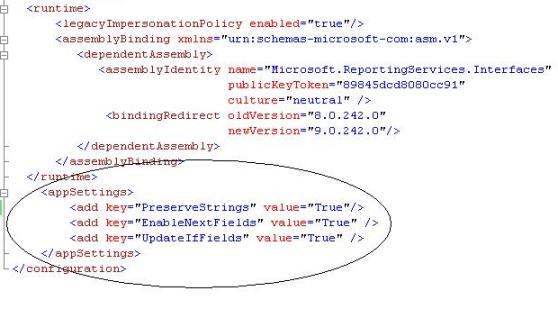
  2. Check to see if an appSettings section exists in the file: ie <appSettings></appSettings>
    1. If yes
      1. Add your keys to the existing appSettings section. The format is <add key=”[KEY NAME]” value=”[VALUE]” />
    2. If not
      1.  add an appSettings section before the closing </configuration> tag at the bottom of your file. It should look like: <appSettings></appSettings>
      2. Inside of the appSettings tags, add your keys in the <add key=”[KEY NAME]” value=”[VALUE]” /> format.

webconfig

This is an example appSettings section in a configuration file

[Review] Pinal Dave from SQLAuthority.com

Founder of SQLAuthority.com and developer for Pluralsight, Pinal Dave, reviewed OfficeWriter’s SSRS integration. Below is an excerpt from his blog post. To read the full review click here.

The OfficeWriter API is a .NET library by SoftArtisans that makes it easy for developers to add Excel and Word reporting and document processing to their own applications. OfficeWriter allows users to take data from any data source and turn reports into dynamic, visual presentations. Without requiring Microsoft Office on the server, OfficeWriter is optimized for high-performance, scalable server use. The .NET API integrates with business applications, including those in SSRS and SharePoint.

Why use OfficeWriter’s API with SQL Server Reporting Services (SSRS)? The default rendering extensions for Reporting Services deliver flat, static output. In order to render for multiple extensions such as HTML and PDF, the basic report design in SSRS cannot accommodate specific features, such as multiple worksheets in Excel. This also means that certain features like charts cannot be dynamic in the output because not all of the rendering extensions in SSRS support Excel charts. Therefore, charts are exported as images. Additionally, until SSRS 2008 R2, there wasn’t a default rendering extension for Word. Before SSRS 2012 there was no means of exporting to XLSX or DOCX. Using OfficeWriter for Reporting Services corrects these limitations, allowing end-users to design reports in Excel and Word and make use of many specific features in those applications.

How Creating a Report in SSRS with OfficeWriter Works:

OfficeWriter fits into SSRS with two parts. First, the OfficeWriter Renderer is a server-side rendering extension for Excel and Word, providing Excel and Word features beyond the built-in SSRS export options. Second, the OfficeWriter Designer is a client-side add-in for Excel and Word, which allows users to design reports that utilize the OfficeWriter rendering extensions.

To read the full review click here.

Choosing OfficeWriter Designer or Designer .NET

Overview

OfficeWriter Designer is an add-on for Microsoft Excel and Microsoft Word that allows users to create new RDL reports and design pre-existing reports inside of Excel or Word. Until OfficeWriter 8.6, the original OfficeWriter Designer was the only tool available with this functionality.

However, as of OfficeWriter 8.6, SoftArtisans will include a second, new version of OfficeWriter Designer called the OfficeWriter Designer .NET. The OfficeWriter Designer .NET is a completely rewritten version of its predecessor, created from .NET/C# using VSTO (Visual Studio Tools for Office run time).

Benefits of OfficeWriter Designer .NET

  • Office 64-bit support
  • No dependencies on COM/VBA
  • More robust handling of modifications to queries in Visual Studio/Report Builder
  • Better parameter support with the View functionality, including support for cascading parameters

Which Designer Should I Use?

The new OfficeWriter Designer .NET does not currently support all of the features of the previous Designer. For full functionality support, use the original OfficeWriter Designer. Please see the feedback section below for more information about submitting requests for new features. Continue reading Choosing OfficeWriter Designer or Designer .NET

How to create a drill-down report in Excel with hyperlinks

Problem

Reporting Services provides drill-down report behavior, where clicking on a populated data field generates another report based on the value of the data field clicked. This post addresses how to acheive similar behavior within Excel with OfficeWriter using Reporting Sevices URL access and Excel’s HYPERLINK function.

Solution

Overview

When the OfficeWriter renderer populates the Excel report with data, it inserts new rows for each row of data. This means that all Excel formulas are updated, including the HYPERLINK function formula. This approach uses this formula update functionality and imported data values to dynamically create hyperlinks that point to the Reporting Services URLs.

For the sake of example, “SalesReport” is the original report that contains a list of invoice IDs. “InvoiceReport” is the linked report that takes an InvoiceID as a parameter.

Reporting Services URL Access

Typically, Reporting Service reports are rendered through an application, such as the Report Manager. Reporting Services also allows for rendering reports using just URLs. The basic syntax to render a report wtith a parameter is:

 http://[servername]/reportserver?/[File path to report on Report Server] &rs:Command=Render&rs:Format=[Rendering Format]&[ParamID]=[Param Value] 

The URL for rendering the “InvoiceReport” in the OfficeWriter for Excel format, with Invoice ID 12345, is as follows:

 http://myservername/reportserver?/ InvoiceReport&rs:Command=Render&rs:Format=XLTemplate&InvoiceID=12345 

Notes:

How to create a custom SQL Server Reporting Services error page

Problem

When SQL Server Reporting Services (SSRS) encounters an error, it returns an error message which is displayed by Report Manager. The error message can include technical details that reveal more information than necessary or are potentially confusing or intimidating to a user. One example is the scenario in which the user attempts to export a report from Report Manager using the “Excel designed by OfficeWriter” option, but the report is not created using the OfficeWriter Designer. In this case, SSRS would return the following error:

 Error SA008050: This report was not designed for the selected OfficeWriter rendering extension. 

Depending on configuration, Report Manager may also display a detailed error message and a stack trace. In this case, the error message is self-explanatory. However, often it is desirable to provide a friendly custom error page that hides the technical details of the internal exception and provides more helpful instructions to users.

Configuring a custom error page for Report Manager is no different from doing so for other ASP.NET applications. The custom error page is simply a web page that you create. You can configure ASP.NET to display a custom error page to all users. Alternatively, the custom error page can be displayed only to users accessing Report Manager from a remote machine, which is usually the case in production. For users accessing Report Manager from the same machine, the full error would be displayed. Typically, a detailed error message is helpful for debugging purpose during development.

Additionally, you can configure a custom error page to be displayed for specific HTTP status codes. For example, the OfficeWriter error above is an internal server error, which results in HTTP status code 500.

Solution

To configure a custom error page for Report Manager:

  1. Browse to Report Manager folder.
    • For SSRS 2005, its typical location is DRIVE:\Program Files\Microsoft SQL Server\MSSQL.x\Reporting Services\ReportManager, where x is the instance
    • For SSRS 2008 and SSRS 2008 R2, DRIVE:\Program Files\Microsoft SQL Server\MSRS10.SSRS\Reporting Services\ReportManager .
  2. Make a copy of the existing Web.config as backup
  3. Open Web.config in a text editor, or in Visual Studio to get Intellisense support
  4. Under the section, locate the `1 section
  5. Modify the existing section, or insert a new one, with the appropriate settings
  6. Restart the Report Server

The possible values for the mode attribute of the tag are Off, On, and RemoteOnly. The default is Off. In order to enable a custom error page, mode must be set to On or RemoteOnly. For example, the below section specifies the following: 1) a custom error page be displayed for remote users only, 2) a specific page for HTTP status code 500, and 3) a default page for all other HTTP status codes. Note that attributes are case-sensitive.