All posts by Alison

Full time OfficeWriter Product Owner, part-time pivot table enthusiast.

Super Short Tips: Working with pivot tables in VBA

Sometimes you just need to write macros for pivot tables. It’s a fact of life.

Maybe your pivot table is dynamically populated with data and you need to make some custom changes once the data is in the table, but you can only do that after the file is opened in Excel and the pivot table refreshes. Perhaps your plagued with the error that happens when you open a file with a pivot table directly from Internet Explorer. Whatever your reason, you need to write some VBA for pivot tables.

Here’s my super short list of tips for working with pivot tables in VBA:

#1 – Record a macro of yourself to get started

If you know what you want to do, but you’re not sure what the VBA code should be, record a macro of yourself doing the desired action. Not only will this give you a hint about where to start in your VBA, but you’ll also verify the exact method calls for your version of Excel and your pivot table version. All of my pivot table macros start with me performing operations in Excel and then generalizing the VBA from there.

#2 – Base your VBA on pivot fields

Pivot fields come from the column names in the data source for your pivot table. Even as the data is changing, the pivot fields remain constant because the construction and layout of the pivot table depends on the pivot fields. The fact that they remain constant can be very useful when writing VBA.

If you create macros that are based on particular pivot table items, you can’t be sure that those values will be there when the workbook is populated. For example, you want to make sure that all the groups for a particular row label are collapsed when the user first encounters the pivot table. You can manually collapse each of these groups. Problem: you create a macro that collapses groups “A”, “B”, “C”, etc separately. What if group “A” isn’t in your data set when the report is generated? Excel will throw an errror.

You can take the chance that group “A” may or may not appear in your data set, or you can create a macro that focuses on the pivot field that group “A” belongs to, rather than the individual entries.

ActiveSheet.PivotTables("PivotTable1").PivotFields("PivotField1").ShowDetail = False

This will collapse all the groups within ‘PivotField1’.

In short, avoid making macros that are dependent on specific data, because you can’t be sure that the VBA will execute without error.

#3 – VBA for pivot tables in Excel 2003 is different than in Excel 2007/2010

Excel 2003 had our best friend, the Pivot Table Wizard. Everything for the pivot table was done through a wizard menu, so the VBA in Excel 2003 follows suite. Starting in Excel 2007, Excel reworked how users interacted with pivot tables, and the Pivot Table Wizard was banished for eternity. Thus, VBA in Excel 2007/2010 is drastically different.

If you have end-users who are going to be opening a report with pivot table VBA in Excel 2003, 2007, and 2010, you’ll want to detect what version of Excel is being opened, then execute the 2003 or 2007/2010 based on this.

To determine what version of Excel the VBA is executing in, check Application.Version. This will return a string representing the version of Excel (e.g. 10.0, 12.0, 14.0 etc.)

#4 – Pivot tables have versions too

Just as there are differences between XLS and XLSX files in terms of what features can be supported, there are differences between pivot tables created in XLS files vs those created in XLSX files. What’s more, there are also differences between pivot tables created in Excel 2007 and 2010. It’s important to note what version of pivot table you’re targeting.

Luckily you can check the PivotTable.Version property to see which of the versions your pivot table is.

So there you have it – my cheat sheet for creating VBA for pivot tables.

Super Short Tips: Creating Workbooks with Excel VBA

Let’s say you want to write an Excel macro that will create a new workbook and save it to a specific location and then close the new file. This is really easy with Excel VBA:

Sub AddNewWorkbook()
     Set NewWb = Workbooks.Add
     With NewWb
          .SaveAs Filename:="C:\Path to directory\NewFile.xls"
          .Close
     End With
End Sub

You run this once and it works perfectly. You run it again and Excel tells you that “A file named ‘C:\Path to directory\NewFile.xls’ already exists in this location. Do you want to replace it?”

Well, of course you do. Why is Excel bothering you with these trivial questions?

So you want to supress the Excel alert. To do this, just set Application.DisplayAlerts to False before you save the file, and then turn it back on after you’re done:

Sub AddNewWorkbook()
     Set NewWb = Workbooks.Add
     Application.DisplayAlerts = False
     With NewWb
          .SaveAs Filename:="C:\Path to directory\NewFile.xls"
          .Close
      End With
     Application.DisplayAlerts = True
End Sub

Easy-peasy.

This technique is also handy for supressing the oh-so-lovely Do you want to save the changes you made to workbook X? alert. Microsoft has some additional tips for hiding the saving changes alert in this KB article: How to suppress “Save Changes” prompt when you close a workbook in Excel.

How to import text on multiple lines in Excel

Let’s say that you have a string “Top sales person in the Central region” in your data base. You want it to look like the following in a cell in an Excel worksheet:

Highlights:
Top sales person in the Central region

How do you do this?

Splitting text over multiple lines in Excel

In order to display text on multiple lines in a cell in Excel, two conditions must be met:

  1. The cell must be formatted with “Wrap Text”
  2. The text must contain the new line character

If you press ALT+ENTER in Excel, Excel automatically formats the cell with “Wrap Text” and inserts a new line character into the cell. But this approach won’t work if you are importing your data from an outside source, for example, if you are importing data with OfficeWriter’s ExcelTemplate object.

Formatting the cell with “Wrap Text” is as easy as right clicking the cell, going to Format Cell > Alignment  and checking off ‘Wrap Text’. The next question is how to get the new line character into the cell.

Option 1: Use an Excel formula to concatenate the new line character to the text in the cell

In the example, we need to append “Highlights:” and the new character line to the text that’s already there. Let’s say that the text is in cell D8. Then the formula would be =CONCATENATE("Highlights", CHAR(10), D8). If the formula had to be applied to a series of cells, where you weren’t sure if there would be a comment or not, then you could wrap that formula in an IF formula: =IF(LEN(D8)>0, CONCATENATE("Highlights:", CHAR(10), D8), ").

What if the text from the database needed to be split over multiple lines?

Let’s suppose the text in the database already contained “Highlights”: “Highlights: Top sales person in the Central region”. Then how do you break apart the strings?

First we need to grab the “Highlights:” part. We can employ Excel’s LEFT(N_chars) function, which grabs the N left-most characters:

=LEFT(D8, 11) will return “Highlights:”

Next we need to grab just the second part. We can use Excel’s MID(text, start_index, chars) function to get a specific sub-string:

=MID(D8, 13, LEN(D8)-11) will return “Top sales person in the Central region”.

We can concatenate these together with the new line character: =CONCATENATE(LEFT(D8,11), CHAR(10), MID(D8, 13, LEN(D8)-11)). We can also wrap it in the similar IF formula if we only wanted to apply this formula if there was a comment. (Otherwise you will end up with #VALUE!).

Option 2: Add the new line character to the text that it’s imported into the file

(For example, manipulating the data in .NET code before importing it into a file using ExcelTemplate).

Just add the newline character to your text: “Top sales person in the Central region” –> “Highlights: /n Top sales person in the Central region”. When the text is imported, Excel will respect the new line character. Make sure that the cell is formatted with “Wrap Text” ahead of time.

Additional reading:

Creating a % of Total Column with ExcelWriter

Intro

This is the final post in a 3-part series on creating % of Total columns in Excel spreadsheets. A % of Total column displays values as a percentage of the total sum of the values in that column. I’ve already touched on how to do this with static data in Excel and also with a pivot table.

For those who might be new to ExcelWriter, ExcelTemplate, and data markers:

ExcelWriter’s ExcelTemplate method of creating Excel files is to design a template in Excel that contains data markers. Data markers are cell values that begin with %%= or %%=$ that specifies a database column, variable, or array to insert into the spreadsheet column. ExcelWriter does this by inserting a new row into the worksheet for each row of data being imported. When this happens, ExcelWriter updates the references to the cells that are affected by the row insertion.

Solution

For this exercise, I’m starting out with a simple table that’s has a Format as Table table style applied. Column C contains our sales data. Columnd D will be the % of Total column. The table header row is row 4 and the data marker row is row 5. Note that we have data markers %%=Data.StoreName and %%=Data.StoreSales to import the Store Name and Store Sales columns from the data source. The total row is computed with formulas =SUM(C5:C5) and =SUM(D5:D5). The data marker and total rows have been pre-formatted with currency and percentage number formats.

Continue reading Creating a % of Total Column with ExcelWriter

Adding a % of Total Column to a PivotTable

Intro

A customer recently asked for some help with adding a % of Total column for sales data without a pivot table (read about it with Excel and with ExcelWriter). But I wanted to see how the same table and column would be done with a pivot table. Enter Pitan, the Pivot Mage and here we go!

Solution

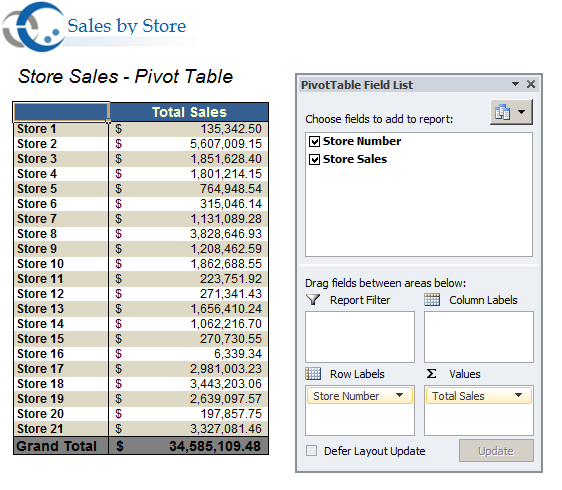
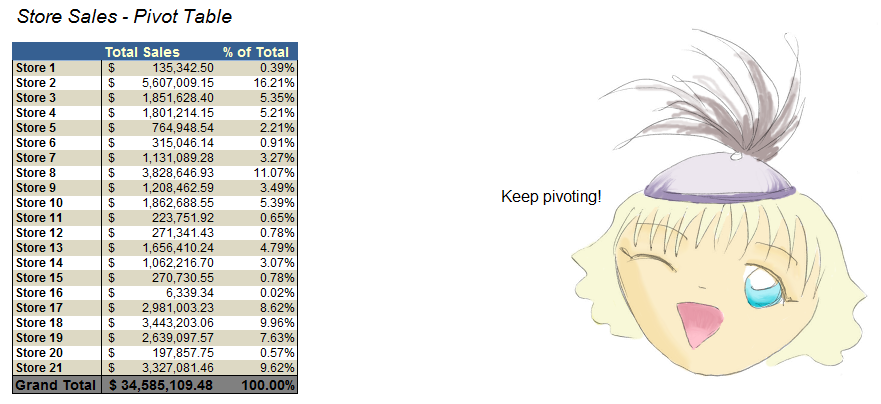
We start with a basic pivot table that already has the store names as row labels and the sales data as the data values. We want to add a column that shows each stores’s sales totals as a percentage of the sales total over all the stores.

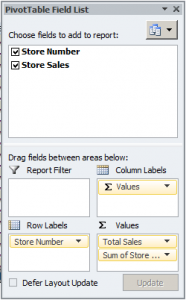
1. Add a duplicate column of the values that you want to show the percentages for. In this case, it’s “Store Sales”, so there will be two columns of “Stores Sales”: one for displaying the raw values and one for calculating the percentages.

2. Display the field values as % of Column Total. This can be done two ways:

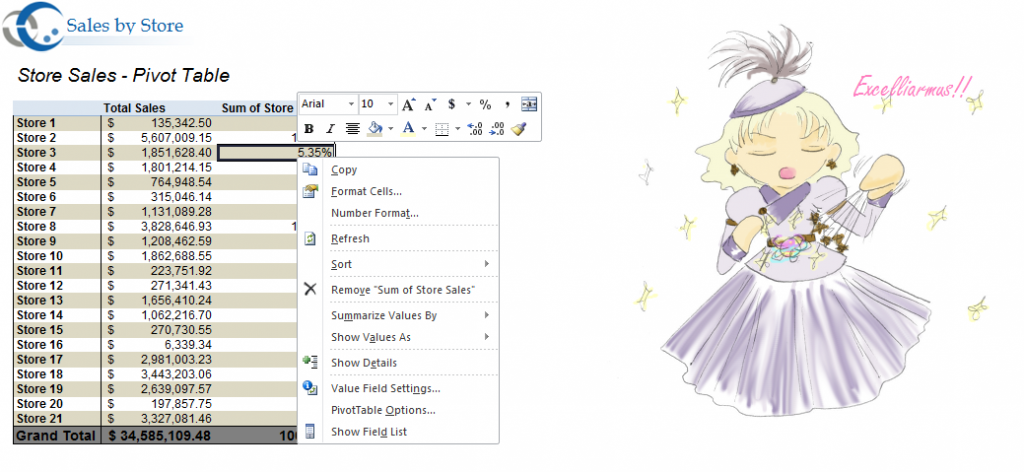
  • Right click on the field > Show Values As > % of Column Total
  • Use Value Field Settings to format the field
    1. Go to the field in the field view
    2. Select ‘Value Field Settings’ from the drop down
    3. Go to the Show Values As tab
    4. Select % of Column Total


3. (Optional) Rename the field as desired (from Value Field Settings)

4. Congratulations!

For more information about different field calculations, see Microsoft’s article on how to Calculate values in a PivotTable Report.


How to insert a hard carriage return into a string of data

Problem

In Excel, to have text displayed on multiple lines, two conditions must be met:

  1. The cell must be formatted with Wrap Text
  2. The text must contain the new line character (hard carriage return)

When you press ALT+ENTER in Excel, Excel automatically formats the cell to have Wrap Text and inserts a new line character into the cell.

This post covers how to insert a hard carriage return into data that is imported into an Excel file with ExcelWriter.

Solution

Text Wrap

If you are importing data using ExcelTemplate, make sure to format the cell alignment with “Text Wrap” in the cell that contains the data marker. This also applies if you are importing data using ExcelApplication with a partial template.

To set “Wrap Text” in Excel:

  1. Right-click on the cell
  2. Go to the Alignment tab
  3. Under Text Control, check off “Wrap Text”

If you aren’t working with a template, you can also set this property on a cell using ExcelApplication:

 //The WrapText property must be set to true in the cell containing the new line character worksheet.Cells["A1"].Style.WrapText = true; 

New Line Character

To import the new line character with your data, just add the new line character to your string of data.

Here is an example of using ExcelApplication to write a string into a cell. The string contains the new line character:

 worksheet.Cells["A1"].Value = "Fred Smith," + '\n' + "President"; 

Here is an example of some data that might be bound to a ExcelTemplate file:

 object[] dataArray = new object {"Fred Smith \n President", "2003", "Boston, MA"};

How to retrieve a formatted date from an Excel workbook

Problem

When I retrieve the value of a cell which has a Date format in Excel, I do not get the formatted Date; I get a number. How do I retrieve the formatted Date instead?

Solution

Excel Dates are stored in a “serial date format” behind-the-scenes. So, for example, 2/4/2004 is stored as 38021 in Excel. This number represents the number of days elapsed since January 1, 1900.

When you display a Date in Excel, a built-in conversion is performed which converts this serial format into a string for display in the cell depending on the format you apply to that cell.

More information on Excel Serial Dates can be found at http://www.cpearson.com/excel/datetime.htm.

If you want to use a Date from a cell in your code, all you will be able to retrieve is the serial value of this Date. To use it as a formatted string you will have to convert it.

A set of conversion methods can be found at Code Project.

You will need to use one of them in your application in order to convert the serial value of the date to a formatted string. Once you have a formatted string, you can also create a Date object in .NET (using Convert.ToDateTime() for example) and use the built in .NET Date functions if desired.

A simple example in VB.NET

This example retrieves a serial date from an Excel cell and uses a VB.NET version of the ExcelSerialDateToDMY() method from The Code Project to convert it to its day, month, and year components. To run this example, you would call ReadDate() from the PageLoad event or a ButtonClick event, for example. ReadDate() reads the Date (in serial date format) from cell “E1” of sample2.xls. It then calls ExcelSerialDateToDMY() to retrieve the converted day, month, and year values of the date. It then creates a new .NET Date object using those values. Finally, it writes the .NET Date’s short string value to the Response, so you can see that the correct values were retrieved.

Private Sub ReadDate()
'Create Application object and load Excel file from disk
Dim xlw As New SAExcelApplicationDotNet xlw.Open(Server.MapPath("./sample2.xls"), False)
Dim sheet As SAWorksheet sheet = xlw.Worksheets(1)


'Read cell E1, it's a date
Dim sd As Integer = sheet.Cells("E1").Value

' The following 3 variables are used as "output" parameters to the ExcelSerialDateToDMY()
' method, since the method uses the parameters By Reference, not By Value.
Dim d As Integer ' Will contain the day as an Integer
Dim m As Integer ' Will contain the month as an Integer
Dim y As Integer ' Will contain the year as an Integer


' Retrieve the day, month, and year values of the serial date.
ExcelSerialDateToDMY(sd, d, m, y)


' Create a new .NET Date object with the retrieved values, and display it on the page.
Dim dt As Date = New Date(y, m, d)
Response.Write(dt.ToShortDateString)
End Sub


Private Sub ExcelSerialDateToDMY(ByRef nSerialDate As Integer, ByRef nDay As Integer, _
ByRef nMonth As Integer, ByRef nYear As Integer)
' This function is courtesy of The Code Project.
' http://www.codeproject.com/datetime/exceldmy.asp?df=100&forumid=4548&exp=0&select=590906


' nSerialDate is the serial date from Excel
' nDay, nMonth, and nYear are the "output parameters" where the method will store
' the Day, Month, and Year values as Integers that it extracts from nDate


' Excel/Lotus 123 have a bug with 29-02-1900. 1900 is not a
' leap year, but Excel/Lotus 123 think it is...
If nSerialDate = 60 Then
nDay = 29
nMonth = 2
nYear = 1900
Return
ElseIf nSerialDate < 60 Then
' Because of the 29-02-1900 bug, any serial date
' under 60 is one off... Compensate.
nSerialDate = nSerialDate + 1
End If


' Modified Julian to DMY calculation with an addition of 2415019
Dim l As Integer = nSerialDate + 68569 + 2415019
Dim n As Integer = CInt(Fix((4 * l) / 146097))
l = l - CInt(Fix((146097 * n + 3) / 4))
Dim i As Integer = CInt(Fix((4000 * (l + 1)) / 1461001))
l = l - CInt(Fix((1461 * i) / 4)) + 31
Dim j As Integer = CInt(Fix((80 * l) / 2447))
nDay = l - CInt(Fix((2447 * j) / 80))
l = CInt(Fix(j / 11))
nMonth = j + 2 - (12 * l)
nYear = 100 * (n - 49) + i + l
End Sub

How to run different versions of OfficeWriter side-by-side

Problem

You have existing applications using an older version of ExcelWriter or WordWriter. You want to use the latest version of the product for new application development without affecting existing applications. Is this possible?

Solution

Yes, if you are using the .NET version of OfficeWriter, it is easy to run different versions side-by-side (in different applications). You just need to be aware of considerations regarding the automatic installer and the product license keys.

Note: If you are using OfficeWriter’s SSRS integration, a single instance of Reporting Services can only have one version of OfficeWriter installed. However, you may use the newer version in other standalone applications.

Installation

Only one version of OfficeWriter can be installed with the automatic installer. The usual upgrade process is to first remove the previous version through Add/Remove programs and then run the new installer. Therefore, in order to use two versions side-by-side, at least one of the installations will need to be manual.

License Keys

When your company purchased OfficeWriter, the main contact for your order received license keys for the product which must be installed on each server. These keys can be entered either through the automatic installer or by using our LicenseManager.exe utility (which is unpacked to the OfficeWriter Program Folder).

Every major version of OfficeWriter requires a new set of license keys. Minor upgrades can continue using the same license keys. If the new version you wish to install is a major upgrade from the previous version, you will need to enter a new license key.

Instructions

First, download the new installer package from the product updates page.

Assuming the previous version of the product was installed with the automatic installer, you now have two options:

  1. Do a normal automated upgrade and then reinstall the old license key manually.
  2. Leave the old installation untouched and do a manual upgrade.

Option 1:

  1. (optional) Back up the OfficeWriter Program folder from the previous version.
  2. Uninstall OfficeWriter from Add/Remove Programs. This will not affect the DLLs in your applications.
  3. Run the new installer. Make sure to use the correct license key for the new version.
  4. If this was a major upgrade, the new license key will not work for the older version so you need to reinstall the older license key

To reinstall the older license key:

  1. Double-click on the LicenseManager.exe utility in the program folder.
  2. Enter the older key in the first textbox and click “Add/Upgrade.” Exit the application.

Option 2:

  1. Do NOT uninstall the previous version.
  2. Unpack the files from the new installer by running it on a different machine. (Note: If the other machine does not have a license for OfficeWriter, please uninstall the product when you are through with this process)
  3. Copy the OfficeWriter DLLs to the destination server from the bin directory in the OfficeWriter Program folder.

If this is a major upgrade:

  1. Copy the new LicenseManager.exe from the OfficeWriter program folder. The older version of this utility that you may have on your server will not be able to accept the license keys for the new major version of OfficeWriter.
  2. Double-click on the .exe. It will show you which keys are already installed.
  3. Enter the new key in the first textbox and click “Add/Upgrade.” Exit the application.

You are now ready to use the new version of OfficeWriter in any application.

What are the system requirements for OfficeWriter?

The system requirements for OfficeWriter are outlined in our documentation for the two major versions that are currently supported:

OfficeWriter 8

OfficeWriter 8 Documentation Home

OfficeWriter 4

OfficeWriter 4 Documentation Home

Grouping and Nesting vs. PivotTables in ExcelTemplate

Although PivotTables and ExcelWriter’s Grouping and Nesting can produce similar looking results when used with ExcelTemplate, these options provide different functionality. This post outlines the pros and cons of using both options.

Pivot Tables

Pivot tables are a native Excel feature that are designed to sort and filter aggregate data. You can use them to transpose and combine data to present grouped views.

Useful Features

  • Group data – This can be done horizontally in row groups or vertically in column groups.
  • Sort data – Pivot tables automatically sort and group data.
  • Produce grouped calculations – i.e. the sum over all of the sales for a region, or the larger expense for a particular quarter
  • Transpose data

Limitations (when working with ExcelWriter)

  • You cannot pre-select filters, create groupings by hand etc. – Any feature that requires data to be in the pivot table cannot be selected in the template because the data won’t be imported until after the report is generated
  • Pivot tables have limited style options. Pivot tables can have table styles, but creating custom headers/footers for groups is challenging
  • You cannot put anything to the right or below the pivot table. This is because when the pivot table is populated, it will expand to the right and down. It will overwrite anything that was in those cells. For this reason it is recommended that you do not have multiple pivot tables on a worksheet.
  • Pivot tables do not allow for text in the data values area of the table. Text is only allowed in the report filters, row labels, or column labels.

PivotTables in OfficeWriter Docs:

Grouping and Nesting

ExcelWriter Grouping and Nesting allows you to format grouped data in OOXML (XLSX, XLSM) files using ExcelTemplate.

Features

  • Custom formatting – You have the ability to create multi-row headers and footers that contain whatever formulas, formatting, and content you’d like.
  • ‘Push down’ behavior – ExcelTemplate automatically pushes down rows when inserting data. This means that anything below a grouping block will be retained in the final report.
  • Accepts any data type – There are no limitations on the type of data that be represented (unlike pivot tables which only allow non-numerical data in the row/column labels).

Limitations

  • Data must be sorted ahead of time, otherwise Grouping and Nesting will not work properly (see information below on how to create Grouped and Nested reports)
  • Unable to group over columns

Grouping and Nesting in OfficeWriter Docs: