All posts by Sam

Automate Your Holiday Cards with OfficeWriter

With the holidays just around the corner, schedules are becoming increasingly packed. Maybe you’re on the hunt for the perfect gift, or entertaining the slightly overbearing but well-meaning in-laws, or maybe, just maybe, you need to make those last minute travel plans. With all the hustle and bustle, it’s easy to overlook those seemingly insignificant but entirely necessary holiday cards.

As a developer I’m always looking to save time and automate just about everything…even my holiday cards. (Don’t tell my mother she still thinks I spend hours every year making them.) So in the spirit of the giving season, I wanted to share my sample code with you, to get you on your way to automating your holiday cards and back to searching for the perfect stocking stuffers.

Step 1 – Download OfficeWriter:

To get started, you will need to have OfficeWriter installed in order to be able to use the sample code below. In my solution, I used OfficeWriter and its built-in WordTemplate functionality to do a server-side mail merge. If you do not have OfficeWriter, you can download a free evaluation here.

Step 2 – Download Sample Code:

Next, you will need the sample code. Download the sample solution here. This solution comes bundled with:

  • Sample code
  • Easily modifiable templates for both holiday cards and mailing labels
  • Dummy data

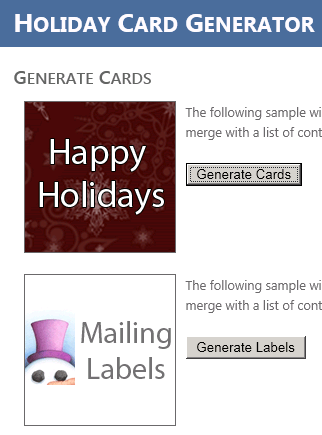
Open the solution and run the generator to see sample holiday cards and mailing labels like:

Holiday Card Generator

Sample Output:

Sample Code:

Looking at the sample code you will see that with just about 10 lines of OfficeWriter code I can generate both holiday cards and mailing labels. Continue reading Automate Your Holiday Cards with OfficeWriter

Meet the Team: Sam

Hello and welcome to our Meet the Team series, in which we aim to give you deeper insight into the minds and personalities of those who make up this eclectic, close-knit group. We are developers, marketers, and technical support engineers, and at work we craft everything from Microsoft reporting APIs to mobile email applications. And outside of work? Let’s just say racing against the machine during hackathons, building architecturally sound beer towers during retros, and paddling down the Charles during the warmer months are simply the beginning.
Meet Sam — forever in pursuit of the unique, beginning an Icelandic adventure, undercover ninja (like Tamar).

1. What do you do? 

At work I wear many hats, but my primary role is as a software developer on our product OfficeWriter.

2. What are you listening to right now?

I have quite an eclectic taste, and I generally rely on Pandora to pick my music for me. However right now I am listening to- Suzy – Caravan Palace

3. If you were a beer what would you be and why?

Continue reading Meet the Team: Sam

Visual Studio Runtime Interop Exception

Recently I was working on a Project in Visual Studio 2008 that has some Web Services in it. Every time I opened the project I would get the error:

System.Runtime.InteropServices.COMException

According to a blog post by Marocanu2001, he was receiving this error because he did not have IIS installed.  However in my case this was not the issue. In my case it was because I was running Visual Studio in limited user mode, and not as an administrator. Without Administration rights, when Visual Studio tries to configure the web services in IIS it will throw this exception.

The solution in short:

  • Make sure IIS is installed on your machine

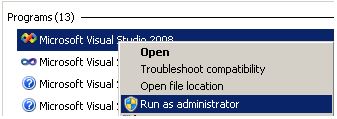
Make sure Visual Studio is run in Administrative mode. (Right-click “Run as Administrator”)


Hope this works for you as well. Happy coding!

Major Upgrades using WiX

Major Upgrades using WiX

Recently one of my colleagues wrote about his experience with WiX, and how he could create a simple installer in fifteen minutes. Today I want to talk about taking your newfound WiX installer to the next level by configuring your WiX installer to perform major upgrades.  In most cases a major upgrade means removing any previous version of an application and installing the new version.

Depending on which version of WiX you are using, you have a couple of options to perform a major upgrade.

Special Considerations:

Special considerations should be made before you start creating your installer. One of the most important ones in my opinion is deciding if your installer will be per-user or per-machine. By default WiX is a per-user install.  If you want your installer to be per machine you can add the following your solution:

<!-- Install at a per-machine level and not per-user -->
<Property Id="ALLUSERS" Value="1"/>

Any upgrade that you make should use a consistent ALLUSERS property. If you decided to change this once your application is already deployed, a major upgrade will not be looking in the same place, and any new version of the installer will not be able to detect the old installed version. This can lead to multiple versions of the software installed on one system.

WiX 3.5.1315.0 and later

In version 3.5.1315.0 of WiX the Major Upgrade Element was introduced, which makes common upgrade scenarios very simple.

It can be as simple as:

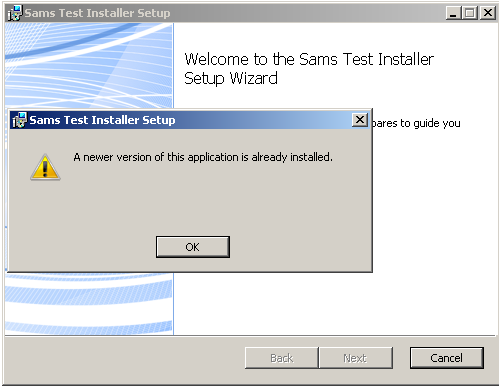
<MajorUpgrade AllowDowngrades="no" DowngradeErrorMessage="A newer version of this application is already installed."/>

If you try to run the installer on a system that already has a newer version you will receive an error with the DowngradeErrorMessage such as:
However if you are indeed installing a new version, then the installer will automatically uninstall the old version and install the new version. How easy is that?!

Pre WiX 3.5.1315.0

If you are using a version of WiX before 3.5.1315.0 then you have to perform a major upgrade in a slightly more complicated way. Seeing as everyone may not be using the newer version of WiX, I think it is still worth explaining.  Note: What defines a Major upgrade is changing the Product Version and Changing the Product ID; just changing the product version will be considered a minor upgrade.

Step  1   Define your GUIDS:

Whenever you are ready to perform a major upgrade you will need to change your product’s GUID. The product GUID is how WiX determines major versions of the product. In my case I am using *, which will generate a new unique GUID every time I build my installer.

  <!-- * means WIX will generate a new GUID -->
	<Product Id="*" Name="$(var.Product.Name)" Language="$(var.Product.Lang)" Version="$(var.Product.Version)" Manufacturer="$(var.Product.Manufacturer)" UpgradeCode="f47c5510-7e95-11e1-8027-bbc14824019b">
		<Package InstallerVersion="$(var.Package.InstallerVersion)" Compressed="yes" Platform="$(var.Platform)" />

Step 2 Define your condition message:

<Condition Message="A newer version of this application is already installed.">
      <![CDATA[Installed OR NOT NEWER_VERSION_FOUND]]>
    </Condition>	

Step 3 Define upgrade table:

The upgrade table tells the installer what the versions it should detect are and how to respond. You will notice that when I detect newer versions, OnlyDetect = “true” because I do not want to replace newer versions of my product.

<!-- Upgrade Table -->
    <Upgrade Id="f47c5510-7e95-11e1-8027-bbc14824019b">
      <UpgradeVersion
        Property="OLD_VERSION_FOUND"
        Minimum="1.0.0.0"
        Maximum="$(var.Product.Version)"
        IncludeMinimum="yes"
        IncludeMaximum="no"
        OnlyDetect="no"
        IgnoreRemoveFailure="yes"
        MigrateFeatures="yes"
        Language="1033"  />

      <UpgradeVersion
        Property="NEWER_VERSION_FOUND"
        Minimum="$(var.Product.Version)"
        IncludeMinimum="no"
        OnlyDetect="yes"
        Language="1033"  />
    </Upgrade>

Step 4 define the Install Execute Sequence

    <!--Removes the old version and then installs the new version-->
    <InstallExecuteSequence>
      <RemoveExistingProducts After="InstallInitialize"></RemoveExistingProducts>
      <InstallExecute After="RemoveExistingProducts"></InstallExecute>
    </InstallExecuteSequence>

And that’s it. I hope this helps others who are looking to perform major upgrades with their WiX installers. If you are working a lot with WiX, I recommend you check out the book WiX: A Developer’s Guide to Windows Installer XML  by  Nick Ramirez

Regex and LINQPad

Recently, I was working with a customer who needed dynamic worksheet names in their Excel workbooks.  With ExcelWriter this is no problem!  Since the input was coming from the end users, I need to perform some validation on the input to make sure it conforms to Excel’s restrictions on what a valid worksheet name can be.

Valid Worksheet Names in Excel

  1. They cannot exceed 31 characters.
  2. They cannot contain the following characters: \ / ? * [ ]
  3. The name cannot be the same as another Worksheet in the Workbook.
  4. The worksheet name cannot be blank

In this case I am interested in #2 and dealing with invalid characters.  I know that Regex is the best option for this–when I’m working with Regex, I often find testing to be a pain. I‘ll open Visual Studio, create a console application and write some code to test my patterns.  Just when I was starting to get fed up with all these random testing console applications in my projects directory, I remembered an application called LINQPad that my co-work Sean told me about. LINQPad is a standalone C#/VB/F# scratch pad that can instantly execute code. The output is displayed in a rich format.

So I came up with the following Regex Pattern: Continue reading Regex and LINQPad

How to Assign ASP.NET Development Server to a Specific Port

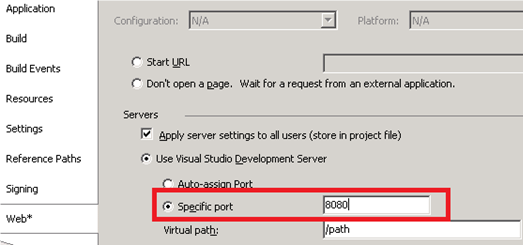
Recently I was working writing a .NET web service as well as a client application to access this web service. I like to continually test throughout my development, and I noticed that this time, the .NET development server continued to switch ports every time I ran my application. This forced me to change my URL in my client app each time I ran the application as well. To resolve this issue I set the development server to have a static port instead of a dynamic port. Here’s how to do it: In Visual Studio 2008 if you’re using a web application project, right click the project and select properties. You will see the following web tab:


There you can set the specific port. In my case I set it to port 8080, but you can set it to anything you would like.


OfficeWriter and .NET 4.0: Resolving System.Web Dependency

Recently I had a customer who was trying to use OfficeWriter with .NET 4.0 and kept receiving the error:

Warning MSB3253: The referenced assembly “assembly name” could not be resolved because it has a dependency on “System.Web, Version=4.0.0.0, Culture=neutral, PublicKeyToken=b03f5f7f11d50a3a” which is not in the currently targeted framework “.NETFramework,Version=v4.0,Profile=Client”. Please remove references to assemblies not in the targeted framework or consider retargeting your project.

The application was being compiled to the .NET 4.0 Client Profile. An application that targets the .NET Framework 4 Client Profile installs the minimum set of client assemblies on the user’s computer, without requiring the full version of the .NET Framework 4 to be present+.+ This is a problem because the System.Web assembly is not included—but OfficeWriter has a dependency to System.Web (which is not available in the Client Profile).

The solution: you will need to build your console application against the full .NET 4.0 Framework, because of the dependency on System.Web

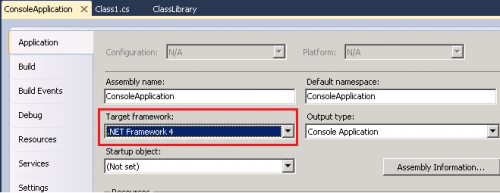
To do this, just right click on your project in the solution explorer, go to properties and set the target framework under the application tab to .NET Framework 4.

Just rebuild your application and you should be good to go.

System.BadImageFormatException on a 64-bit Machine

The other day, one of our customers was switching over to 64-bit development machines, and encountered the following issue:

System.BadImageFormatException:

Could not load file or assembly ‘(assembly name)’ or one of its dependencies. An attempt was made to load a program with an incorrect format.

The likely reason is that you (or in this instance, our customer) are trying to load a 32-bit assembly into a 64-bit application. This can happen when you have the Any CPU platform selected.

Solution:

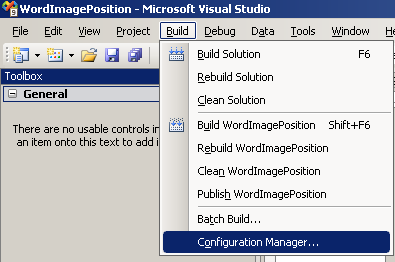
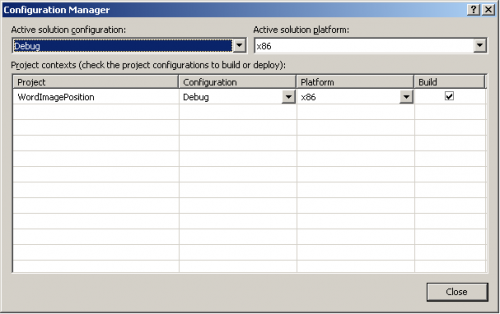
If your scenario sounds like the one I described, try setting your application to run in x86 mode. In Visual Studio this can be done by going to Build -> Configuration Manager…

…and setting the Platform to be x86.

SharePoint 2010 Development: Getting Started


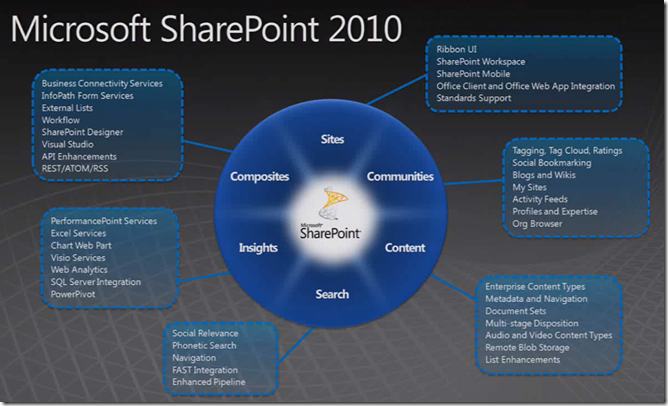
[Image via Tihomir Ignatov]

Setting up a SharePoint Development Server

Recently I wanted to start some SharePoint 2010 development, and taking Microsoft’s recommendation that developing for SharePoint be conducted on a machine that already has it installed, I set out to create development-optimized SharePoint environment.

One of the greatest tools I came across was the SharePoint 2010 Easy Setup Script. The script is a set of Windows PowerShell scripts that install and configure all the pre-requisites and products to get you developing for SharePoint in no time.

Running these scripts will install evaluation versions of: Continue reading SharePoint 2010 Development: Getting Started