Recently we found it beneficial to rewrite one of our Windows installers. The previous one was built with the well-known InstallShield 2008, which is a pretty powerful GUI tool built over a very basic language called InstallScript. You can do pretty much anything you need with the tool, but a lot of it can be rather arcane and not at all straightforward. This is fine and dandy if a team has a dedicated installer engineer, but when the installer is rarely touched it doesn’t tend to work out as well. InstallScript itself eventually runs into using goto statements, something abhorrent to many of us. On top of that, the tool is a few grand per license. We needed to make some major changes to our installer, and knowing the state of the tool and code for the existing one we thought it better to seek out alternatives.
Why WiX? WiX actually comes out of Microsoft, and was amongst the first of their projects to be delivered open source under the Common Public License. Since it’s open source, it’s also free. Before, we had to log into the one machine that can actually make changes to the installer, as we only had the one license. Now, every developer can just have WiX installed on their box outright. Additionally, WiX comes with Votive, a Visual Studio plugin. As we’re already using Visual Studio to develop OfficeWriter, the project in question, this is simply a nice feature we get for free. One doesn’t need Visual Studio or the plugin to develop a WiX installer, however.
What about the complexity? WiX actually stands for Windows Installer XML, and as one might expect it’s mostly XML based. If we’re using Votive, a lot of the basic XML needed is automatically generated. Just messing around with WiX in Visual Studio is very easy since IntelliSense works with it. Just for kicks, let’s run through the literal process I used in Visual Studio to make a dummy installer that just works.
It only takes fifteen minutes.
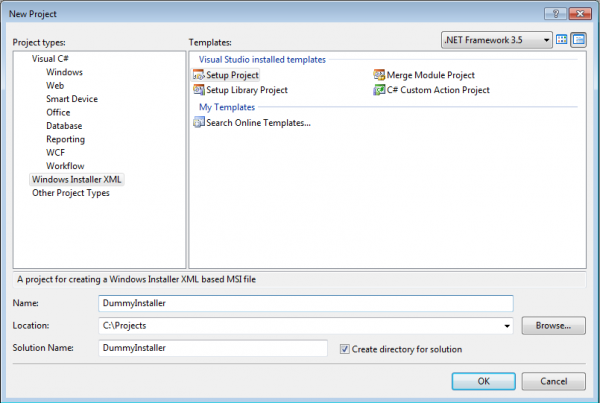
After installing WiX (which appears to have its own installer made in WiX) I created a new Setup Project from the Windows Installer XML category. I went ahead and named this project DummyInstaller. However, it’s your world and you can name your project anything you want.
This will create a totally default WiX source file called Product.wxs. It should look like this:
<?xml version="1.0" encoding="UTF-8"?>
<Wix xmlns="http://schemas.microsoft.com/wix/2006/wi">
    <Product Id="aa5f32b3-7210-4afe-b848-0c6856744770" Name="DummyInstaller" Language="1033" Version="1.0.0.0" Manufacturer="DummyInstaller"
           UpgradeCode="d0690010-3040-4429-bcd0-ed429555fe04">
        <Package InstallerVersion="200" Compressed="yes" />

        <Media Id="1" Cabinet="media1.cab" EmbedCab="yes" />

        <Directory Id="TARGETDIR" Name="SourceDir">
            <Directory Id="ProgramFilesFolder">
                <Directory Id="INSTALLLOCATION" Name="DummyInstaller">
                    <!-- TODO: Remove the comments around this Component element and the ComponentRef below in order to add resources to this installer. -->
                    <!-- <Component Id="ProductComponent" Guid="a6676a1f-c4e2-4420-916e-eb7a0ac2ff78"> -->
                        <!-- TODO: Insert files, registry keys, and other resources here. -->
                    <!-- </Component> -->
                </Directory>
            </Directory>
        </Directory>

        <Feature Id="ProductFeature" Title="DummyInstaller" Level="1">
            <!-- TODO: Remove the comments around this ComponentRef element and the Component above in order to add resources to this installer. -->
            <!-- <ComponentRef Id="ProductComponent" /> -->

            <!-- Note: The following ComponentGroupRef is required to pull in generated authoring from project references. -->
            <ComponentGroupRef Id="Product.Generated" />
        </Feature>
    </Product>
</Wix>
If we revise the file to look more like…
<?xml version="1.0" encoding="UTF-8"?>
<Wix xmlns="http://schemas.microsoft.com/wix/2006/wi">
    <Product Id="aa5f32b3-7210-4afe-b848-0c6856744770" Name="DummyInstaller" Language="1033" Version="1.0.0.0" Manufacturer="DummyInstaller"
           UpgradeCode="d0690010-3040-4429-bcd0-ed429555fe04">
        <Package InstallerVersion="200" Compressed="yes" />

        <Media Id="1" Cabinet="media1.cab" EmbedCab="yes" />

        <Directory Id="TARGETDIR" Name="SourceDir">
            <Directory Id="ProgramFilesFolder">
                <Directory Id="INSTALLLOCATION" Name="DummyInstaller">

                    <Component Id="DummyInstallerProductComponent" Guid="a6676a1f-c4e2-4420-916e-eb7a0ac2ff78">
                                            <File Id="DummyInstallerExecutable" Source="DummyExecutable.exe"/>
                    </Component>
                </Directory>
            </Directory>
        </Directory>

        <Feature Id="ProductFeature" Title="DummyInstaller" Level="1">
            <ComponentRef Id="DummyInstallerProductComponent" />
            <ComponentGroupRef Id="Product.Generated" />
        </Feature>
    </Product>
</Wix>
…we’ll have something a little more useful. Basically, we added a new component called the DummyInstallerProductComponent, with a randomly generated guid. Inside this component is a reference to a single file called the DummyInstallerExecutable, whose source is DummyExecutable.exe. Pretty straightforward. Secondly, in the ProductFeature feature we added a ComponentRef to our DummyInstallerProductComponent component. The last thing we need to do is pick a happy little executable to add to the project and rename it to DummyExecutable.exe. I went with notepad++.exe, because it is totally excellent. Now build the solution.
We have a working installer.
There’s now a DummyInstaller.msi in the DummyInstaller\bin\Debug folder, wherever you placed the solution. It’s totally barebones, but it will place the DummyExecutable.exe in the Program Files folder upon installation. This is also enough work to make the executable be uninstallable too. Totally painless.
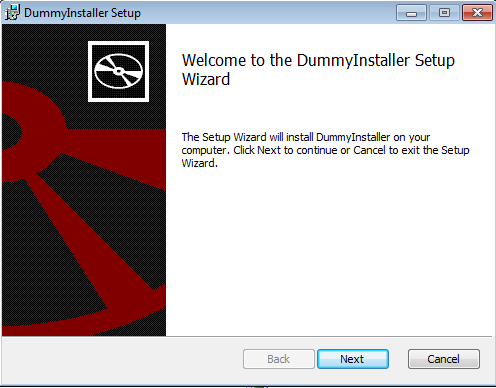
With that said, the above installer is pretty bland. It doesn’t even have any dialog boxes, unless you consider the box from UAC a part of the installer. Let’s add some simple dialog boxes. WiX has many of these pre-built, but one can build pretty much anything desired. We first want to add a reference to the project for WixUIExtension.dll. Then add these lines inside the Product tag:
<Property Id="WIXUI_INSTALLDIR" Value="INSTALLLOCATION" />
<UIRef Id="WixUI_InstallDir" />

<?xml version="1.0" encoding="UTF-8"?>
<Wix xmlns="http://schemas.microsoft.com/wix/2006/wi">
  <Product Id="aa5f32b3-7210-4afe-b848-0c6856744770" Name="DummyInstaller" Language="1033" Version="1.0.0.0" Manufacturer="DummyInstaller"
    UpgradeCode="d0690010-3040-4429-bcd0-ed429555fe04">
    <Package InstallerVersion="200" Compressed="yes" />
    <Media Id="1" Cabinet="media1.cab" EmbedCab="yes" />

    <Property Id="WIXUI_INSTALLDIR" Value="INSTALLLOCATION" />
    <UIRef Id="WixUI_InstallDir" />

    <Directory Id="TARGETDIR" Name="SourceDir">

      <Directory Id="ProgramFilesFolder">
        <Directory Id="INSTALLLOCATION" Name="DummyInstaller">
          <Component Id="DummyInstallerProductComponent" Guid="a6676a1f-c4e2-4420-916e-eb7a0ac2ff78">
            <File Id="DummyInstallerExecutable" Source="DummyExecutable.exe"/>
          </Component>
        </Directory>
      </Directory>


      <Directory Id="ProgramMenuFolder">
        <Directory Id="ProgramMenuSubfolder" Name="Dummy Installer">
          <Component Id="DummyInstallerStartMenu" Guid="cf3e1c88-7665-4dce-b03f-fbb3c458ca2b">
            <Shortcut Id="DummyInstallerShortcut" Name="Totally Not a Dummy Executable" Description="DummyInstaller"
              Target="[INSTALLLOCATION]DummyExecutable.exe" WorkingDirectory="INSTALLLOCATION"/>
            <RegistryValue Root="HKCU" Key="Software\DummyInstallerIndustries\DummyInstaller"
                            Name="installed" Type="integer" Value="1" KeyPath="yes"/>
            <RemoveFolder Id="ProgramMenuSubfolder" On="uninstall"/>
          </Component>
        </Directory>
      </Directory>

    </Directory>

    <Feature Id="ProductFeature" Title="DummyInstaller" Level="1">
      <ComponentRef Id="DummyInstallerProductComponent" />
      <ComponentRef Id="DummyInstallerStartMenu" />
      <ComponentGroupRef Id="Product.Generated" />
    </Feature>

  </Product>
</Wix>
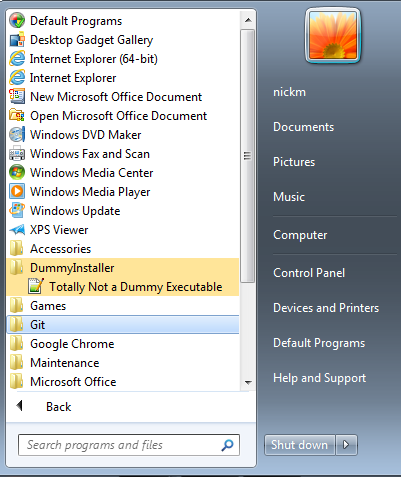
We added a new component called DummyInstallerStartMenu within the start menu folder. This shortcut requires that we add a registry value under HKCU to actually appear. WiX will also complain if we don’t automatically remove it, which the RemoveFolder tag will accomplish for us. Lastly, we just need to add another ComponentRef for DummyInstallerStartMenu and we’re good to go.
In no time at all we’ve created a start to finish installer that can place a single file in Program Files, add a shortcut to it, and be totally uninstallable. It even comes with common dialog trees right out of the box. The XML syntax is simple enough to understand that one should be able to see how to extend this simple installer further to accomplish any of their installation goals. WiX just works, and it’s free and open source. For a more in-depth look at what WiX can do, check out the documentation.
Share the post "Don’t Pay for Install Tools when WiX Works"


 Follow