Major Upgrades using WiX
Recently one of my colleagues wrote about his experience with WiX, and how he could create a simple installer in fifteen minutes. Today I want to talk about taking your newfound WiX installer to the next level by configuring your WiX installer to perform major upgrades. In most cases a major upgrade means removing any previous version of an application and installing the new version.
Depending on which version of WiX you are using, you have a couple of options to perform a major upgrade.
Special Considerations:
Special considerations should be made before you start creating your installer. One of the most important ones in my opinion is deciding if your installer will be per-user or per-machine. By default WiX is a per-user install. If you want your installer to be per machine you can add the following your solution:
<!-- Install at a per-machine level and not per-user -->
<Property Id="ALLUSERS" Value="1"/>
Any upgrade that you make should use a consistent ALLUSERS property. If you decided to change this once your application is already deployed, a major upgrade will not be looking in the same place, and any new version of the installer will not be able to detect the old installed version. This can lead to multiple versions of the software installed on one system.
WiX 3.5.1315.0 and later
In version 3.5.1315.0 of WiX the Major Upgrade Element was introduced, which makes common upgrade scenarios very simple.
It can be as simple as:
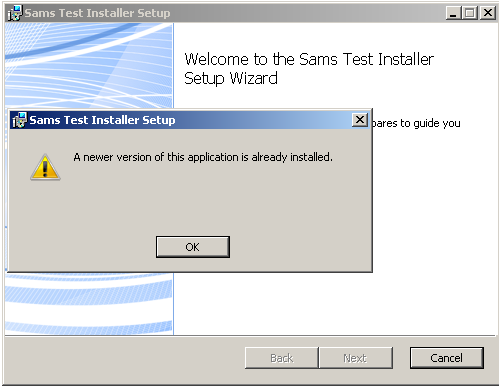
<MajorUpgrade AllowDowngrades="no" DowngradeErrorMessage="A newer version of this application is already installed."/>
If you try to run the installer on a system that already has a newer version you will receive an error with the DowngradeErrorMessage such as:

However if you are indeed installing a new version, then the installer will automatically uninstall the old version and install the new version. How easy is that?!
Pre WiX 3.5.1315.0
If you are using a version of WiX before 3.5.1315.0 then you have to perform a major upgrade in a slightly more complicated way. Seeing as everyone may not be using the newer version of WiX, I think it is still worth explaining. Note: What defines a Major upgrade is changing the Product Version and Changing the Product ID; just changing the product version will be considered a minor upgrade.
Step 1 Define your GUIDS:
Whenever you are ready to perform a major upgrade you will need to change your product’s GUID. The product GUID is how WiX determines major versions of the product. In my case I am using *, which will generate a new unique GUID every time I build my installer.
  <!-- * means WIX will generate a new GUID -->
	<Product Id="*" Name="$(var.Product.Name)" Language="$(var.Product.Lang)" Version="$(var.Product.Version)" Manufacturer="$(var.Product.Manufacturer)" UpgradeCode="f47c5510-7e95-11e1-8027-bbc14824019b">
		<Package InstallerVersion="$(var.Package.InstallerVersion)" Compressed="yes" Platform="$(var.Platform)" />
Step 2 Define your condition message:
<Condition Message="A newer version of this application is already installed.">
      <![CDATA[Installed OR NOT NEWER_VERSION_FOUND]]>
    </Condition>
Step 3 Define upgrade table:
The upgrade table tells the installer what the versions it should detect are and how to respond. You will notice that when I detect newer versions, OnlyDetect = “true” because I do not want to replace newer versions of my product.
<!-- Upgrade Table -->
    <Upgrade Id="f47c5510-7e95-11e1-8027-bbc14824019b">
      <UpgradeVersion
        Property="OLD_VERSION_FOUND"
        Minimum="1.0.0.0"
        Maximum="$(var.Product.Version)"
        IncludeMinimum="yes"
        IncludeMaximum="no"
        OnlyDetect="no"
        IgnoreRemoveFailure="yes"
        MigrateFeatures="yes"
        Language="1033"  />

      <UpgradeVersion
        Property="NEWER_VERSION_FOUND"
        Minimum="$(var.Product.Version)"
        IncludeMinimum="no"
        OnlyDetect="yes"
        Language="1033"  />
    </Upgrade>
Step 4 define the Install Execute Sequence
    <!--Removes the old version and then installs the new version-->
    <InstallExecuteSequence>
      <RemoveExistingProducts After="InstallInitialize"></RemoveExistingProducts>
      <InstallExecute After="RemoveExistingProducts"></InstallExecute>
    </InstallExecuteSequence>
And that’s it. I hope this helps others who are looking to perform major upgrades with their WiX installers. If you are working a lot with WiX, I recommend you check out the book WiX: A Developer’s Guide to Windows Installer XML by Nick Ramirez