Tag Archives: vba

How to select slicer values with VBA

PitanHeader_short

Hello, everyone, and welcome to another edition of Pitan Pivot Mage!

Today we will cover how to select slicer values with VBA. This is especially useful if you have a report generated by OfficeWriter’s ExcelTemplate model and you can’t select the slicer values in the template file.

Intro

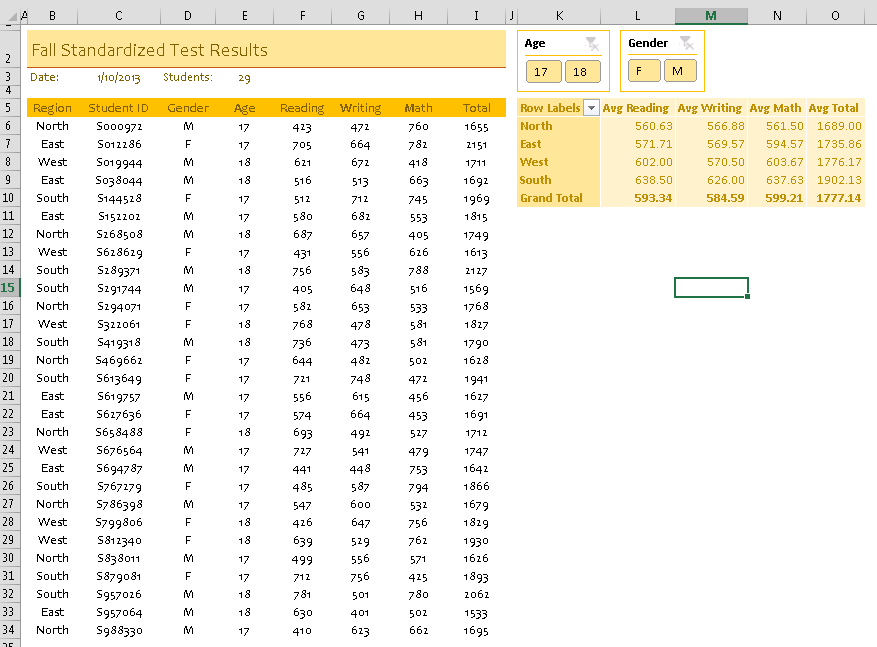
Let’s start out with an ExcelWriter report template. It has some data off to the side and a PivotTable that summarizes the test scores with averages. There are two slicers for filtering on age and gender.

Template

When it’s populated with data, all of the values in the slicers are automatically selected, so the default is a full view of the data.

RenderedReport

Writing the Macros

Whenever I need to write a PivotTable macro, I always start by recording myself performing the action I want and then generalize the code later. In this case, I want to select only “M” and “17” in my slicers for 17-year-old male students.

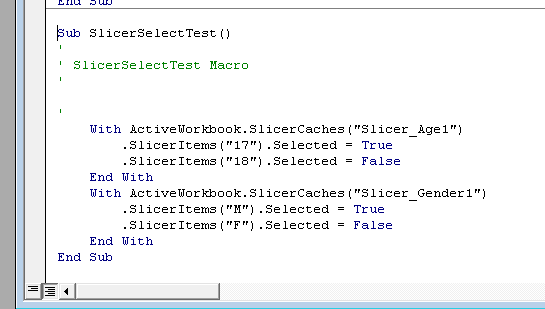
My first pass gives me some useful information:

RawMacro

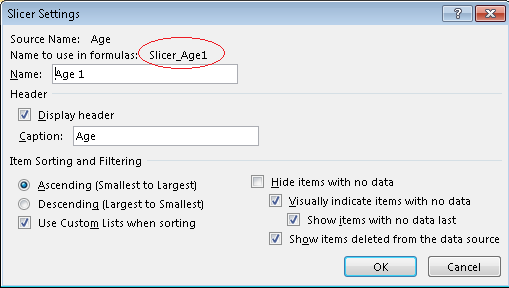
The first thing I notice is the slicer name “Slicer_Age1” and “Slicer_Gender1”. This is the name for the slicer for formulas and VBA. To find the name of your slicer, select the slicer and go to slicer settings. This is on the left, under slicer tools:

SlicerTools_Settings

The slicer tool dialog lists the name of the slicer, but also the Name to use in formulas. This is the programmatic name for the slicer that we’ll use in the macro.

Slicer_Programmatic_Age

Then I was able to generalize the macro to take a slicer name, value, and whether it should be selected or deselected:


'Selects or deselects a value (slicerVal) in a slicer (slicerName)
Sub SelectSlicerValue(ByVal slicerName As String,
ByVal slicerVal As String, ByVal isSelected As Boolean)
ActiveWorkbook.SlicerCaches(slicerName).SlicerItems(slicerVal).Selected = isSelected
End Sub

To make things easier for myself, I  created a subroutine that would select 17 and “M,” while deselecting 18 and “F.”

'Selects slicer values to display only data for 17-year-old male students
Sub SelectMale17Profile()
SelectSlicerValue "Slicer_Age1", "17", True
SelectSlicerValue "Slicer_Age1", "18", False
SelectSlicerValue "Slicer_Gender1", "M", True
SelectSlicerValue "Slicer_Gender1", "F", False
End Sub

Calling the Macros

To make sure that the macro runs when the workbook is opened, I called the subroutine in the Workbook_Open() code.


Private Sub Workbook_Open()
SelectMale17Profile
End Sub

Handling the PivotTable refresh

As outlined in our tutorial for how to use PivotTables with ExcelTemplate reports, the PivotTable needs to refresh in order for the imported data to display; the easiest way to do this is to set ‘Refresh on Open’ under PivotTable Data Properties. This poses a problem because macros in Workbook_Open() execute before the the PivotTable refresh and the slicer macros will be unable to find the values to select. This results in a run-time error.

To avoid this problem, I wrote a quick macro that refreshes the PivotTable:

'Refreshes the PivotTable as a replacement for the 'refresh on open' property
Sub PivotTableRefresh(ByVal pivotTableSheet As String, ByVal pivotTableName As String)
ActiveWorkbook.Sheets(pivotTableSheet).PivotTables(pivotTableName).PivotCache.Refresh
End Sub

And added it before the slicer code in Workbook_Open().

Private Sub Workbook_Open()
'Refresh the PivotTable with a macro because it may not refresh first
PivotTableRefresh "Template", "PivotTable1"
'Select the desired slicer values
SelectMale17Profile
End Sub

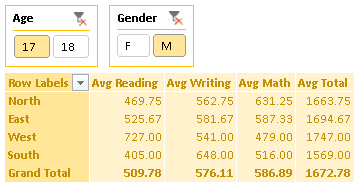
There you go!

SelectedProfile

Downloads

A copy of the template file with the macros, a sample output file, and the code used to populate the template file are available for download here as a zip file.

Getting started:

Learn more about ExcelTemplate or try it out in a free trial of OfficeWriter today.

    
 OR     


Super Short Tips: Working with pivot tables in VBA

Sometimes you just need to write macros for pivot tables. It’s a fact of life.

Maybe your pivot table is dynamically populated with data and you need to make some custom changes once the data is in the table, but you can only do that after the file is opened in Excel and the pivot table refreshes. Perhaps your plagued with the error that happens when you open a file with a pivot table directly from Internet Explorer. Whatever your reason, you need to write some VBA for pivot tables.

Here’s my super short list of tips for working with pivot tables in VBA:

#1 – Record a macro of yourself to get started

If you know what you want to do, but you’re not sure what the VBA code should be, record a macro of yourself doing the desired action. Not only will this give you a hint about where to start in your VBA, but you’ll also verify the exact method calls for your version of Excel and your pivot table version. All of my pivot table macros start with me performing operations in Excel and then generalizing the VBA from there.

#2 – Base your VBA on pivot fields

Pivot fields come from the column names in the data source for your pivot table. Even as the data is changing, the pivot fields remain constant because the construction and layout of the pivot table depends on the pivot fields. The fact that they remain constant can be very useful when writing VBA.

If you create macros that are based on particular pivot table items, you can’t be sure that those values will be there when the workbook is populated. For example, you want to make sure that all the groups for a particular row label are collapsed when the user first encounters the pivot table. You can manually collapse each of these groups. Problem: you create a macro that collapses groups “A”, “B”, “C”, etc separately. What if group “A” isn’t in your data set when the report is generated? Excel will throw an errror.

You can take the chance that group “A” may or may not appear in your data set, or you can create a macro that focuses on the pivot field that group “A” belongs to, rather than the individual entries.

ActiveSheet.PivotTables("PivotTable1").PivotFields("PivotField1").ShowDetail = False

This will collapse all the groups within ‘PivotField1’.

In short, avoid making macros that are dependent on specific data, because you can’t be sure that the VBA will execute without error.

#3 – VBA for pivot tables in Excel 2003 is different than in Excel 2007/2010

Excel 2003 had our best friend, the Pivot Table Wizard. Everything for the pivot table was done through a wizard menu, so the VBA in Excel 2003 follows suite. Starting in Excel 2007, Excel reworked how users interacted with pivot tables, and the Pivot Table Wizard was banished for eternity. Thus, VBA in Excel 2007/2010 is drastically different.

If you have end-users who are going to be opening a report with pivot table VBA in Excel 2003, 2007, and 2010, you’ll want to detect what version of Excel is being opened, then execute the 2003 or 2007/2010 based on this.

To determine what version of Excel the VBA is executing in, check Application.Version. This will return a string representing the version of Excel (e.g. 10.0, 12.0, 14.0 etc.)

#4 – Pivot tables have versions too

Just as there are differences between XLS and XLSX files in terms of what features can be supported, there are differences between pivot tables created in XLS files vs those created in XLSX files. What’s more, there are also differences between pivot tables created in Excel 2007 and 2010. It’s important to note what version of pivot table you’re targeting.

Luckily you can check the PivotTable.Version property to see which of the versions your pivot table is.

So there you have it – my cheat sheet for creating VBA for pivot tables.

Super Short Tips: Creating Workbooks with Excel VBA

Let’s say you want to write an Excel macro that will create a new workbook and save it to a specific location and then close the new file. This is really easy with Excel VBA:

Sub AddNewWorkbook()
     Set NewWb = Workbooks.Add
     With NewWb
          .SaveAs Filename:="C:\Path to directory\NewFile.xls"
          .Close
     End With
End Sub

You run this once and it works perfectly. You run it again and Excel tells you that “A file named ‘C:\Path to directory\NewFile.xls’ already exists in this location. Do you want to replace it?”

Well, of course you do. Why is Excel bothering you with these trivial questions?

So you want to supress the Excel alert. To do this, just set Application.DisplayAlerts to False before you save the file, and then turn it back on after you’re done:

Sub AddNewWorkbook()
     Set NewWb = Workbooks.Add
     Application.DisplayAlerts = False
     With NewWb
          .SaveAs Filename:="C:\Path to directory\NewFile.xls"
          .Close
      End With
     Application.DisplayAlerts = True
End Sub

Easy-peasy.

This technique is also handy for supressing the oh-so-lovely Do you want to save the changes you made to workbook X? alert. Microsoft has some additional tips for hiding the saving changes alert in this KB article: How to suppress “Save Changes” prompt when you close a workbook in Excel.