Starting in version 7.1 of ExcelWriter, you can use grouping and nesting markers to display flat data in a grouped and nested format using the ExcelTemplate object and a OOXML (.xlsx) template. Not a current ExcelWriter user? No problem: you can download a free evaluation and follow along!
Introduction
If you have hierarchical data in an Excel report, grouping the data is a good way to make it easier to read. ExcelTemplate now features grouping a nesting options that make it easy to group hierarchical data. The basic feature of ExcelTemplate grouping and nesting is removing unnecessary repeated values from a field if it is given hierarchical data in a flat format. We’ll focus on a single group in this post; for information on grouping and nesting multiple groups, you can check our documentation, and be sure to check back here for further blog posts. Advanced features such as headers and footers are also discussed in our documentation and will also be described in a future blog post.
Creating a Data Set for grouping
Though grouping and nesting is meant to show hierarchical data, the input data for a template with grouping and nesting must be in flat format. This means that a data set for nesting and grouping will have repeated values for fields that are higher in the hierarchy. In this case, salesperson José Saraiva of PostOne Bicycles is faced with sales data that looks like this:
| Territory Name | Salesperson | Product Category | Product Subcategory | Color | Unit Price | Order Qty | Line Total |
|---|---|---|---|---|---|---|---|
| Canada | José Saraiva | Accessories | Helmets | Black | $20.19 | 1 | $20.19 |
| Canada | José Saraiva | Accessories | Helmets | Blue | $20.19 | 1 | $20.19 |
| Canada | José Saraiva | Accessories | Helmets | Blue | $20.19 | 1 | $20.19 |
| Canada | José Saraiva | Accessories | Helmets | Red | $20.19 | 1 | $20.19 |
| Canada | José Saraiva | Bikes | Mountain Bikes | Black | $2024.99 | 1 | $2024.99 |
| Canada | José Saraiva | Bikes | Mountain Bikes | Black | $2024.99 | 1 | $2024.99 |
| Canada | José Saraiva | Bikes | Mountain Bikes | Black | $2024.99 | 1 | $2024.99 |
| Canada | José Saraiva | Bikes | Mountain Bikes | Black | $2024.99 | 1 | $2024.99 |
| Canada | José Saraiva | Bikes | Mountain Bikes | Silver | $2024.99 | 1 | $2024.99 |
| Canada | José Saraiva | Bikes | Road Bikes | Red | $2146.99 | 1 | $2146.99 |
| Canada | José Saraiva | Bikes | Road Bikes | Red | $2146.99 | 1 | $2146.99 |
| Canada | José Saraiva | Bikes | Road Bikes | Red | $2146.99 | 1 | $2146.99 |
Grouping code
Grouping code is no different from regular ExcelTemplate code. In this case, José’s programmers will write this code to process his templates:
DataSet ds = GetData(); //--- Get the Sales data
ExcelTemplate xlt = new ExcelTemplate(); //--- Create a new ExcelTemplate object
xlt.Open(Page.MapPath(@"templates\GroupingTemplate.xlsx")); //--- Open the template
//--- Create the DataBindingProperties objectDataBindingProperties props = xlt.CreateDataBindingProperties();//--- Bind the data to the templatexlt.BindData(ds, "AdventureWorks", props);
//--- Process the template to import the dataxlt.Process();//--- Stream the output back to the userxlt.Save(Page.Response, "Grouped Sales Report.xlsx", false);
|
Dim ds As DataSet = GetData() '--- Get the Sales data
Dim xlt As New ExcelTemplate() '--- Create a new ExcelTemplate object
xlt.Open(Page.MapPath("templates\GroupingTemplate.xlsx")) '--- Open the template
'--- Create the DataBindingProperties objectDim props As DataBindingProperties = xlt.CreateDataBindingProperties()
'--- Bind the data to the templatexlt.BindData(ds, "AdventureWorks", props)
'--- Process the template to import the dataxlt.Process()'--- Stream the output back to the userxlt.Save(Page.Response, "Grouped Sales Report.xlsx", False)
|
Grouping by a single group
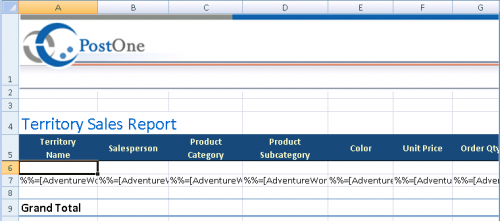
You’ll need to use data markers in a Grouping and Nesting template, just as any other ExcelTemplate. You will, however, need to place the data markers for the grouped data in a single data marker row, and José has done in the example below:
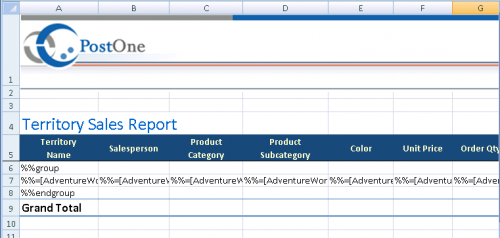
If José binds the data above to this template, he’ll see it exactly as you see it above – in flat form. He can group based on the first column – Territory Name – by adding a %%group tag to the cell above the data marker for that column. To mark the end of the grouping block, he add an %%endgroup tag below the data markers, as is required any time you use a %%group marker:
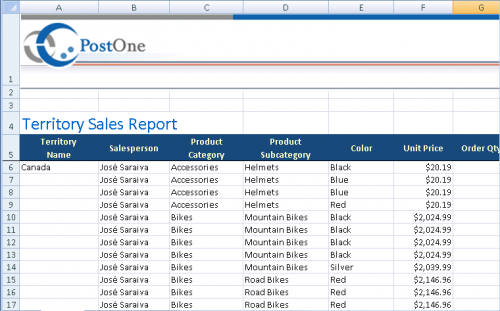
The resulting spreadsheet should look like the one below, with all of the extra repeated values from the Territory Name field removed. Now José is able to view his data grouped by Territory Name:
Notice that the rows with the %%group and %%endgroup tags are removed as well. Be sure not to place any content in these rows, as it will be automatically removed when data is bound to the template.
As helpful as this simple grouping would be if José wants to easily see the sales he’s made to each territory, it’s just the tip of the iceberg for ExcelTemplate Grouping. In my next post, I show how José’s colleague Jillian expands on ExcelTemplate grouping by adding nested groups.
Related Posts and Links
For more details on ExcelTemplate nesting grouping, please check out our documentation. Tutorials, from which this blog post is derived, can be found here:
- Using Grouping and Nesting with ExcelTemplate
- Advanced Grouping and Nesting
- Creating Data Markers: Grouping Markers
- Part 2 of the Grouping and Nesting series: Grouping and Nesting on Multiple Columns
- Part 3 of the Grouping and Nesting series: Adding Headers to a Grouped Spreadsheet


 Follow