When creating a custom list, you need to provide a list definition in the form of a schema.xml file. Rather than creating a schema.xml file from scratch, a recommended approach is to copy an existing list definition. The out-of-the-box SharePoint custom list is a good starting point as it provides the barest minimum of features required. Armed with a stock list definition, you need to modify it for the list you want to create. If you want to use a specific content type, you can specify it in the <ContentTypes> section. You need to specify the columns of the list in the <Fields> section. Finally, you will want to modify the view definition to specify the columns to be included in the view.
Modifying an existing list definition is a quick way to create a custom list. Often, however, you will want to have more control over the view definition other than what fields are included in it. The view definition is the largest section in the schema.xml and can be rather daunting. Here is where SharePoint Manager comes in.
SharePoint Manager is a nifty tool that lets you browse all of the content of a SharePoint site (be sure to select the flavor appropriate for your SharePoint installation). More crucially, it also provides the schema XML that underpins most SharePoint items.
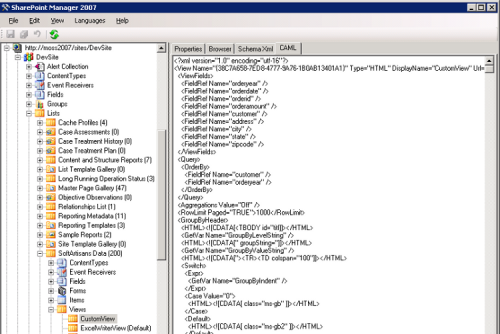
SharePoint Manager gives you a convenient way to determine the CAML definition for a given view. Once you provision the custom list, simply create the desired view in the UI. Then use the SharePoint Manager to browse to the view and retrieve its CAML definition.
Below is a snippet of the CAML definition for a custom view as deciphered by SharePoint Manager 2007.
<View Name="{38C7A658-7ED8-4777-9A76-1B0AB13401A1}" Type="HTML" DisplayName="CustomView" Url="/sites/DevSite/MyListInstance/CustomView.aspx" Level="1" BaseViewID="1" ContentTypeID="0x" ImageUrl="/_layouts/images/generic.png">
|
You will have to make a few tweaks to this “raw” view definition before you can use it successfully in schema.xml:
- Create an ASPX page with the same name as the view, CustomView.aspx, and place it in the same folder as schema.xml. This page should be a bare-boned form which defines a single Web Part zone whose ID is “Main”. A quick way is to create a ListDefinition project which comes with the Visual Studio Extensions for SharePoint then copy AllItems.aspx and rename it to CustomView.aspx.
- Remove the path from the URL attribute. Otherwise you will get an exception, “The file or folder name contains characters that are not permitted”, when provisioning the custom list.
- If you define more than 1 view, change BaseViewID attribute to make sure each view is assigned a unique value.
- Add a boolean DefaultView attribute if this is to be the default view. If there are multiple views, obviously only one view should be marked as the default view.
The view definition above was tweaked as follows:
<View Name="CustomView" Type="HTML" DisplayName="CustomView" Url="CustomView.aspx" Level="1" BaseViewID="2" Conten
Share the post "Adding a View When Provisioning a Custom List"

 Follow
From where to copy all items.aspx?