All posts by kate

10 Tips for Handling Inherited Code

[Kate, one of our developers at SoftArtisans, was pulled onto a project to do consulting work. Below, Kate discusses her work and how she learned to handle inherited code. Read about the lessons she’s learned after being gifted a whole new project of code.]Credit: HubSpot

Recently, I inherited the code for a pretty large project, and anyone who knew the application wasn’t around when I took it over. Learning a brand new application is a daunting task – doubled if you have to learn it without any outside resources. As I tried to familiarize myself with the application, I picked up a few tricks to handling inherited code. These are a few of the things I learned along the way that will hopefully save you hours on your next undertaking.

1. Resist temptation

It can be really hard to ignore glaring implementation flaws when you look at code for the first time. Unfortunately, there are often reasons that the junky code exists in the first place. It might not be the best solution, but if it works, just leave it. Until you fully understand what each piece of code does, you might break something unintentionally by trying to fix it. Now you’ve lost time and still don’t understand the code any better. Unless it’s necessary for your current scope of work, make a tech debt note about why it’s bad code, and back away slowly.

2. Check the docs

I learn by immediately messing around in the code and doing as much damage as possible before rolling back. This isn’t really great, but hands-on learning is so natural for most technical things that we forget about reading. You. Yes, you. You are a developer so reading seems really unnecessary. Unfortunately, we still haven’t found a way to automate it, so you’ll have to do the reading yourself. Look at any documentation that might be around. It’ll suck. It won’t make a bit of sense. Then in 6 months, you’ll look at a weird method and remember that the docs said why it was like that. And you’ll think to yourself, “Ah, well, Old Fellow, looks like that reading did more than a mite bit of good!” and you’ll laugh and light up a cigar with your adoring fans swooning and giggling. Unless, you know, you’re a normal person and not a caricature of an old famous British man. Which brings me to 3…

3. Be a caricature of an old famous British man. No. Kidding. Don’t do this. (But if you do this, let’s be friends.)

3. Check the change log

It’s useful to see what might have been done recently, what kinds of issues have been encountered, and where those fixes lie. If there’s bug tracking, change logs, general progress docs, find them all. You don’t have to memorize every issue, but go over some known problems and keep yourself from making the same mistakes.

4. Be a user

It’s a lot easier to understand the code if you take some time to use the actual application. Use it like a user would, ask users (or consult the people who already did), find out why this is the way it is. There might be a good reason that all the buttons are yellow and labeled “Do not click.” It might help the users’ workflow. Make sure you know, because ultimately if the people who need this hate what you’ve done, someone else will be inheriting this code from you.

5. Just ask

When you inherit code blind, it’s awful. I mean, of course, the last ten people to look at this have all left the company/country/planet, and you’re all alone and in the dark. However, it doesn’t hurt to ask around and find out if anyone else knows what’s up. Alternately, if you have someone who knows the code, don’t get stuck in “Am I seriously doing this wrong?” hell, and just ask the question. 9 times out of 10, the code is confusing because it’s confusing code.

6. Look before you implement

It’s great when you can finally work on the code you’ve inherited. Continue reading 10 Tips for Handling Inherited Code
Thinking Outside the Spreadsheet Box: Unexpected Uses of OfficeWriter

If you leave me alone for too long, I do foolish things like make a mini-paint app that writes the image to 1×1 cells in Excel. And so can you! But before I show you how to make a mini-paint app (the easiest thing you will ever do in your life), let me explain to you what part of me said, “Yeah, Champ, this is a great idea! Who wouldn’t want to make a weird spreadsheet that contains an image made with the background color on cells?” It all began when I was thinking about this awesome idea by my art crush, Evan Roth (*swoon*). He said, “Hey world! I want work to be art,” and decided to make a double-mouse that outputs to an art program on one screen and his regular work on the other. So I figured, why not put some art in Excel too?

Then I got more and more excited as I realized there are actually a ton of cool things you can do…

  • Use the formulas in Excel as transformations on your picture.
  • Randomize cell size to introduce weirdness.
  • Flip the project to input an Excel template and output an image, using Excel calculations and System.Draw to make a simple ray tracer.
  • Do some stuff with conditional formats, or all those light transform equations you learned in high school for no reason…until now!
  • Make a mock tool that lets users draw a spreadsheet design and output it to a real spreadsheet! (I thought a lot about this, and it’s not necessarily simple, but it is a really cool idea. If anyone puts that together, please let me know. I mean you, Evan Roth….Call me?)

The Mini-Paint

For the sake of simplicity, I’m showing you the randomized cell idea. I’ve made it an optional setting in this example, but, you know, make it your own and all. Oh, also, get at me with your art! For this app you’ll need WinForms and OfficeWriter.

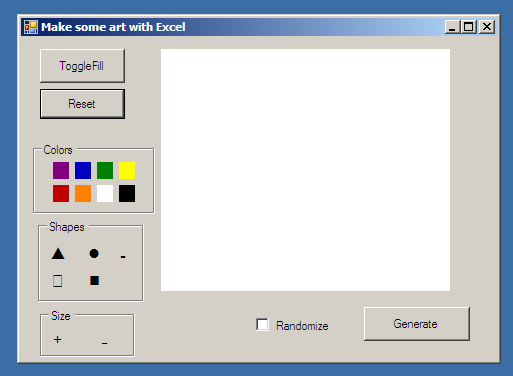
appwindow

I started by making a pretty basic app that has some simple actions. The “canvas” is a PictureBox that I save and resave some drawing objects to on each mouse event. The color selector is just 8 flat buttons set to be the color they represent. The shapes are again flat buttons with Wingdings images because I was too lazy to find a relevant .res file with some neat picture icons. Can you guess what the size toggles are? Flat buttons. Generic plus/minus from your plain boring keyboard. Okay. Basic functions.

  • MouseDown sets a pointer location.
  • MouseUp nullifies the pointer location.
  • MouseMoved is a basic drawing function. (You can find a ton of examples, but I like this one from good ol’ SO.)
  • Color buttons set a global variable, _selectedColor, to the color of the button.
  • Shape button clicks set a global variable called _selectedShape. I set it to an enum of possible shape options and I use a switch statement in the draw method. Instead of calling DrawLine or DrawRectangle, I call DrawShape(x,y) with x and y being current mouse x and y.

DrawShape is roughly this: Continue reading Thinking Outside the Spreadsheet Box: Unexpected Uses of OfficeWriter

Binding bordered images to GridViews

Here’s a neat trick: bind an image with a border to a GridView!
The first rule of web development is “nothing is as easy as it seems.” I think the second rule is something about choosing from standards? I don’t really care. The point is, this seemed like it would be too easy, but the implementation threw some curves at me. Let’s hearken back to a simpler time and begin our journey with a list of possible horrors:

  • The image object links to a physical location. It does not write BLOB objects. Friggen nothing writes BLOB objects.
  • Sometimes there are null values.
  • I need a border. This will create a little empty black square if a null is encountered.
  • What the heck is the difference between <%# and <%= again? And how the heck do I search for it? (Look here for explanation and links. Please read this. You’ll be so happy you did.)

Now we follow our hero on her continued path of – yes, hero is the male form. Don’t judge me. You don’t know – discovery. The first step is, of course, to point the Image object to an HttpHandler and pass that the ID for the data row containing the image. The handler itself is a pretty straightforward interface. There’s only one method: ProcessRequest() where you need to implement a method to grab the data from SQL. There’s also one property:  good ol’ IsReusable(). IsReusable is a boolean value that indicates whether or not the HttpHandler object can be reused. There’s a lot to take into consideration here:

  • Threading
    • If you have multiple threads accessing this at the same time you can completely screw up the state. What I’m doing is getting the query string within the process request. This is fine since the variable is local to the method it will be unique to the thread. You don’t have to stick to my code, though. If you are reusing the object, remember that any thread can, at any time, be changing a global variable.
  • End state of the handler
    • This is especially important here, since we’re using a lot of data objects, we need to make sure everything is properly disposed before the method is done executing.
  • Memory considerations
    • If IsReusable is false, then a new handler will be created for each request. This can cause performance issues if you have a lot of, say, users, accessing this, say, all at once. However, a simple httphandler doesn’t usually cause a lot of memory bloat. This is one of those application-specific things.

Whether you set IsReusable to true or false really comes down to what you need this handler to do. If you’re really uncertain, leave it at false – it will at least guarantee there are no multithreading nightmares, like in the sopranos. Continue reading Binding bordered images to GridViews

All Kinds of Things You Can Do With SPUser Objects

The SPUser object is a really useful tool, but sadly not very intuitive. Here are some of my favorite SPUser snippets.

People picker list columns don’t return a user object, which is frustrating, but not foreign to those of us with picker experience. An ID is generally returned by a lookup field. Not so for people pickers, which return a domain\user string that is frequently pre-pended by nonsense.

This is how you get a user directly from the list item:

protected SPUser GetUserfromItem(SPListItem userItem)

{

SPFieldUser userField = (SPFieldUser)userItem.Fields.GetField(“User”);

SPFieldUserValue fieldValue = (SPFieldUserValue)userField.GetFieldValue(userItem[userField.Id].ToString());

return fieldValue.User;

}

Now let’s look at a neat little method that grabs some properties by current user! As a side note, there are a lot of issues that are purportedly resolved by setting the context to null – I have never found this helpful. Never. In my lifetime.

//User Properties by user

private bool GetProperty(string userName)

{

//Your return value is a bool

bool found = false;

//Create a profile manager

UserProfileManager profMan;

//Get your site in a “using” so there’s no disposing

using (SPSite site = new SPSite(SPContext.Current.Site.ID))

{

//Make everything unsafe. Just kidding. This is so that you have permissions to edit the profile property.

//If you don’t plan on making changes, you can access the property without this.

Web.AllowUnsafeUpdates = true;

//Okay. Get your web on!

using (SPWeb newWeb = site.OpenWeb())

{

//Get the context and set the profile manager

SPServiceContext context = SPServiceContext.GetContext(site);

profMan = new UserProfileManager(context);

//Get your user profile object

UserProfile prof = profMan.GetUserProfile(userName);

//This is important. Remember to check the Property.Value. Otherwise you are checking to see

//if the property itself is null. And since you know it exists – guess what? It isn’t null. Continue reading All Kinds of Things You Can Do With SPUser Objects

Dr Dre Or How I Decided to Stop Worrying and Learn the Hardware

Every so many months I look up “X number of things every programmer should know” and do my best to incorporate one of those principles into my coding. There are some standard concepts: modularity, short methods, avoid “spaghetti code, ” understand what your compiler is actually doing, the four years and tens of thousands of dollars you spent on an education is worth nothing. Nothing.

My most recent gem is here. I actually found this article sometime ago and tl;dr-ed it, throwing it into the “Read This” folder. I’m not proud of shelving an article due to its length, nor that I ended the last sentence with a preposition, but that’s just how things went.

In any case, after rediscovering it, two points caught my eye. First, #5: Beauty is in Simplicity. (I’ll save you the trouble of changing tabs.) This section is about writing simple code that‘s also easy to read. Most of my short code is pretty much impossible to understand (kind of like this). Maybe it’s because all my variable names are in Bantu, but still it would be worth learning how to write simple code that another person could understand. New principle identified! That was until I saw #10: Consider the Hardware. According to this, lots of small functions aren’t necessarily the best for machine efficiency. Oh, good. Do I go with small methods for modularity and readability, or giant methods for more efficient execution?

The two aren’t actually exclusive, but they sure seem that way. Continue reading Dr Dre Or How I Decided to Stop Worrying and Learn the Hardware

Simple PowerShell Deployment Scripts

Stsadm is the standard for MOSS 2007. Although still available in SP2010, it is deprecated and should not be used. So let’s start with some basics of PS for SP.

  1. One does not simply use PowerShell: The commands are specifically geared for the SharePoint Management Shell. If you open Management Shell as an administrator and type each command in, it’ll work fine. However, when it comes to running scripts there are some issues.
  • You have to load the Microsoft.SharePoint.PowerShell snapin, like so:  “Add-PsSnapin Microsoft.SharePoint.PowerShell”
    • This may give you an error: “The local farm is not accessible.” You need to have your account enabled as a SharePoint Admin (see below)
  • Make sure you’ve set the execution policy. This one is easy, just use the “Set-ExecutionPolicy” command. The possible values are:
    • AllSigned – You can only run trusted signed scripts.
    • RemoteSigned – If the script is downloaded, it must be signed, otherwise just run it.
    • Restricted – This one is self explanatory. No one gets to run scripts. No nobody. Not nohow.
    • Unrestricted – Again, self explanatory. As a very wise English professor once told me, “Unrestricted is the opposite of restricted.” I never forgot that…
  • You always need root: You have to be an SP administrator in order to run SP commands from PowerShell. You can check your local permissions by:
    • Right clicking on SP Management Shell and running it as an administrator. This will give you access to admin privileges, but if your login isn’t a SP admin, then you can’t do any of this in regular PowerShell.
    • Typing “Get-SpShellAdmin”
    • Looking for your login.
    • If you aren’t on the list, you can use the current Shell to add yourself, like so: “Add-SpShellAdmin -UserName YOUR\UserName”
    • Now you should be able to execute SharePoint scripts in PowerShell.
  • Remember – All Files .Ps1.: The script has to be saved with extension .ps1.
    • You  shoud save as “All File Types” rather than “*.txt,” otherwise it may not work.
  • No execadmsvcjobs: That command is no longer available. So timer jobs have to be waited for a little differently.
  • ## Get the solution
    $Solution = Get-SPSolution -identity $SolutionFileName
    $lastStatus = ""
    ## loop whilst there is a Job attached to the Solution
    while ($Solution.JobExists -eq $True)
    {
     $currentStatus = $Solution.JobStatus
    	 if ($currentStatus -ne $lastStatus)
    	 {
    		Write-Host "$currentStatus…" -foreground green -nonewline
    		 $lastStatus = $currentStatus
    	 }
    	 Write-Host "." -foreground green -nonewline
      sleep 1
     }
     ## completed
     Write-Host ""
     Write-Host " "$Solution.LastOperationDetails -foreground green

    The Script
    I wrote a simple script that prompts for file name, webapp name, and what function you’d like to perform. It is based on the script found on Nik Patel’s SharePoint World blog. The difference between Nik’s and mine is that mine doesn’t check for everything before performing operations. If you choose to use it, you have to be aware that you might get an error; however, it is a very simple version and much easier to use/understand/modify.

    #####
    # Script to deploy Webparts/Solutions. Does not make use of feature installation
    # Kate Mogel 2012
    #
    # To use:
    # Place in folder with WSP file. Open powershell and cd into solution folder
    # Run script as admin, refering to local file (e.g. ./DeployScript.ps1)
    # Enter full file name (e.g. solution.wsp), web app name, and choose an operation
    #####
    param(
    [string]$solName = "$(Read-Host 'Enter WSP File name ')",
    [string]$webName = "$(Read-Host 'Enter WebAppName. i.e. http://SP2010APP ')",
    [string]$whichFunct = "$(Read-Host 'Enter IS to install, RS to remove, US to upgrade ')"
    )
    
    function main{
    
     #Check for snapin. Add if not present
     $snapin = Get-PSSnapin | Where-Object {$_.Name -eq 'Microsoft.SharePoint.Powershell'}
     if ($snapin -eq $null)
     {
            Add-PSSnapin Microsoft.SharePoint.Powershell
     }
    
    #Get location
    $solLoc = Get-Location 
    
      #Check the operation
      if($whichFunct -eq "IS")
      {
     	addSol
      }
      if($whichFunct -eq "RS")
      {
          Uninstall-SPSolution -Identity $solName -WebApplication $webName
      }
      if($whichFunct -eq "US")
      {
          Update-SPSolution -Identity $solName -LiteralPath $solLoc\$solName -GACDeployment
      }
    
    }
    
    #Function to add and install solution
    function addSol{
    	$Sol = Get-SPSolution | where-object {$_.Name -eq $solName}
    	if($Sol -eq $null){
    	    Add-SPSolution -LiteralPath "$solLoc\$solName" -Confirm:$false
    	    Install-SPSolution -Identity $solName -WebApplication $webName -GACDeployment
     	}
    }
    #Run Main Method
    main

    Okay. Go deploy your WSP.

    How to Migrate Lists from MOSS 2007 to SQL Server 2008 R2

    These list migrations have been tested on MOSS2007 to SQL 2005 and 2008 R2.

    How to migrate non-Lookup items:

    The lists can be migrated as templates, as explained here:

    1. Create the tables in SQL. A simple script to do so:

    use MYDB
    CREATE TABLE myTable
    (
    ID int PRIMARY KEY,
    name varchar(50),
    someData varchar(50),

    )

    2. Once the templates are converted and installed, and the tables are set up, a client object program has to be used to push them into SQL.  Unfortuantely, SharePoint’s client OM does not work in MOSS, so you’ll have to transfer the templates first. For my program I chose a console application. Here’s a simplified script for a non-specific list:

    using System.Collections.Generic;
    using Microsoft.SharePoint;
    using System.Data.SqlClient;
    using Microsoft.SharePoint.Client;
    using SP = Microsoft.SharePoint.Client;
    using System.Data.Sql;
    //Note that I cut out the first half of the references since they're all standard system assemblies
    namespace ListToSQL
    class Program
     {
    string connString = "Data Source=ucla2010db;Initial Catalog=REACTOR;Integrated Security=SSPI";
    
    	static void Main(string[] args)
     	{
    		Program prog = new Program();
     		prog.GetListItems();
     	}  
    
             private void GetListItems()
             {
    
    	  string SPSite = "http://MySite/siteName";
    
    	  using (SP.ClientContext context = new SP.ClientContext(SPSite))
     	  {
     			SP.Web web = context.Web;
     			SP.List myList = web.Lists.GetByTitle("MyList");
     			SP.CamlQuery qry = new SP.CamlQuery();
    
    			//No need to actually filter the query. We want all the items
     			qry.ViewXml = @"";
    
     			SP.ListItemCollection listColl = myList.GetItems(qry);
     			context.Load(listColl,
    				items => items.Include(
     				item => item["Title"],
     				item => item["Date"],
     				item => item["OtherField"]));
     				context.ExecuteQuery();
    
     			BulkUpdateSQL(BuildTable(listColl),"myDataTableName");
                }
            }
    
           private DataTable BuildTable(SP.ListItemCollection contextList)
          {
               DataTable dt = new DataTable();
    
               //Select any ListItem at all and loop through the field names
               ListItem colItem = contextList[0];
    
               foreach (string name in colItem.FieldValues.Keys)
               {
    	       //Make the field names into column names
                     dt.Columns.Add(name);
               }
    
               foreach (ListItem item in contextList)
               {
                     //Create a new row for each ListItem
                     dt.Rows.Add(dt.NewRow());
    
                     foreach (string name in item.FieldValues.Keys)
                     {
    	            //Add each FieldValue item to the row
                          dt.Rows[dt.Rows.Count - 1][name] = item[name];
                     }
               }
    
             return dt;
           }
    
           private void BulkUpdatePI(DataTable dt, string destName)
           {
                 using (SqlConnection conn = new SqlConnection(connString))
                 {
                     conn.Open();
                     using (SqlBulkCopy copy = new SqlBulkCopy(conn))
                     {
     /* Note that you can use ColumnMappings [i.e. "copy.ColumnMappings.Add("Title", "name")"]
      * With either ordinal or string-based mapping,
      * But every column you don't map will get ignored if you explicitly map
      */
                            copy.DestinationTableName = destName;
                            copy.WriteToServer(dt);
                     }
              }
    }


    TADA! Lists in SQL!

    But what about… LOOKUPLISTS!?

    The only way to do this from MOSS2007 and maintain the lookup info is to export the list to Excel:

      1. In the Data View list view there is an option to export to excel.
      2. Save the file in a location accessible by your DB
      3. From there, go to the DB you want the data in
      4. Right click the management folder and select “Import Data”
      5. In the Import Data Wizard, select “Microsoft Excel” from the dropdown
    • This will prompt you to enter the file name for the excel file. Do that.
  • Leave “first row has column names” checked, since that is the SP export default
  • Click next (but you already knew that)
  • Select the following:
    • Destination:

    Whatever type of DB your MOSS server is, if you are  unsure, use SQL Native Client.

    • Server Name: The name of your MOSS server. If you are unsure, try “MOSS.”
    • Authentication: Most likely windows
    • Database: The database you wanto to import the excel file into.
    • And… Next
  • Now you can copy the data or write a specific query. I tend to just copy all the data so it’s in SQL if I need it
  • On the “Select Source Tables and Views” screen you will see bizarrely named source options. Select the first (possibly only) option. You can change the mappings or preview the table from this screen.
  • Then hit finish. You can schedule the operation or run it now.
  • Great.
  • We’re still not done.
  • From there you can go to your 2010 server and basically perform the same import operation, only add the MOSS Excel table into your new database.
  • This doesn’t actually create primary key lookups, it only imports the data as-is, but now you have it, so you can manipulate it as needed!
  •  

    Creating a Simple Connection Consumer in SharePoint

    There are a million articles about using seven different interfaces and fourteen .wsp deployments to make an entirely custom connection provider and consumer. However, I couldn’t find one about how to create a simple connection consumer that filters based on a SharePoint list. I also couldn’t find anything about changing the brand-new double-headed arrow icon that SharePoint replaced the radio button with. Turns out they can go in the same simple solution:

    • Setting up the Consumer – This consumer will take a single row of information from a SharePoint list. It’s implemented in “MyWebPart.cs” and not in a user control.
    //Create the data row that the list information will fill
    DataRowView _row = null;
    //Declare your consumer. Note that "Row" can be anything - it's just the term that
    // SP will use when you enable the connection
    [ConnectionConsumer("Row")]
    //Set up the actual connection
    public void SetConnect(IWebPartRow provider)
    {
        //"RecieveRow" is the method you'll create to interpret the data
         RowCallback callback = new RowCallback(ReceiveRow);
        //This is where the data comes in 
         provider.GetRowData(callback);
    }

    This code sets up the DataRow. Note that the “provider” parameter is passed by the SharePoint connection.

    • Capturing your data – This is where you can actually use the filter – manipulate, save, and query to your heart’s content. Below is a sample RecieveRow method:
    public void ReceiveRow(object row)
    {
         //Set your local _row equal to the row passed by SharePoint
         _row = (DataRowView)row;
       
         //Make sure it isn't null 
         if (_row != null)
         {
        //The next three lines of code are a great way to open a site without having to dispose of anything!
        SPWeb contextWeb = SPControl.GetContextWeb(Context);
        using (SPSite site = new SPSite(contextWeb.Url))
        {
            using (SPWeb web = site.OpenWeb())
            {
             //Convert the DataRowView into a DataRow, so you can actually use it
                 DataRow dr = _row.Row;
                
                 //I need to allow unsafe updates to execute my query
                 web.AllowUnsafeUpdates = true;
                 //Query against the row data
                 SPQuery query = new SPQuery();
                 query.Query = string.Format(
                     @"<Where>
                         <Eq>
                             <FieldRef Name='MyColumn' />
                             <Value Type='Lookup'>{0}</Value>
                         </Eq>
                     </Where>", dr["mycolumnvalue"].ToString() );
                        
                 SPList list = web.Lists["MyList"];
                 SPListItemCollection items = list.GetItems(query);
                /*********
                 *In here you do all you want with that filtered item list.
                 *Convert it to a data table, pass the list to a usercontrol.
                 *After all, it's your filter!
                 ********/
               
                //Disable unsafe updates when you're done
                 web.AllowUnsafeUpdates = false;
            }
         }
         }
    }

    That’s all there is to it. You can fill a data structure in the RecieveRow method and pass it on to a user control the same way you would pass any other value.

    • Customization –  Here’s a little bonus – how to update the radio buttons with the filter wsp.
      • In the hive, the double-headed arrow radio buttons are the following two files:
        • RBSEL.gif
        • RBUNSEL.gif
      • If you want to replace them create a folder in your solution package with the following path:  MyWebPartProject > TEMPLATE > IMAGES
      • Rename your “on” radio button “RBSEL” and save it as a gif
      • Rename your “off” radio button “RBUNSEL” and save it as a gif
      • Place both of them in the IMAGES folder.
      • When you deploy, it will overwrite the default arrows.

    This change OVERWRITES the default SharePoint images. Only do this if you want to update all of the radio buttons on the farm. Otherwise you will have to restore the double-headed arrow icons, and it won’t be fun.


    [Image via the San Francisco Weekly]

    Dealing with Flash Modules in SharePoint

    flash sharepoint 2010There are a number of problems adding flash to SharePoint 2010. A few issues and resolutions follow:

    ErrorPROBLEM: Flash files won’t open from a document library

    • What’s actually happening here is that SharePoint adds special headers to disallow applications and scripts from being run in the browser.
    • This is a security measure to keep users from uploading dangerous content.
    • The user gets prompted to download the file instead.

    Tick SOLUTION:

    ErrorPROBLEM: I can’t access swf files from the 14 hive! Continue reading Dealing with Flash Modules in SharePoint