There are existing guides to creating a web part that hosts a user control and others on creating an ASP.NET AJAX-enabled web part. Here I’ll discuss how to create a web part that combines both features. With the user control, you can perform complex layout more easily using the visual designer. And of course, with ASP.NET AJAX you can eliminate full-page postbacks and provide users with a smoother browsing experience.
The walkthrough includes a SoftArtisans.Tutorial.AjaxWebPart for SharePoint 2010 (it can be made to work for SharePoint 2007 with little modification).
|
SharePoint and ASP.NET AJAX With SharePoint 2007, the first step would be to configure SharePoint to use ASP.NET AJAX. Fortunately, SharePoint 2010 is already enabled for ASP.NET AJAX, so you can avoid performing error-prone surgery on Web.config. |
Step 1: Creating the project
While there are SharePoint project templates, I prefer to use a basic project template for the maximum control and flexibility. It is also more instructive to delve into the nuts and bolts rather than have everything generated for you.
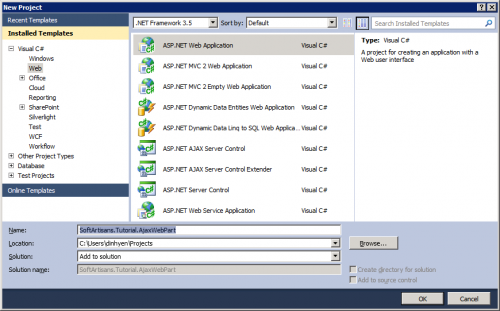
In Visual Studio 2010, create an ASP.NET Web Application project. Set the project’s target to .NET Framework 3.5 for SharePoint 2010.
Step 2: Creating project folders
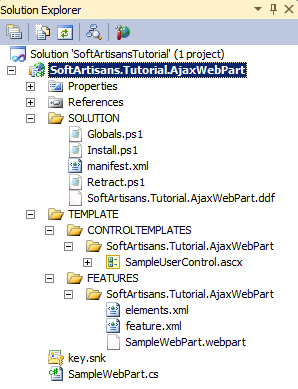
Create the below folders. The TEMPLATE folder hierarchy is intended to mirror the TEMPLATE virtual directory in the 14 Hive. The SOLUTION folder is there for convenience and stores the solution package and deployment scripts. Create a folder named SoftArtisans.Tutorial.AjaxWebPart under both the CONTROLTEMPLATES and FEATURES folders where project files will be deployed. I’ll discuss the content of the files further along in the walkthrough.
Step 3: Signing the assembly
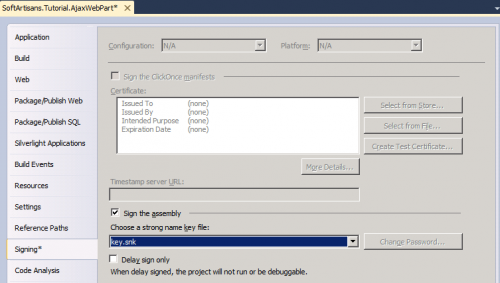
Sign the assembly by opening Project properties, selecting the Signing tab and generating a key file.
Step 4: Determining the strong name
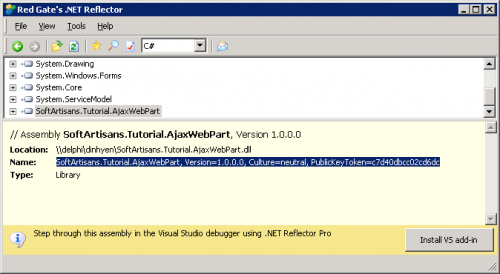
You will need to know the assembly’s strong name. One way is to build the project then load the assembly in the .NET Reflector. You can copy the assembly’s strong name in the information panel of the Reflector.
Step 5: Adding the user control
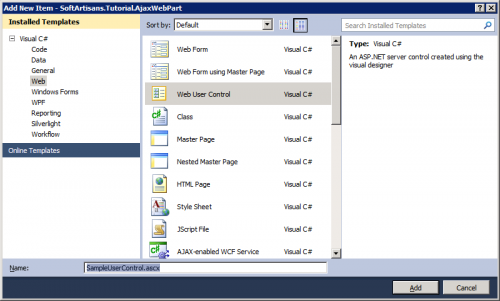
Add a new Web User Control as CONTROLTEMPLATES/SoftArtisans.Tutorial.AjaxWebPart/SampleUserControl.ascx. When you do so, Visual Studio automatically adds the required library references.
<%@ Control Language="C#" AutoEventWireup="true" CodeBehind="SampleUserControl.ascx.cs" Inherits="SoftArtisans.Tutorial.AjaxWebPart.SampleUserControl,
SoftArtisans.Tutorial.AjaxWebPart, Version=1.0.0.0, Culture=neutral, PublicKeyToken=c7d40dbcc02cd6dc" %>
<asp:UpdatePanel ID="UpdatePanel1" runat="server" UpdateMode="Always">
<ContentTemplate>
<div style="padding: 5px; border: solid 1px #102431; color: white; background-color: #184563">
<p>
<asp:Label ID="Label1" runat="server" Text="" />
</p>
<div style="float: left">
<asp:Button ID="Button1" runat="server" Text="Get the current time" OnClick="OnGetCurrentTime" />
</div>
<div style="float: left; padding: 5px">
<asp:UpdateProgress ID="UpdateProgress1" runat="server" AssociatedUpdatePanelID="UpdatePanel1">
<ProgressTemplate>
Updating...
</ProgressTemplate>
</asp:UpdateProgress>
</div>
<div style="clear: both;">
</div>
</div>
</ContentTemplate>
</asp:UpdatePanel>
<p>
<asp:Label ID="Label2" runat="server" Text="" />
</p>
In the Control directive, you must specify the assembly in conjunction with the class name of user control. Otherwise, you will receive the following error:
A Web Part or Web Form Control on this Page cannot be displayed or imported. The type could not be found or it is not registered as safe.
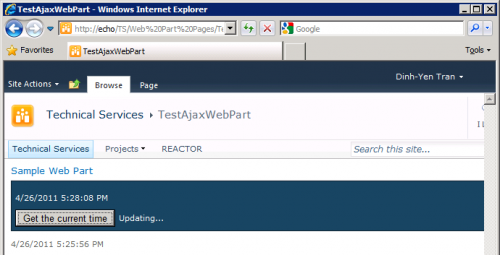
The first label and button are placed inside an ASP.NET AJAX Update Panel. The Update Panel also contains an Update Progress control, which is shown when an asynchronous postback is in progress. For simplicity, all AJAX-enabled controls are placed inside the Update Panel so that an asynchronous postback is triggered by any postback-capable control inside the panel. However, for added flexibility, you can also configure a trigger so that an asynchronous postback can be initiated by any control anywhere on the page; refer to the documentation for more details.
The second label is placed outside the Update Panel. It should not be updated by an asynchronous postback.
The code behind page for the user control is as follows:
namespace SoftArtisans.Tutorial.AjaxWebPart{ public partial class SampleUserControl : System.Web.UI.UserControl
{
protected override void OnLoad(EventArgs e)
{
base.OnLoad(e);
this.Label1.Text = this.Label2.Text = DateTime.Now.ToString();
}
protected void OnGetCurrentTime(object sender, EventArgs e)
{
System.Threading.Thread.Sleep(1000);
this.Label1.Text = DateTime.Now.ToString();
}
} // class
} // namespace
|
I insert some delay in the handler for the button click event so that the progress indicator is made visible.
Step 6: Adding the web part
Add a class file called SampleWebPart.cs for the web part code:
namespace SoftArtisans.Tutorial.AjaxWebPart{ public class SampleWebPart : Microsoft.SharePoint.WebPartPages.WebPart
{
private SampleUserControl _uc = null;
protected override void OnInit(EventArgs e)
{
base.OnInit(e);
// Add required ScriptManager control if none exists (only 1 allowed on page)
if (ScriptManager.GetCurrent(this.Page) == null)
{
ScriptManager scriptManager = new ScriptManager();
scriptManager.ID = "scriptManager";
scriptManager.EnablePartialRendering = true;
this.Page.Form.Controls.AddAt(0, scriptManager);
}
_uc = (SampleUserControl)Page.LoadControl("~/_CONTROLTEMPLATES/SoftArtisans.Tutorial.AjaxWebPart/SampleUserControl.ascx");
}
protected override void CreateChildControls()
{
base.CreateChildControls();
this.Controls.Add(_uc);
}
} // class
} // namespace
|
The web part is simply a container for the user control, which is loaded in the OnInit event handler. ASP.NET AJAX requires a Script Manager control. The OnInit event handler injects the Script Manager control into the page only if it is not already present. This condition is important because the page can contain only one Script Manager control even if it hosts multiple ASP.NET AJAX-enabled web parts. Refer to this post for more information on adding the Script Manager control to a web part.
Step 7: Adding the feature metafiles
Add FEATURES/SoftArtisans.Tutorial.AjaxWebPart/feature.xml. This defines the feature as a Site Collection feature and specifies the location of the feature support files.
<?xml version="1.0" encoding="utf-8" ?>
<Feature Id="{803033BB-9C0A-40F4-8568-51226B1845FD}"
Title="SoftArtisans.Tutorial.AjaxWebPart"
Description="Sample ASP.NET AJAX web part"
Version="1.0.0.0"
Hidden="FALSE"
Scope="Site"
DefaultResourceFile="core"
<ElementManifests>
<ElementManifest Location="elements.xml"/>
<ElementFile Location="SampleWebPart.webpart" />
</ElementManifests>
</Feature>
|
Add FEATURES/SoftArtisans.Tutorial.AjaxWebPart/elements.xml. This specifies that the web part is to be installed in the Web Part Gallery under the SoftArtisans group.
<?xml version="1.0" encoding="utf-8" ?>
<Module Name="SoftArtisans.Tutorial.AjaxWebPart" List="113" Url="_catalogs/wp">
<File Path="SampleWebPart.webpart" Url="SampleWebPart.webpart" Type="GhostableInLibrary">
<Property Name="Group" Value="SoftArtisans" />
</File>
</Module>
</Elements>
|
Add FEATURES/SoftArtisans.Tutorial.AjaxWebPart/SampleWebPart.webpart. This specifies the assembly which contains the web part code and the properties of the web part.
<?xml version="1.0" encoding="utf-8" ?>
<webParts>
<metaData>
<type name="SoftArtisans.Tutorial.AjaxWebPart.SampleWebPart,
SoftArtisans.Tutorial.AjaxWebPart, Version=1.0.0.0, Culture=neutral, PublicKeyToken=c7d40dbcc02cd6dc" />
<importErrorMessage>Cannot import this Web Part.</importErrorMessage>
</metaData>
<data>
<properties>
<property name="Title" type="string">Sample Web Part</property>
<property name="Description" type="string">Display the current time</property>
</properties>
</data>
</webPart>
</webParts>
|
Warning: All tags are required; for example, if you omit the <importErrorMessage> tag, you will receive a “bad format” error when loading the web part.
Step 8: Adding the solution metafiles
Add SOLUTION/manifest.xml. This specifies the location of the feature files. It also specifies that the assembly should be installed into the Global Assembly Cache and designates it as a safe assembly.
<?xml version="1.0" encoding="utf-8" ?>
<Solution SolutionId="{77BBD8DF-44DA-461c-87AF-2B1B5070666B}" xmlns="http://schemas.microsoft.com/sharepoint/">
<Assemblies>
<Assembly Location="SoftArtisans.Tutorial.AjaxWebPart.dll" DeploymentTarget="GlobalAssemblyCache">
<SafeControls>
<SafeControl
Assembly="SoftArtisans.Tutorial.AjaxWebPart, Version=1.0.0.0, Culture=neutral, PublicKeyToken=c7d40dbcc02cd6dc"
Namespace="SoftArtisans.Tutorial.AjaxWebPart"
TypeName="*"
Safe="True" />
</SafeControls>
</Assembly>
</Assemblies>
<FeatureManifests>
<FeatureManifest Location="SoftArtisans.Tutorial.AjaxWebPart\feature.xml" />
</FeatureManifests>
<TemplateFiles>
<TemplateFile Location="CONTROLTEMPLATES\SoftArtisans.Tutorial.AjaxWebPart\SampleUserControl.ascx" />
</TemplateFiles>
</Solution>
|
Now we’re down to the home stretch. Add SOLUTION/SoftArtisans.Tutorial.AjaxWebPart.ddf. This is the control file that specifies which files are packed into the solution package.
.Set DiskDirectory1="Solution"
.Set CabinetNameTemplate="SoftArtisans.Tutorial.AjaxWebPart.wsp"
SOLUTION\manifest.xmlbin\SoftArtisans.Tutorial.AjaxWebPart.dll;;; Feature.Set DestinationDir=SoftArtisans.Tutorial.AjaxWebPartTEMPLATE\FEATURES\SoftArtisans.Tutorial.AjaxWebPart\feature.xmlTEMPLATE\FEATURES\SoftArtisans.Tutorial.AjaxWebPart\elements.xmlTEMPLATE\FEATURES\SoftArtisans.Tutorial.AjaxWebPart\SampleWebPart.webpart;;; User controls.Set DestinationDir=CONTROLTEMPLATES\SoftArtisans.Tutorial.AjaxWebPartTEMPLATE\CONTROLTEMPLATES\SoftArtisans.Tutorial.AjaxWebPart\SampleUserControl.ascx |
Step 9: Building and deploying the solution
Build the project. Build the solution package using MakeCab.exe. For convenience you may want to run MakeCab.exe as a project build event:
To deploy the solution as a farm solution, you can use the deployment scripts described at Automating installation and uninstallation for SharePoint 2010 farm solution. Be sure to modify Globals.ps1 for your web application.
Using the web part
Once you will have deployed the solution and activated the SoftArtisans.Tutorial.AjaxWebPart Site Collection feature, create a Web Part Page and add the Sample Web Part to it. The Sample Web Part can be found in the SoftArtisans group in the Web Part Gallery.
|
Activating a Site Collection feature You can view the Site Collection Features only if you are designated as a Site Collection Administrator. Alternatively, you can activate the SoftArtisans.Tutorial.AjaxWebPart feature using PowerShell:
|
To see the asynchronous postback, click on the button. Only the first label should be updated.
Share the post "How to create a web part containing ASP.NET AJAX-enabled user control in SharePoint 2010"

 Follow