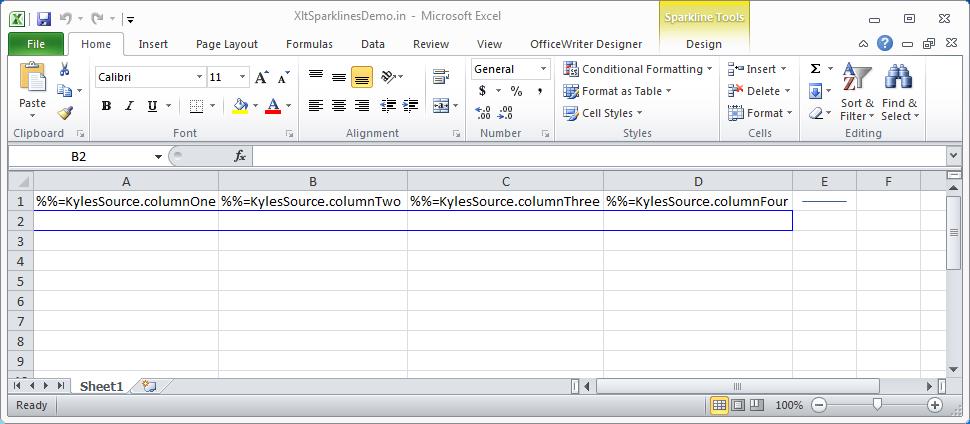
Tag Archives: OfficeWriter

Webinar: Ghouls, Goblins, and Data

Register for the October Webinar!

Learn how OfficeWriter can put data in the hands of your business users.

When: Friday, October 18th at 1 P.M.

In this webinar:

We’re looking at what the average American spends on Halloween each year from costumes to candy to decorations. Importing this data into Excel using OfficeWriter, we’ll see which costumes outrank the rest. Is it Miley Cyrus, your favorite decade garb, or the ever-popular witches and ghosts? We’ll find out, along with what Americans spend on these once-a-year ensembles, mounds of candy, and gobs of decorations. You’ll take away new tricks for creating reports in Excel and maybe a DIY Halloween costume idea or two.

What we’ll cover:

  • Building a report in SSRS from start to finish
  • Using charts and sparklines to display your data
  • Plotting multiple data sets on one graph
  • OfficeWriter’s new .NET designer ribbon for Excel


How to Sort Locked Cells in Protected Worksheets

Problem

When creating workbooks with protected sheets, it is common to want to allow users to get different views of the data by sorting and filtering,  without allowing them to change the data. However, while filtering works fine on locked cells, sorting does not. Even if Sort is enabled in the worksheet protection settings, if a user attempts to sort locked cells when a worksheet is protected, Excel throws the error “the cell or chart you are trying to change is protected and therefore read-only.” There is no obvious way to allow users to sort data on a protected worksheet.

Details

Locked VS. Unlocked Cells in Excel

The purpose of locking a cell is to prevent a user from editing the content of a cell when a worksheet is protected. This means when worksheet protection is turned off, a locked cell is no different from an unlocked cell. By default, all cells in an Excel worksheet are locked.

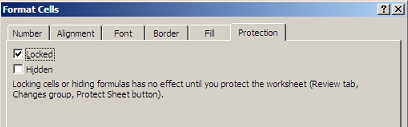
In order to unlock cells in Excel:

  1. Unprotect the sheet you are working on
  2. Right-click the cell, select “Format Cells”
  3. Select the “Protections” tab
  4. Uncheck the “Locked” checkbox property
  5. Click “OK”

Lock Cells Dialog

Lock Cells Dialog Box

It is also possible to unlock specific ranges of cells in Excel using the Allow Users to Edit Ranges feature in the Review tab. Making ranges editable for ranges of cells makes the cells behave like unlocked cells for the most part (e.g. their content is editable). However, the cell’s official locked/unlocked status does not actually change. See this Microsoft Excel article  for more details about how to unlock ranges of cells.


About Worksheet Protection Properties

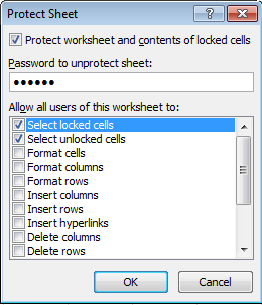
When you protect a sheet, Excel allows you to select from 15 different permissions you want to give to all viewers of the worksheet. You can allow users of the worksheet to:

  • Select Locked Cells
  • Select Unlocked Cells
  • Format Cells
  • Format Columns
  • Format Rows
  • Insert Columns
  • Insert Rows
  • Insert Hyperlinks
  • Delete Columns
  • Delete Rows
  • Sort
  • Use Autofilter
  • Use PivotTable Reports
  • Edit Objects
  • Edit Scenarios

Protect Sheet Dialog

properties

How Protection Properties are Affected By Locked Cells

When a cell is locked, not all worksheet protection properties operate as you’d expect. Four of the properties do not work when a cell is locked:

  • AllowSort
  • AllowDeleteColumns
  • AllowDeleteRows
  • AllowInsertHyperlinks

This is because in order to use these features the affected cell’s content must be changed. For example, using “Sort” does not just change the order of how the cells are viewed, it actually changes the values of the cells so that they are sorted. Due to this implementation of “Sort,” this worksheet protection property does not work when the cells are locked.

Solution

There are two approaches we can take to solve this issue:

Solution 1: Using “Allow Users to Edit Ranges” to Allow Locked Cell Sorting (RECOMMENDED)

This solution takes advantage of how allowing users to edit ranges makes locked cells behave like unlocked cells.

Step 1: Make cells editable so that sorting will work.

Add cells we want to sort to a range and make that range editable in “Allow Users to Edit Ranges.” This allows users to edit these cells when the worksheet is protected, even if they are locked cells.

  1. Select all the cells you would like the user to be able to sort, including their column headings.
  2. Go to the Data tab and click Filter. An arrow should appear next to each column header.
  3. Go to Review tab-> Allow Users to Edit Ranges
    1. Click “New…”
    2. Give the range a title.
    3. “Refers to Cells” should already contain the cells you want to allowing sorting on.
    4. If you want to allow only certain people to sort, give the range a password.
    5. Click “OK”

Step 2: Prevent users from editing these cells

When protecting the worksheet, uncheck “Select Locked Cells” worksheet protection property. This will prevent users from editing the cells.

  1. In the “Allow Users to Edit Ranges” dialog:
    1. Click “Protect Sheet…”
    2. Give the worksheet a password
    3. Uncheck the worksheet protection property called “Select Locked Cells”
    4. Check the “Sort” property and the “AutoFilter” properties
    5. Click “OK”

This solution allows users to use the Auto Filter arrows in the column names or the Sort buttons in the Data tab to sort data. Another benefit is that you have the option of allowing only certain users to sort by giving the range a password. Please note that this range password is separate from the password you set to protect the sheet.

Solution 2: Using Macros to Allow Locked Cell Sorting

To use a Macro to allowed the sorting of locked cells, you will need to make a macro for every sort operation you would like to allow. For example, ascending sorts and descending sorts would have to be written in separate macros. In addition, not all users have macros enabled because they are a security risk. However, the advantage of macros is that you don’t need to configure your template in any special way.

The macro we will write unprotects the sheet, selects a range called “range1,” sorts range1, and protects the sheet again:

Sub Macro1() 
' 
' Macro1 Macro 
' 
' Keyboard Shortcut: Ctrl+d 
'    
     //unprotect sheet 
     ActiveSheet.Unprotect
     //selects range     
     Application.Goto Reference:="range1"     
     //clears sort
     ActiveWorkbook.Worksheets("Sheet1").Sort.SortFields.Clear     
     //does descending sort, sets sort properties 
     ActiveWorkbook.Worksheets("Sheet1").Sort.SortFields.Add Key:=Range("A1"), _
         SortOn:=xlSortOnValues, Order:=xlDescending, DataOption:=xlSortNormal
With ActiveWorkbook.Worksheets("Sheet1").Sort
         .SetRange Range("A1:A4")
         .Header = xlNo
         .MatchCase = False
         .Orientation = xlTopToBottom
         .SortMethod = xlPinYin
         .Apply
     End With
     //protects the work sheet again
     ActiveSheet.Protect DrawingObjects:=False, Contents:=True, Scenarios:= _
         False
 End Sub

Sparklines in OfficeWriter

[In OfficeWriter 8.6 we introduced support for sparklines in your Excel reports. Sparklines are mini graphs that live within a cell of your Excel spreadsheet to quickly visualize and identify trends in your data. Below is an example of how to use sparklines within OfficeWriter reports.]

Hi! My name is Kyle and I worked on developing support for sparklines in ExcelTemplate. For those unfamiliar, a sparkline is basically a small chart that lives in a single cell. Sparklines are a great way to quickly visualize trends in data, especially if they are located in cells near their data source.

sparklines_image1

Below we’ve put together a demo of using sparklines within OfficeWriter’s ExcelTemplate. The first step is to insert data markers and sparklines into the file. Here I’ve inserted a sparkline next to the row of data markers and created a group of sparklines immediately below the data markers. The data source for the sparkline in cell E1 is A1:D1. The data source for the sparkline in cell A2 is A1 and so on for the rest of the group. Continue reading Sparklines in OfficeWriter

New Webinar! Make Reports that Measure Up

Take a look at how OfficeWriter can turn your drab Excel reports into chart-topping spreadsheets. This month, it’s all about music as we cover your favorite bands, artists, and labels.

In this webinar we’ll cover:

  • Grouping and nesting in Excel
  • Using SQL Server Reporting Services (SSRS)
  • Charting in Excel and relationships between genre, artists, labels, and album price

When: Friday, August 23, 2013 at 1 P.M. EST

*Register early as space is limited.

Can’t attend? Register anyway, and we’ll send a copy of the slides and recording following the webinar.


How to create stock charts using ExcelApplication

Problem

You need to create stock charts like the High-Low-Close or candlestick charts that Excel provides, but ExcelApplication does not have an enumeration for these charts.

Solution

Introduction to Stock Charts

Excel can create four kinds of charts intended for analyzing stock data. These are often referred to as high-low-close or candlestick charts because of their distinctive shape. These charts can be easily created with the Chart Wizard in Excel.

It is possible to use these charts with ExcelTemplate as you would any other chart. While ExcelApplication contains enumerations for many kinds of charts it does not have one for stock charts. Because of this, they cannot be created directly. In this article I’ll explain how to use a line chart and some special formatting to create charts that look exactly like each type of stock chart provided by Excel.

Setting up the data

Stock charts require very specific data in a very specific order. If you look at the names of the charts in Excel, you’ll note that each of them is actually a list of the data that chart needs, in the order that chart needs it. The four kinds of charts are High-Low-Close, High-Low-Open-Close, Volume-High-Low-Close and Volume-High-Low-Open-Close. As you can see, there is significant overlap and the data always appears in the same order; only the presence or absence of Volume and Open Data is different. For all of the following examples, we’ll use the same data pictured below:

For simplicity, we’ll create areas for each section of data and name them volumeAreaopenAreahighArealowArea and closeArea. Now that we have that, we can start creating stock charts.

A Basic High-Low-Close Chart

The simplest chart to create is a High-Low-Close chart. This chart displays the high and low values for a stock as a vertical line, with a tick mark at the point where the stock closed for the day. To begin creating this chart, we’ll follow a formula that will remain the same for all of the other stock charts.

First, create Continue reading How to create stock charts using ExcelApplication

How to prevent line breaks after an empty merge field

Problem

When you use the WordTemplate object to populate a WordWriter template document with data retrieved from a data source, you may have situations in which a merge field is not bound to a value. The most common scenario is creating a mailing address. Each field of a mailing address may be represented by a merge field. Typically, the second line of the address is optional. In the generated document, if the merge field corresponding to the second line of the address does not have a value, a blank line may be present.

In Microsoft Word, a blank line generated during a mail merge can be suppressed using application settings. With WordWriter, a blank line is not automatically removed.

WordWriter template document:

Generated document:

Solution

The following discussion uses a merge field called AddressLine2 as an example, but is applicable to any field with optional value.

In the WordWriter template document, if the line break is separate from the AddressLine2 merge field, the line break will be present in the generated document whether or not Continue reading How to prevent line breaks after an empty merge field

How to create a drill-down report in Excel with hyperlinks

Problem

Reporting Services provides drill-down report behavior, where clicking on a populated data field generates another report based on the value of the data field clicked. This post addresses how to acheive similar behavior within Excel with OfficeWriter using Reporting Sevices URL access and Excel’s HYPERLINK function.

Solution

Overview

When the OfficeWriter renderer populates the Excel report with data, it inserts new rows for each row of data. This means that all Excel formulas are updated, including the HYPERLINK function formula. This approach uses this formula update functionality and imported data values to dynamically create hyperlinks that point to the Reporting Services URLs.

For the sake of example, “SalesReport” is the original report that contains a list of invoice IDs. “InvoiceReport” is the linked report that takes an InvoiceID as a parameter.

Reporting Services URL Access

Typically, Reporting Service reports are rendered through an application, such as the Report Manager. Reporting Services also allows for rendering reports using just URLs. The basic syntax to render a report wtith a parameter is:

 http://[servername]/reportserver?/[File path to report on Report Server] &rs:Command=Render&rs:Format=[Rendering Format]&[ParamID]=[Param Value] 

The URL for rendering the “InvoiceReport” in the OfficeWriter for Excel format, with Invoice ID 12345, is as follows:

 http://myservername/reportserver?/ InvoiceReport&rs:Command=Render&rs:Format=XLTemplate&InvoiceID=12345 

Notes:

How to create a custom SQL Server Reporting Services error page

Problem

When SQL Server Reporting Services (SSRS) encounters an error, it returns an error message which is displayed by Report Manager. The error message can include technical details that reveal more information than necessary or are potentially confusing or intimidating to a user. One example is the scenario in which the user attempts to export a report from Report Manager using the “Excel designed by OfficeWriter” option, but the report is not created using the OfficeWriter Designer. In this case, SSRS would return the following error:

 Error SA008050: This report was not designed for the selected OfficeWriter rendering extension. 

Depending on configuration, Report Manager may also display a detailed error message and a stack trace. In this case, the error message is self-explanatory. However, often it is desirable to provide a friendly custom error page that hides the technical details of the internal exception and provides more helpful instructions to users.

Configuring a custom error page for Report Manager is no different from doing so for other ASP.NET applications. The custom error page is simply a web page that you create. You can configure ASP.NET to display a custom error page to all users. Alternatively, the custom error page can be displayed only to users accessing Report Manager from a remote machine, which is usually the case in production. For users accessing Report Manager from the same machine, the full error would be displayed. Typically, a detailed error message is helpful for debugging purpose during development.

Additionally, you can configure a custom error page to be displayed for specific HTTP status codes. For example, the OfficeWriter error above is an internal server error, which results in HTTP status code 500.

Solution

To configure a custom error page for Report Manager:

  1. Browse to Report Manager folder.
    • For SSRS 2005, its typical location is DRIVE:\Program Files\Microsoft SQL Server\MSSQL.x\Reporting Services\ReportManager, where x is the instance
    • For SSRS 2008 and SSRS 2008 R2, DRIVE:\Program Files\Microsoft SQL Server\MSRS10.SSRS\Reporting Services\ReportManager .
  2. Make a copy of the existing Web.config as backup
  3. Open Web.config in a text editor, or in Visual Studio to get Intellisense support
  4. Under the section, locate the `1 section
  5. Modify the existing section, or insert a new one, with the appropriate settings
  6. Restart the Report Server

The possible values for the mode attribute of the tag are Off, On, and RemoteOnly. The default is Off. In order to enable a custom error page, mode must be set to On or RemoteOnly. For example, the below section specifies the following: 1) a custom error page be displayed for remote users only, 2) a specific page for HTTP status code 500, and 3) a default page for all other HTTP status codes. Note that attributes are case-sensitive.

ExcelTemplate: How to format alternating row colors

Problem

A common way to display data in Excel is to alternate the background color of every other row when displaying a large table of data. With ExcelWriter there are multiple ways to accomplish this. This post covers some possible ways to apply alternating row colors with ExcelTemplate.

There is another post that discusses how to do this with ExcelApplication.

Solution

Option 1: Format as Table in Excel 2007/2010

Starting in Excel 2007, Excel provides pre-formatted table styles which already contain alternating row or column colors. This is the easiest way to format your data with alternating row colors. Note: these table styles may not render properly in Excel 2003 or in the XLS file format.

To format an area of cells as a table:

1. Highlight the area of cells.

2. Go to Format as Table in the ribbon.

3. Select a table style from the available styles.

4. If you chose to include your table header row, make sure to check off “My table has headers” in the confirmation dialog.

There are basic options for modifying the banding patterns:

You can also create new table styles:

You can do this for ExcelTemplate templates:

When the rows of data are inserted, the color banding will be applied:

Option 2: Use Conditional Formatting

The other approach is to use conditional formatting in the template to achieve alternating row colors. This may be more appropriate if you are not certain if your end-users will have Excel 2007/2010.

1. Create an ExcelWriter template with data markers in Excel.

2. Highlight the cells with data markers that correspond to the data you wish to display with alternating background colors.

3. From the menu, choose Format>Conditional Formatting. The formatting you define for this row will be applied to every new row that will be inserted by ExcelTemplate at runtime.

4. First define the formatting for even rows. In the “Condition1” field, choose “Formula Is” and in the formula field, type the following formula:

 =MOD(ROW(),2) = 0 

This formula uses the MOD( ) function to determine if the number of the current row (returned by the ROW( ) function) can be evenly divided by 2.

5. Click on the “format” button.

6. Click on the “patterns” tab and select a background color.

7. Now set a condition for odd rows, by clicking “ADD” and following the same steps as above but with a different formula:

 =MOD(ROW(),2) = 1 

8. Save the template and use it in your ExcelWriter application.

When ExcelTemplate imports new rows of data, the conditional formatting will also be applied to all the new rows:

How to open a report from SQL Server Reporting Services with the Application object

Problem

You want to modify your reports with the WordApplication or ExcelApplication object after they’ve been populated with data by SQL Server Reporting Services. The ExcelApplication or WordApplication object’s Open method can’t pull a report from a report server, so how do you open a SSRS report with OfficeWriter?

Solution

For simplicity and ease of reading the code examples and text in this article refer to the ExcelApplication object exclusively. However, the exact same techniques can be used with the WordApplication object. The only strict requirement for opening reports from SSRS is for the Open method to have an overload that takes a Stream argument, which both objects have.

SQL Server Reporting Services exposes a web service that lets programs access and work with the reports on the server. The web service has a number of functions for interacting with a report server and in fact is the same API that the Report Manager tool is built on top of. One of its functions will let us retrieve a fully rendered report that we can then pass to the ExcelApplication object. Once the ExcelApplication object has opened the report, it can be used as if it were any other file.

Getting a Reference to the Report Server

There are a number of different ways to access a report server to manage your reports. The MSDN documentation has detailed instructions for all the different techniques. The most powerful way, and the one that the Report Manager application uses, is to use the report server’s web service, or SOAP API. The easiest way to use the web service is to add the report server as a web reference in Visual Studio. This will allow us to make web service calls to the report server as though it were any other object in a .NET project. I’ll provide a brief overview of the steps to add a report server as a web reference; details can be found at MSDN. Continue reading How to open a report from SQL Server Reporting Services with the Application object