Tag Archives: excelwriter

Outlining Excel Reports with ExcelWriter

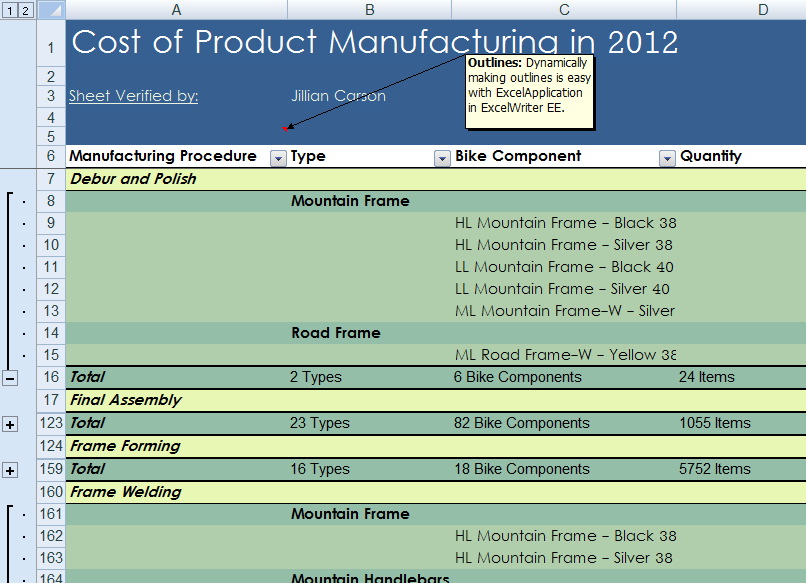
Outlines in Excel are a useful way to organize and present lots of data in workbooks.  ExcelWriter offers several different ways to integrate outlines into Excel reports:

ExcelWriter’s Application object (available in Enterprise Edition), provides full control to modify Excel files programmatically. This includes adding or removing Excel outlines and more:

  1. Group an area of rows or columns
  2. Read or set the level of outlining for any given row or column in a worksheet
  3. Read or set whether the group that a given row or column belongs to is expanded or collapsed
  4. Ungroup all the rows or columns in an area of a worksheet
  5. Detect where the summary rows or columns are located for all the groups in a worksheet
Sample output from ExcelApplication

Continue reading Outlining Excel Reports with ExcelWriter

Creating a Sales Pipeline Report with ExcelWriter

One of the great features of ExcelWriter is Grouping and Nesting feature of ExcelTemplate. Grouping and Nesting allows you to easily format your data in order to make it more readable. This feature is especially handy when applied to a common report, such as a sales pipeline report. Internally at SoftArtisans, we use ExcelWriter with Grouping and Nesting when generating our own sales pipeline report! By taking advantage of this feature, you can get fancier looking reports with little additional effort – ExcelWriter does the formatting work for you!

Before we begin, let me say that I will not attempt to tell you how to query your data as I’m sure everyone will be using different CRM systems. However, no matter how you’re querying your data (be it SQL, or a web service like SOAP or REST) the process is generally the same.

To start, you need to decide how you want to group your data. In most cases you’ll want to group first by month or quarter; then you could group by salesperson. These can be whatever you want, but you must have a column in your result set that will represent each.

For example, we group our own sales report data by: Continue reading Creating a Sales Pipeline Report with ExcelWriter

Automating Reports with SSRS Subscriptions

SQL Server Reporting Services subscriptions are an easy way to automatically run and deliver SSRS reports. You can schedule reports to run at a regular interval and deliver to file share, e-mail, or a SharePoint document library (if you’re using SharePoint integration mode).

How it’s done:

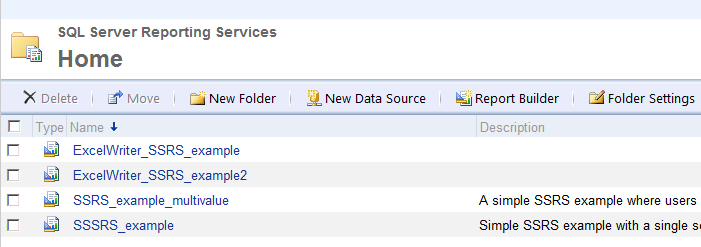
Here is my SSRS 2008 R2 instance, with a couple of prepared reports:

I’m going to create a subscription for SSRS_example_multivalue, which has a parameter with multiple values to select from. Continue reading Automating Reports with SSRS Subscriptions

Post-Processing SSRS Reports using OfficeWriter in .NET

Using OfficeWriter‘s integration with SSRS in conjunction with the Designer is typically a straightforward process with no programmatic manipulation of the reports. A developer designs the report in Visual Studio BIDS, opens the .rdl using the Designer, designs the template in Word/Excel, and publishes the report. The report is then rendered inside the Report Manager using the custom OfficeWriter export option. However, there are times that situations call for post-processing the report programmatically and that’s where the ExcelApplication and WordApplication objects come in. Accessing and rendering the reports through the SSRS API is straightforward and the resulting byte array can be turned into a MemoryStream and passed to OfficeWriter.

Adding the SSRS Web Service

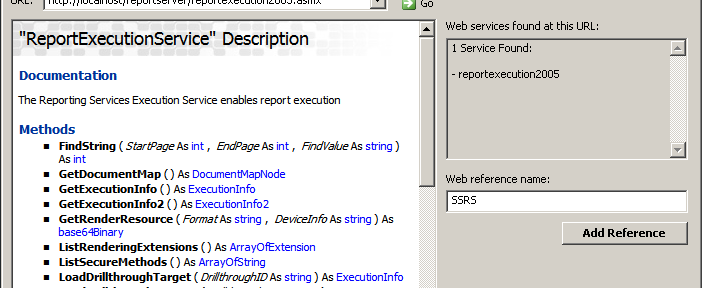
The first step necessary to tapping into the SSRS API is to add the Report Execution Service to your web references inside of Visual Studio. The URL for the web service is likely along the lines of *http://localhost/reportserver/reportexecution2005.asmx*, where localhost/reportserver is the hostname and virtual directory of the SSRS server. Note that this is for SQL Server 2008, despite the 2005. This web service is located in the directory C:\Program Files\Microsoft SQL Server\MSRS10.MSSQLSERVER\Reporting Services\ReportServer in the example instance I am using. Continue reading Post-Processing SSRS Reports using OfficeWriter in .NET

Create an Excel Spreadsheet in Powershell

This post shows you how to create an excel spreadsheet in Powershell with OfficeWriter.

PowerShell


##################################################################

##

## Create an Excel Spreadsheet with ExcelApplication in Powershell ##

## by Jim Stallings (http://www.officewriter.com)

##

##################################################################

# Add the assembly Add-Type -Path ‘C:\Program Files (x86)\SoftArtisans\OfficeWriter\bin\dotnet\SoftArtisans.OfficeWriter.ExcelWriter.dll

# Create a new ExcelApplication object

$xla = New-Object “SoftArtisans.OfficeWriter.ExcelWriter.ExcelApplication

# Create a new workbook

$wb = $xla.Create()

# Add a worksheet to the workbook

$ws = $wb.Worksheets[0]

# Add some text to the first cell in the sheet

$ws.Cells[‘A1’].Value = “Welcome to SoftArtisans OfficeWriter!

# Save the workbook to disk

$xla.Save($wb, “C:\myfile.xls“)

How to insert a hard carriage return into a string of data

Problem

In Excel, to have text displayed on multiple lines, two conditions must be met:

  1. The cell must be formatted with Wrap Text
  2. The text must contain the new line character (hard carriage return)

When you press ALT+ENTER in Excel, Excel automatically formats the cell to have Wrap Text and inserts a new line character into the cell.

This post covers how to insert a hard carriage return into data that is imported into an Excel file with ExcelWriter.

Solution

Text Wrap

If you are importing data using ExcelTemplate, make sure to format the cell alignment with “Text Wrap” in the cell that contains the data marker. This also applies if you are importing data using ExcelApplication with a partial template.

To set “Wrap Text” in Excel:

  1. Right-click on the cell
  2. Go to the Alignment tab
  3. Under Text Control, check off “Wrap Text”

If you aren’t working with a template, you can also set this property on a cell using ExcelApplication:

 //The WrapText property must be set to true in the cell containing the new line character worksheet.Cells["A1"].Style.WrapText = true; 

New Line Character

To import the new line character with your data, just add the new line character to your string of data.

Here is an example of using ExcelApplication to write a string into a cell. The string contains the new line character:

 worksheet.Cells["A1"].Value = "Fred Smith," + '\n' + "President"; 

Here is an example of some data that might be bound to a ExcelTemplate file:

 object[] dataArray = new object {"Fred Smith \n President", "2003", "Boston, MA"};

How to retrieve a formatted date from an Excel workbook

Problem

When I retrieve the value of a cell which has a Date format in Excel, I do not get the formatted Date; I get a number. How do I retrieve the formatted Date instead?

Solution

Excel Dates are stored in a “serial date format” behind-the-scenes. So, for example, 2/4/2004 is stored as 38021 in Excel. This number represents the number of days elapsed since January 1, 1900.

When you display a Date in Excel, a built-in conversion is performed which converts this serial format into a string for display in the cell depending on the format you apply to that cell.

More information on Excel Serial Dates can be found at http://www.cpearson.com/excel/datetime.htm.

If you want to use a Date from a cell in your code, all you will be able to retrieve is the serial value of this Date. To use it as a formatted string you will have to convert it.

A set of conversion methods can be found at Code Project.

You will need to use one of them in your application in order to convert the serial value of the date to a formatted string. Once you have a formatted string, you can also create a Date object in .NET (using Convert.ToDateTime() for example) and use the built in .NET Date functions if desired.

A simple example in VB.NET

This example retrieves a serial date from an Excel cell and uses a VB.NET version of the ExcelSerialDateToDMY() method from The Code Project to convert it to its day, month, and year components. To run this example, you would call ReadDate() from the PageLoad event or a ButtonClick event, for example. ReadDate() reads the Date (in serial date format) from cell “E1” of sample2.xls. It then calls ExcelSerialDateToDMY() to retrieve the converted day, month, and year values of the date. It then creates a new .NET Date object using those values. Finally, it writes the .NET Date’s short string value to the Response, so you can see that the correct values were retrieved.

Private Sub ReadDate()
'Create Application object and load Excel file from disk
Dim xlw As New SAExcelApplicationDotNet xlw.Open(Server.MapPath("./sample2.xls"), False)
Dim sheet As SAWorksheet sheet = xlw.Worksheets(1)


'Read cell E1, it's a date
Dim sd As Integer = sheet.Cells("E1").Value

' The following 3 variables are used as "output" parameters to the ExcelSerialDateToDMY()
' method, since the method uses the parameters By Reference, not By Value.
Dim d As Integer ' Will contain the day as an Integer
Dim m As Integer ' Will contain the month as an Integer
Dim y As Integer ' Will contain the year as an Integer


' Retrieve the day, month, and year values of the serial date.
ExcelSerialDateToDMY(sd, d, m, y)


' Create a new .NET Date object with the retrieved values, and display it on the page.
Dim dt As Date = New Date(y, m, d)
Response.Write(dt.ToShortDateString)
End Sub


Private Sub ExcelSerialDateToDMY(ByRef nSerialDate As Integer, ByRef nDay As Integer, _
ByRef nMonth As Integer, ByRef nYear As Integer)
' This function is courtesy of The Code Project.
' http://www.codeproject.com/datetime/exceldmy.asp?df=100&forumid=4548&exp=0&select=590906


' nSerialDate is the serial date from Excel
' nDay, nMonth, and nYear are the "output parameters" where the method will store
' the Day, Month, and Year values as Integers that it extracts from nDate


' Excel/Lotus 123 have a bug with 29-02-1900. 1900 is not a
' leap year, but Excel/Lotus 123 think it is...
If nSerialDate = 60 Then
nDay = 29
nMonth = 2
nYear = 1900
Return
ElseIf nSerialDate < 60 Then
' Because of the 29-02-1900 bug, any serial date
' under 60 is one off... Compensate.
nSerialDate = nSerialDate + 1
End If


' Modified Julian to DMY calculation with an addition of 2415019
Dim l As Integer = nSerialDate + 68569 + 2415019
Dim n As Integer = CInt(Fix((4 * l) / 146097))
l = l - CInt(Fix((146097 * n + 3) / 4))
Dim i As Integer = CInt(Fix((4000 * (l + 1)) / 1461001))
l = l - CInt(Fix((1461 * i) / 4)) + 31
Dim j As Integer = CInt(Fix((80 * l) / 2447))
nDay = l - CInt(Fix((2447 * j) / 80))
l = CInt(Fix(j / 11))
nMonth = j + 2 - (12 * l)
nYear = 100 * (n - 49) + i + l
End Sub
Grouping and Nesting vs. PivotTables in ExcelTemplate

Although PivotTables and ExcelWriter’s Grouping and Nesting can produce similar looking results when used with ExcelTemplate, these options provide different functionality. This post outlines the pros and cons of using both options.

Pivot Tables

Pivot tables are a native Excel feature that are designed to sort and filter aggregate data. You can use them to transpose and combine data to present grouped views.

Useful Features

  • Group data – This can be done horizontally in row groups or vertically in column groups.
  • Sort data – Pivot tables automatically sort and group data.
  • Produce grouped calculations – i.e. the sum over all of the sales for a region, or the larger expense for a particular quarter
  • Transpose data

Limitations (when working with ExcelWriter)

  • You cannot pre-select filters, create groupings by hand etc. – Any feature that requires data to be in the pivot table cannot be selected in the template because the data won’t be imported until after the report is generated
  • Pivot tables have limited style options. Pivot tables can have table styles, but creating custom headers/footers for groups is challenging
  • You cannot put anything to the right or below the pivot table. This is because when the pivot table is populated, it will expand to the right and down. It will overwrite anything that was in those cells. For this reason it is recommended that you do not have multiple pivot tables on a worksheet.
  • Pivot tables do not allow for text in the data values area of the table. Text is only allowed in the report filters, row labels, or column labels.

PivotTables in OfficeWriter Docs:

Grouping and Nesting

ExcelWriter Grouping and Nesting allows you to format grouped data in OOXML (XLSX, XLSM) files using ExcelTemplate.

Features

  • Custom formatting – You have the ability to create multi-row headers and footers that contain whatever formulas, formatting, and content you’d like.
  • ‘Push down’ behavior – ExcelTemplate automatically pushes down rows when inserting data. This means that anything below a grouping block will be retained in the final report.
  • Accepts any data type – There are no limitations on the type of data that be represented (unlike pivot tables which only allow non-numerical data in the row/column labels).

Limitations

  • Data must be sorted ahead of time, otherwise Grouping and Nesting will not work properly (see information below on how to create Grouped and Nested reports)
  • Unable to group over columns

Grouping and Nesting in OfficeWriter Docs:

How to change strings to formatted numerical values

Problem

In the creation of an Excel workbook, sometimes a column contains numerical values stored as strings. For example, a percent column can display percents as strings. This poses a problem if you want to use these values for equations, or if you want to clean up the display of the file, as Excel will mark these strings with a green corner indicating that they can be displayed as numerals, along with a warning message: “The number in this cell is stored as text or preceded by an apostrophe.”

Solution

ExcelApplication allows you to change the NumberFormat of a column so that it will automatically format numerals. This alone is not enough to change the strings into formatted numerals, though, as you must trim any characters off the strings and convert them to doubles to be handled correctly by Excel.

Hence, converting the values for an entire column requires three steps:

  1. Gather the values from the column into a collection and convert them to numeric values.
  2. Apply the desired Number Format to the styles of column.
  3. Cycle through the collection and add the values back to each cell of the column.

For a code example of the three steps outlined above, please see the sample in our documentation for how to Convert strings to formatted numerical values.

How to change a column of URLs imported with ExcelTemplate into hyperlinks

Problem

Sometimes your application requires creating a column of hyperlinks from URLs stored as strings. When ExcelTemplate populates a data marker with these strings, they remain static.

Solution

There are two ways to turn a column of strings into a column of hyperlinks:

  1. Fill a hidden column in the template with the URLs and use Excel’s HYPERLINK function to build the hyperlinks.
  2. Open the populated spreadsheet with the ExcelApplication object and use Cell.CreateHyperlink to turn the cell values into links.

Using the HYPERLINK Function

In this approach you can create a formula in a column in your worksheet that will reference another column that holds the URLs. To do this, place the datamarker for your URLs in an unused column on the same row in the same worksheet as the column that will contain the hyperlinks. For example, if you want the hyperlinks to begin in cell C5, place the data marker in row five of some other column, for instance AA5.

Now use Excel’s HYPERLINK() formula in C5 to reference the datamarker. Set C5’s formula to “=HYPERLINK(AA5)”, and as the datamarker in AA5 gets filled with URLs and stretches downward, the formula in C5 that references it will also stretch. If you don’t want the readers of the spreadsheet to be able to see the column of raw URLs, you can set it to hidden. In Excel, just right-click on a column header (the letter at the top) and choose ‘Hide’ from the drop-down menu. Now the column will not be visible, though it can be unhidden.

This method can be faster than using the ExcelApplication method (below), since it doesn’t require opening the file with ExcelApplication, but it has the disadvantage of leaving a column full of raw data in the worksheet.

Using ExcelApplication

After filling a column with URLs, you can open the workbook with the ExcelApplication object and convert the strings to hyperlinks. To iterate over a column of URLs and turn them all to hyperlinks, do something like this:


ExcelTemplate xlt = new ExcelTemplate();
xlt.Open("C:\\path_to_template\\template.xls");


// ... Data binding code ...


// Populate the spreadsheet and open it with ExcelApplication
xlt.Process();
ExcelApplication xla = new ExcelApplication();
Workbook wb = xla.Open(xlt);
Worksheet ws = wb["Sheet With URLS"];


// Define the area to convert to hyperlinks
Area URLArea = ws.CreateArea("C3:C90");
for (int i = 0; i < URLArea.RowCount; i++)
{
// Convert each cell to a hyperlink pointing to its URL
Cell c = URLArea[0, i];
c.CreateHyperlink(c.Value);
}

This will create hyperlinks in every cell in that Area using the value of the cell as the URL. Each cell will display the URL as the link text. If you want the cells to show some other text, change c.Value after the call to CreateHyperlink.

Keep in mind when using this technique that opening large files with the ExcelApplication object can be memory-intensive as it needs to create objects for each filled cell.