Introduction
The need to get business data from a SQL Server database (or any other kind of RDBMS for that matter) into Excel for further analysis is universal. I would venture to say that anyone in any business role from marketer to analyst to salesperson to executive to program manager has had the occasion to say: “I need this data in Excel so that I can crunch it!”
Since getting data into Excel is a common requirement, it stands to reason that there are several different ways to accomplish the task. For simple, non-stylized, or purely tabular data imports (situations where you don’t really care about styles or fonts or corporate branding) Excel’s out-of-the-box data import solution can be an option. For more sophisticated scenarios that require a specific look and feel, or something more complex than just straight tabular data dumps there is OfficeWriter.
This article will discuss both methods for getting your data from SQL Server into Excel.
Methods for Exporting Database Data to Excel
As I mentioned there is more than one way to skin the cat here. Which method you choose depends on what you need to accomplish.
Method 1: Excel-based data access
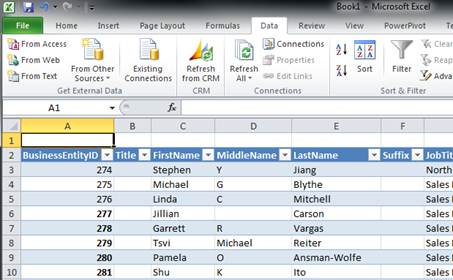
Out of the box, Excel provides what I consider to be a rather limited way to connect directly to SQL Server. Shown here in Excel 2010, the process starts by selecting From SQL Server from the Data tab on the ribbon.
From here you can connect to a SQL Server and select a table from which to pull in data. Once imported, it comes into the workbook in a nicely formatted table like this (this is the SalesPerson table from the AdventureWorks2008R2 sample database):
From there, you can build charts based on the data or add formulas to further analyze what’s in the database. If you need to refresh the data, you can click the Refresh button in the ribbon.
Method 2: OfficeWriter’s Template-Based Approach
OfficeWriter is an API that .NET developers can use to get data into Excel workbooks in a number of different ways. Using OfficeWriter can be as easy as writing five lines of code to dump data into an existing template, or more complex applications can be written with it that adjust and manipulate specific aspects of the Excel workbook such as individual styles, print settings, formulas, and charts.
With OfficeWriter it’s possible to open an existing workbook as a template, or to generate fresh workbooks from scratch when importing data. In this example I’ll show how to open an existing workbook as a template.
Basic example: Getting Data into a Template
The first step in a basic data import with OfficeWriter using the template approach is to open Excel and start building the workbook with the layout and look and feel that you want, but without the data. You can put anything you want into this workbook – images, styles, charts, pivots, extended properties, etc. In this simple example I just put in a report header and some column headers. I used Excel’s “Show Formulas” option so you can see where I entered formulas into the workbook.
In the dataset I want to import into this worksheet, there are three columns: Date, Name, and Amount. Where you want the data to go, put in specially formatted data markers like you see below:
These data markers (the strings that start with %%=) are what bind to individual columns in the dataset. Once they’re entered, save the file.
Now, in Visual Studio I have the following code:
When the GenerateWorkbook method is called, I pass it a DataTable that already contains the results of my database query. These five lines of code are the only OfficeWriter code in the application, so that’s what I’ve chosen to highlight. The code, in summary, opens the workbook, binds it to the DataTable, processes it, and then saves it. In this example I’m just writing the populated file to disk, but if you are writing an ASP.NET web application that generates files with OfficeWriter, you can stream/download the populated file directly to the client without saving it on the server’s disk.
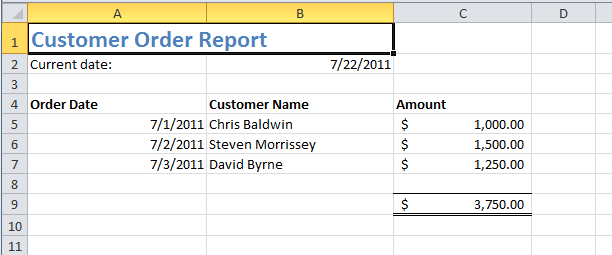
The result of this operation is a new workbook that looks like this:
Some things to mention:
- Formatting preserved – Everything that I defined in the template was preserved. All the original formatting, styles, colors, and layout are all the same.
- Data imported – Notice that the data markers are gone and in their place is the actual data from the DataTable.
- Formulas updated – Note that the sum formula at the bottom of the Amount column reflects the actual sum of the rows that were imported. OfficeWriter automatically updated the formula reference to include all of the imported rows from the DataTable. It doesn’t matter if three or ten or five hundred rows were imported – the formula will be updated.
Evaluate OfficeWriter
This is just a basic example. I could have added charts to the data or a pivot table, but I will save that for a later post.
You can download a free evaluation of OfficeWriter and easily build the application I showed here. Visit http://www.officewriter.com for more information.
Share the post "Exporting SQL Server Database Data to Excel"


 Follow